 |
| OwlMtModels SP 43745 shown after completion. |
This post will include both my usual photos and also a link to a video I made showing the process of assembling one of these cars.
Basic Assembly (Photos)
I'm not going to rehash the 2002 Kit Instructions, which are available on the OwlMtModels website.
 |
| Basic components from OMM 2002 kit for an F-50-5. |
In the photo above, I've done the prep work on all the parts and pre-tapped the bolsters.
 |
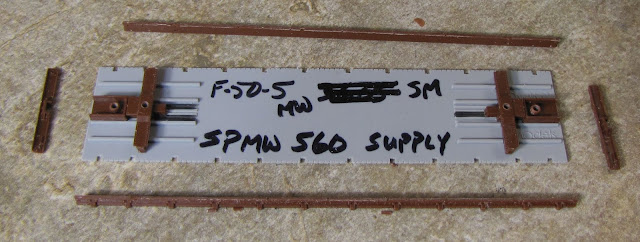
| The sides have been glued to the bolsters, and the weight cover has been marked with the car's reporting marks. |
Next, the sides are glued to the bolsters using the alignment tabs. I use Tamiya liquid plastic glue, which welds the ABS plastic parts together. I use enough glue that it flows between the parts and with a little force, a small amount of plastic squeezes out of the joint. This insures a good joint, after letting the parts fully dry, the model is almost as strong as if there was never a joint there.
 |
| Body assembled and ready to install the weight. |
While not supplied or required in the kit, I added a thin strip of styrene down each side of the weight to keep it centered in the body.
 |
| Applying Tamiya liquind glue with the brush included in each bottle. |
After placing the Weight Cover in place, I glue in one of the centersill beams.
 |
| Installing one of the centersill beams. |
The Centersills fit into notches in the deck of the car. Be sure to mark them if you need to so you don't glue the sills into the wrong ones. The mating tabs should extend to the car's centerline and touch.
 |
| Completed F-50-5/8/9 class body and underframe before installing brake parts. |
Video Instructions (Part 1) - Basic Assembly
I shot most of this Video Instruction for OwlMtModels' flatcar kit last year with a pre-production sample. I reshot the weight installation with the model of SPMW 560, which was a sister of the SPMW 2186 (shown in above photos).
In the video below, I'm going through the process of installing K-brakes on an OwlMtModels flatcar and also commenting on the later AB-system installation.
While I'm not really needing to add much else to the video content. I notice now that I've not really shot many photos of the underframe and details of the production flatcar models that I worked on.
As I've said in the Overview of OwlMtModels F-50-Series blog post, I assembled some of the pre-production models for OwlMtModels. The photo above shows two of these early "gray" models. The Flatcars weigh 2.75-3.25 Oz depending on the wheels used. Most of this weight is found in the alloy metal weight which fills basically all of the space between the inboard wheelsets of the two trucks and extends from the deck down nearly to the bottom of the side sills!
The brake parts on this car are very nice. The links in the hand brake rod and connecting to the brake cylinder are modeled as 'released' and sagging.
In Part 3, I show how to install the couplers and trucks. I'll be posting that blog as soon as the video is loaded to YouTube. I'm sure I'll have some comments about the couplers and new take on semi-scale draftgear (coupler boxes) on these cars.
Jason Hill
Video Instructions (Part 2) - Detailing and Brakes
In the video below, I'm going through the process of installing K-brakes on an OwlMtModels flatcar and also commenting on the later AB-system installation.
Underframe Detailing and Brake Systems (Photos)
While I'm not really needing to add much else to the video content. I notice now that I've not really shot many photos of the underframe and details of the production flatcar models that I worked on.
 |
| Here's early F-50-Series models showing both AB brakes (above) and K-brakes (below) |
As I've said in the Overview of OwlMtModels F-50-Series blog post, I assembled some of the pre-production models for OwlMtModels. The photo above shows two of these early "gray" models. The Flatcars weigh 2.75-3.25 Oz depending on the wheels used. Most of this weight is found in the alloy metal weight which fills basically all of the space between the inboard wheelsets of the two trucks and extends from the deck down nearly to the bottom of the side sills!
 |
| SPMW 560 shown finished with decals applied. |
The brake parts on this car are very nice. The links in the hand brake rod and connecting to the brake cylinder are modeled as 'released' and sagging.
In Closing
Hopefully you've enjoyed seeing how I build this kit. I'll be posting several more blogs on this kit, covered in at least three more parts.
 |
| Trucks and Couplers installed on an OMM F-50-Series flatcar. |
Jason Hill
Related Articles:
SP F-50-Series Flatcars by OwlMtModels (Part 3 & 4) Trucks & Couplers and Additional Comments & Stakepocket Techniques - Video Instructions & Comments.
SP F-50-Series Flatcars by OwlMtModels - Overview & Weathering - Various cars I've worked on Painting and Weathering Techniques.
Related Articles by other Authors:
New Flatcar kit from OwlMt - by Anthony Thompson
Building the OwlMt's flat car - by Anthony Thompson
RMC magazine review of OwlMtModels F-50-Series Flatcar - by RMC review staff

No comments:
Post a Comment
Please identify yourself at the end of your message. Please keep comments relevant to the post or questions to me directly.
All comments are moderated and must be approved, so give me a bit of time to approve them.
No random solicitation in comments. Spamming and phishing comments will be deleted or not allowed to post.