Showing posts with label Walthers. Show all posts

Thursday, October 5, 2023

Common Foreign Freight Cars (Part 1) - Mather Boxcars

I'm starting a new series... I know, I know, you say... what about all the series you've started and not finished?  Well, like model railroads, this blog will never be done!  I've hit on some of the foreign cars already, PRR X31/X32 series boxcarsWWII War Emergency Boxcar36ft Fowler Boxcars - NC&StLNP Double-sheath Boxcars, and Milwaukee "Rib-Side" boxcars.  I'll probably done one on some basics of things like X29 and B&O M-53 "Wagon Top" boxcars.  So while those previous blogs were on specific common types, I'm going a bit more a field with this series of "Common Foreign Freight Cars", into prototypes that I could see coming through the territory I model, or just about anyone models as interchanged traffic.  These cars would be ones that "could show up anywhere" and wouldn't be bad to help 'fill out your roster' with that were either common prototypes, or standard designs which are available in model kit/RTR form (aka, easy to model).

The updated ACY 1295 with chalk marks using the white and gray GellyRoll pens.

Back in the late 1990s, I picked up some wood-sheathed boxcars.  These came from the first series of Proto2000-LifeLike as R-T-R boxcar models, which was very new at the time.  Thankfully they didn't need much work to bring up to standards.  While they look similar to the modern Rapido B-50-15/16s, these are not SP prototype.

Roster 1950


Here's some roster info that I was able to find on-line.  The Mather cars were built with standardized parts and design.  It gives some idea the size of the Mather fleet and also some of the variations in car height, which is new information to me.

7'8" IH cars, P2K models correct
ACY 1250-1299 (50 cars)
C&EI 400-500? (100 cars)
CIM 8000-8454 (453 cars)
IN 2000-2099 (100 cars)
MRS 7500-7599 (24 cars) - 50% total roster of MRS in 1950.
PH&D 1506-1522 (11 cars), 7'10" IH version though, so 2" taller.

8'5" IH cars, taller than P2K models, Sunshine Resin made these (6.1-6.4)
ACY 1100-1199 & 2200-2149 (242 cars), but these are 8'5" IH cars (why P2K lettered my car in this series is weird.)
MWR 1201-1275 (25 cars)
TC 7751-7850 (96 cars)

9'11" IH cars (Sunshine kits 103.1-103.3)
ACY 1200-1220 (21 cars)
MWR 1276-1300 (25 cars)

10'3" IH cars (Sunshine 102.4-103.10)
ACY 3001-3149 (149 cars)
GM&O 7500-7524 (25 cars)
MRS 8000-8024 (25 cars) - other 25 cars in their fleet


It seems that with these differences in height, Proto2000's research in the 1990s were not holding to as high a standard as they were claiming at the time.  Resulting a couple of the models not really being as accurate as we have come to expect 25 years later.  So I will be doing a brief overview of four examples from the 1990s production.

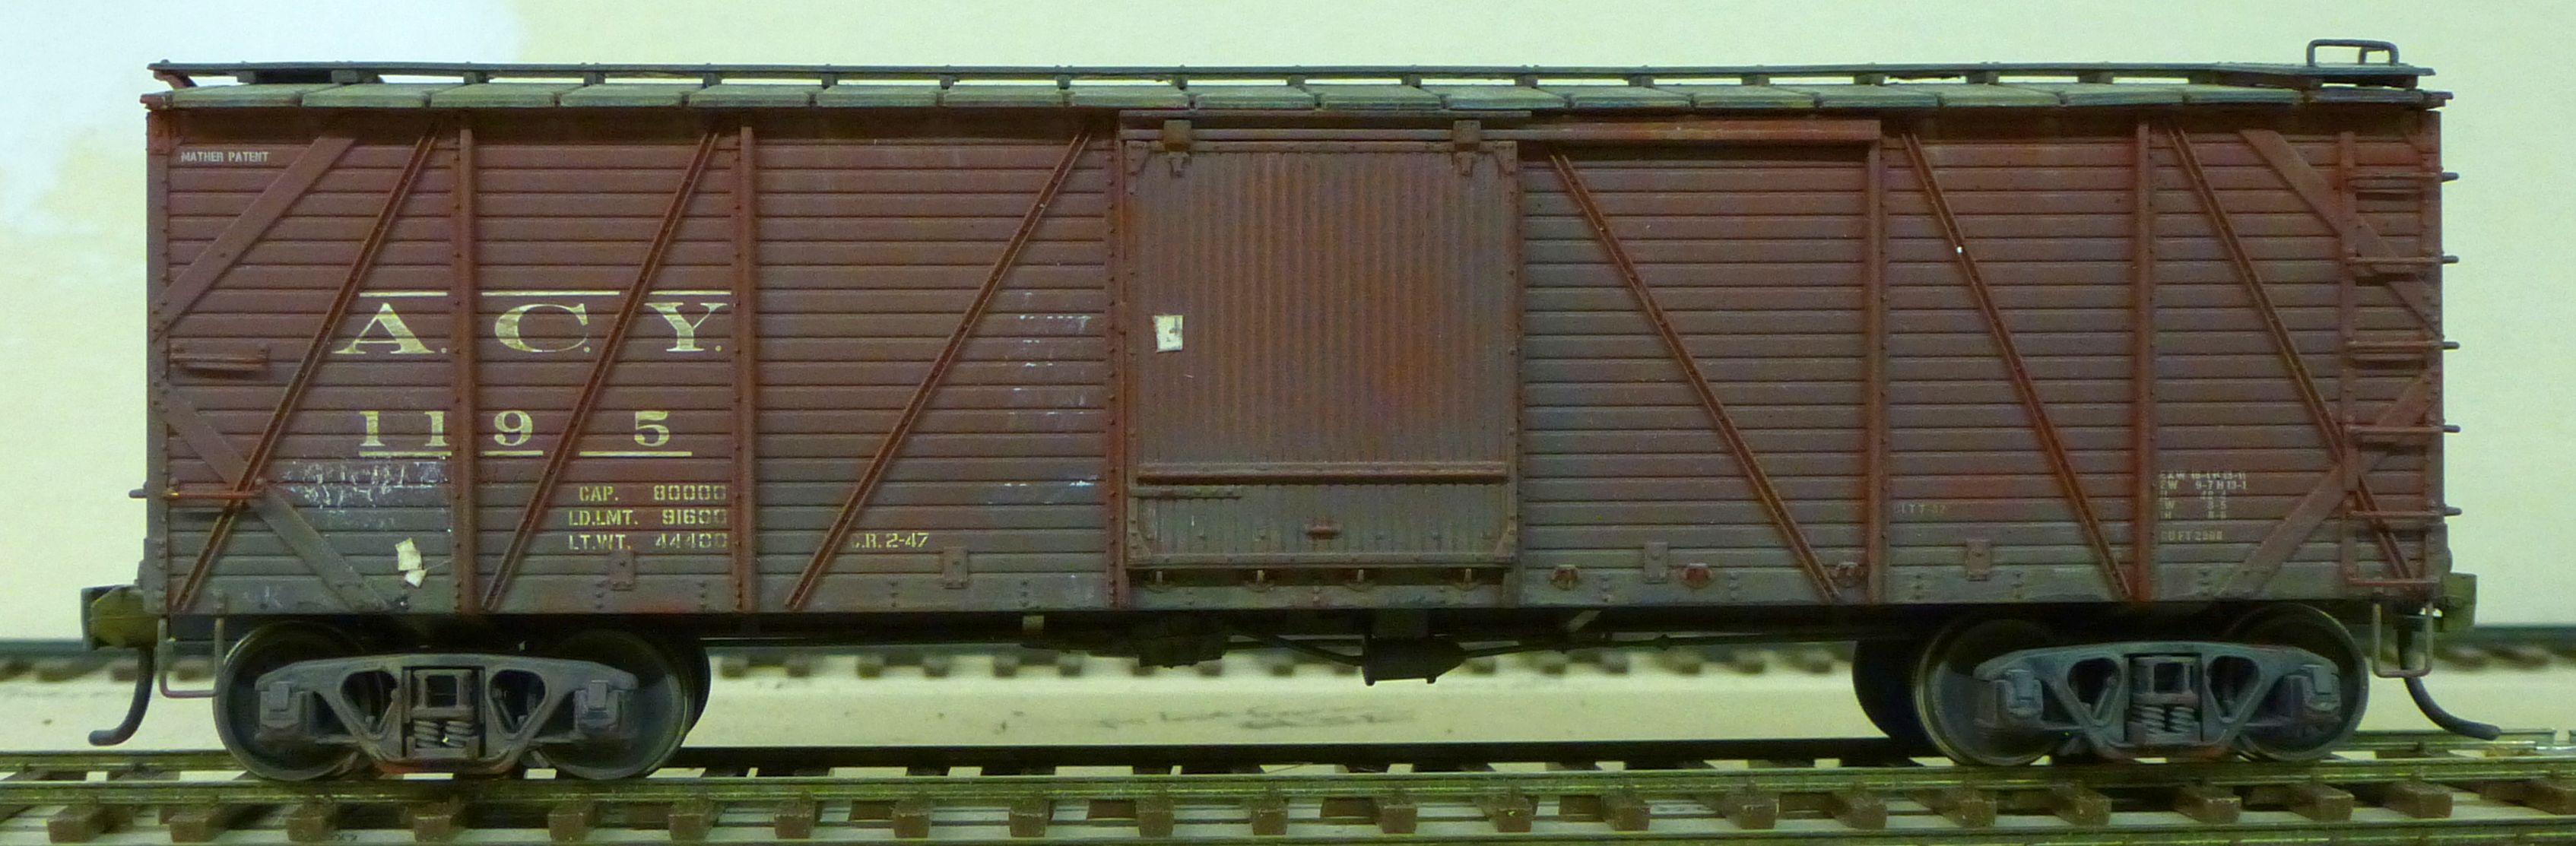
ACY 1195

I have to move this car's number to 1295 to be in the correct series for this height car, see roster above.  I don't know why Proto2000 would make this kind of error, but research in the pre-internet 1990s was much more challenging than these days.

ACY 1195, Mather standard boxcar

The ACY car doesn't have heavy weathering, but mostly just some running grime along the lower carside.  I put on some paper routing cards and a few chalk marks.  Tare date is CR 2-47.

The updated ACY 1295 with chalk marks using the white and gray GellyRoll pens.

In September, 2023, as I was finishing up the Accurail Fowler kitbash, I decided to go ahead and renumber this car to the correct number series for the car's height.  The NC&StL decal set from K4 Decals is very similar in font style and height to the ACY car, so I scratched off the "1" with my No.11 Xacto blade and applied the "2" from the decal set.  I think this photo was before I slightly toned down the new decal, but in the end it matched very nicely on the car.


FtDDM&S 14007


FtDDM&S 14007, Mather standard boxcar

The car has some light chalk marks and some board highlighting with grime.  A couple routing cards are also placed on the carside.  This car is tare dated for CR 3-55, but is preceded by "MSSCO" which I think is the Mather leasing company shops, as some of these cars were leased.  This scheme might not be prototypical in 1950, given the 1950 roster and the tare date on the model... I guess I can hope that it was a lease that started after 1950.

TC 7702


The prototype roster shows these cars should be 9" taller.  Meh, oh well.

TC 7702, Mather standard boxcar

I went into more chalk marks on this TC car, marking loading tallies to the left of the door.  I generally applied a moderate grimy weathering on the sides of this car.  Additional chalk marks around the reporting marks at the left end of the car.  The car's tare date is for MSSCO CR 9-47, so again, I'm guessing another leased car.

PH&D 1509


PH&D 1509, Mather standard boxcar

The PH&D 1509, I kept pretty clean.  They only had 11 cars!, so again I unfortunately found a model that didn't have many cars, so this is another "rare" car to see, you're not going to have a whole train of these.  It looks like some one over lubrication has been applied to the door mechanism.  Minimal chalk marks are applied.  Tare date is for MSSCO CR 4-46.  A couple of routing cards are also applied to the car side.

In Closing


I know single-sheathed foreign cars did still come to the Jawbone in the early 1950s, because of the photo of SP 3237 at Bartlett with a single-sheath Seaboard car.  While not a Mather car, these cars will fill some holes in my foreign boxcar pool to bring the look of single-sheath boxcars, albeit with rather rare small-fleet railroads.  I should also note that these cars are rated as 40-ton capacity cars.

C&NW 32833, a standard Mather single deck stock car by Proto2000.
 
The Mather cars are interesting in that they also produced a large number of cars with the same standard structure as stock cars, both double and single deck cars.  In 1996, LifeLike-Proto2000 produced the stock car kits and I picked up a couple of them.  I was also happy I picked up a couple of the boxcar versions when they came out.  I think there are a couple other railroads that I didn't get.

Walthers took over the Life-Like line and the Proto2000 tooling.  Between the two owners of the tooling they have gone on to produce several more railroad schemes of these cars, including: Illinois Northern, Chicago & Illinois Midland, Chicago & Eastern Illinois, & Manufactures Railway Supply.

Jason Hill

Related Articles:


Randy's Layout Blog - Mathers Boxcars - MRS (green), M&WR (yellow), & CIM (yellow) Proto2000 models. Randy goes into more depth on the mechanical standards and specifications of the prototypes.

Chalk Marks - A New Method - Adding the extremely common prototype 'weathering' to steam-diesel freight cars.


X31 & X32 Boxcar (Part 3) - PRR X31F Turtle-Roofs from Boswer - Double Door raised roof, 40ft


Weathering NP 11661 - A Rapido Double-sheath Boxcar - A standard design used by NP in large numbers.

36ft Fowler Boxcars - NC&StL 15337 (Part 2) Details & Decalling - Accurail's plastic kit (and bashing)

Milwaukee "Rib-Side" boxcars - Accurail and Rib-Side models, the 'clasic' steel car design, unique to Milwaukee Road.

Freight Car Index Page - Overview of all my freight car modeling and kitbashing articles.

Tuesday, September 26, 2023

Walthers 50ft Auto-Boxcars (Part 3) - GN 43952 Gets End Doors


GN 43952 renumbered into the 43000-series last post, is almost done with tare dates and chalk marks.  Just one little problem...

In the last article in this series, Walthers 50ft Auto-Boxcars (Part 2), I wrote about upgrading the historical standing of these cars by changing the road number into a correct series.  However, two of the cars I have are above the cutoff number of 43900, which means they should have end doors, or I'll have to lower the 'hundreds number to something below a '9'.  Given that 400 of the 500 cars are not end-door cars and I only have four cars, I should probably only do one car with the end door.

Edit: Thankfully Doug Polinder pointed out in a comment to me that: "the model is a Howe truss. GN's cars were Pratt." So at best these cars are really going to just be 'stand-ins' for the GN prototypes. Sadly this is one aspect that the ORER fails us, using it as the only research material.

Swapping Ends?


Sister car, GN 41951, with door end side-by-side.

I found a couple of ends the old boxes for these kits.  I also found the incomplete GN 41951 in one of these boxes, and needs some more work.  The extra end-doors were still in the boxes, so I was able to find one to use on the GN 43952.  Of course the new end doors weren't pad printed by Walthers, so I will of course have to decal the whole reporting mark on the A-end door piece.

I first removed the plain A-end of the car.

The first step with the conversion is to take the floor out of the car, then carefully pop the old plain end out of the body.  Thankfully, 20-year-ago-me didn't soak the end with glue, to 'hard weld' it in like I generally do now.  So it was very easy to pop off and only a little cleanup along the top edge, under the roof.

GN 43952 with test-fitted A-End Door.

The new end's test fit is pretty good.  The end-sill opening around the draft box is rather tight, and I will need to press the 'snap pins' into the end harder when the glue is applied.  Generally the end-doors make the cars look more complicated, which is cool. 

However looking at 43500-series we find double-door 50ft boxcars which should match closer to the Walthers model.

Historically, many cars with end doors became problematic to keep serviceable, so many were fixed in the closed position or welded closed.  It would seem from the ORER 1950 that these 96 cars still had working end doors.

Interior view of the new End Door dry-fitted.

I applied Tamiya Liquid Glue to the four alignment pins and then wicked more in with the brush from the bottom edge up both hinge lines and some into the center.  Then pressed the end into the body carefully.  When the alignment pins were softened just enough with the glue, there was a small 'pop' and the end slid a little farther into correct alignment.  Before the glue dries, I have to be sure the whole end is properly seated.  I also wicked in some glue along the top edge of the end-roof joint, but not much more movement happened in that area.

In Closing


This has been a fun kitbash to balance out the four of these cars I have.  Of course, I'm not addressing the lower 43000-series cars, which were only single-door cars.  These cars still fill a great spot when modeling lumber train traffic into Southern California, of the early 1950s.

GN 43952 with the new door-end in place with road number decals in place and a few more chalk marks.

I had some fun on the chalk-marks on the new car end.  Specifically marking the locking bar mechanism and a hinge that was damaged, but looks like the carmen has chalked the OK for both.  This photo also  showed me that the "2" on the end out of alignment.  So I re-wet the decal and was able to adjust it before I used the MicroScale setting fluid on it.

Jason Hill

Related Articles:


Modeling Auto-Boxcars (Part 1) - Walthers 50ft Double-Door Single-Sheath Auto-Boxcars - An Overview

Walthers 50ft Auto-Boxcars (Part 2) - Renumbering GN Cars to Correct Series - Renumbering the Walthers GN cars into the historically correct number series for 1950 era.

Weathering NP 11661 - A Rapido Double-sheath Boxcar - Some basics of weathering with Acrylics on double-sheath boxcar.

ATSF 129872 WWII War Emergency Boxcar Weathering with Pencils and Acrylics - Continuing the weathering on a single-sheath boxcar with Acrylics.

Sunday, September 24, 2023

Walthers 50ft Auto-Boxcars (Part 2) - Renumbering GN Cars to Correct Series

In the first installment of this series, I just did a general survey of the various Walthers 50ft Auto-Boxcars that I had.  Sadly many of them aren't correct, but in this post, I want to address one of the simpler fixes to get a couple of the cars into more 'historically accurate' number series.

One of the nearly completed Great Northern 50ft OB Auto-boxcars by Walthers, from the early 2000s.

These cars needed a bit of work, so lets look at what's involved with updating and correcting a couple of issues with the stock model.  I'm not going to get into the odd brake equipment arrangement in this post, as I don't think it's the first think I look at on a freight car like this.  Even if the model is going to be a stand-in, I would like the primary exterior visible parts of the model to be mostly correct, i.e. roof, ends, sides.

Edit: Doug Polinder pointed out in a comment to me that: "the model is a Howe truss. GN's cars were Pratt."  So at best these cars are really going to just be 'stand-ins' for the GN prototypes.  Sadly this is one aspect that the ORER fails us, using it as the only research material.

Historical Data


Pre-relettering look of the car in the GN 41700-series.

To find out if the car's even existed and had the right door arrangement, I turn to my Westerfield Models CD of ORER 1950 fleet data.  Under the Great Northern, I can see that they do not have the stock model road number listed.

Clipping from 1950 ORER - No 41000-series cars active on the GN this year.

Great Northern's entry in ORER 1950 does not show the 41900-series is empty by 1950.  However, don't give up hope on your model yet.  Search the rest of the company's roster.  There may be another series, or the original road number may have been changed during a rebuild, etc.

However looking at 43500-series we find double-door 50ft boxcars which should match closer to the Walthers model.

 The ORER does show 43500-43899 series show steel frame, 12ft staggered-doors. The 43900-43999 are similar, but also show full end door. The Walthers models come with end-doors as an option in the kit, so it would be possible to model either series if some minor decalling and renumbering was done.

Renumbering


So I'm doing some renumbering of the GN cars that I have into the 43k series, which should be easy to change the 1 to a 3.  The 43500-43899 and 43900-43999 show as XM (General service boxcars) in the AAR Mechanical classification column.

Removed the "1" with a No.11 blade scraping carefully.

I started the renumbering work with a No.11 X-acto blade carefully scraping the surface just down through the pad-printed ink of the "1".  If I go too far, a small drop of darkened FCR paint works to fix it, although the new "3" will be covering most any scratches that happen.

The new decal in place with a bit of water still around.

I'm keeping the renumbering simple with Micro Scale's Block Gothic Alphabet and Numbers, White #90051.  The 9" lettering is what I'll need to change the side road numbers.  If your decal collection has a more "GN" standard lettering style, then obviously it's better to use that.

Buckled End Joints


One of the problems of putting the optional ends on is getting solid joints in the corners.

Given that I built these models about 20 years ago and some of them saw years of service, getting knocked around, the ends were starting to come loose.  So I wicked in some Tamiya Liquid Plastic Glue, which is lower viscosity than water into the corners of the ends.  Then I carefully pushed the end in to get the mitered joint to close.  

After closing the end up with liquid plastic glue to secure it.

The end looks much better after closing the openings.  A little bit of plastic actually squeezed out from this process, but that's easily cleaned up.  I did a little wash with water and AppleBarrel 20512E Burnt Umber to dull down the new white decal to match my previously weathered numbers on the cars.

Adding Tare Station & Date


I also need to add some basic 'tare dates' to the cars.  This is a station code, month-year stenciled onto the side of the car, usually in the panel just inboard of the car's weight data block to show when the car was last weighed to 'zero' it.  This allows the clerks working the car scales to be accurate within 200 pounds of the car's loaded weight when billing cargo by weight.  The weighing also allows the railroads to detect over-loaded cars which are a safety hazard and could cause additional wear and tear on the engines, infrastructure, and bridges.


The Great Northern has a very odd system of station codes, using an alpha and sometimes a number as well.  Some of the great past researchers of railroad history have documented these codes and what they station they represented, so I'm able to 'build' plausible station tare date codes for my models.  One GN car that I've done already has A-1 on it.  I made it out of some spare 3" stencil white decal "A" and a "-1" from the January month of a decal tare data set.

Operations Notes


ATSF 140 BK-4-H Cliff Jan 8, 1953, (at LMRC in 2018, Jason Hill photo)

Most of these GN cars traveling to Southern California would be in the lumber trade with finished lumber in these big double door auto-boxcars.  The routing usually would be GN, then interchanged to the WP at Bieber, then to the Santa Fe at Mormon Yard (aka Fresno), before routing to Southern California on the Santa Fe on symbol 'GWS' over Tehachapi.  Eastward routed cars onto the Santa Fe, would be switched over to N-34 or BK-symbol at Bakersfield to Barstow, then they would be worked into the eastward symbols from there out of San Bernardino.

If it was heading to a Southern Pacific destination, the car may have be interchanged at Bakersfield to avoid additional congestion in the LA basin.  So this ends up being more of a Santa Fe-centric modeling post for today, but the skills are good to learn for any prototype modeler that needs to do renumbering of the freight cars.

Open Doors or Closed Doors?


GN 43741's Left side with doors closed, representing a loaded car.

One of the nice aspects of the Walthers model is the option to model the car with the doors open.  While normally, you don't want cars running around loaded where the stuff inside can fall out or be stolen, often the empty car doors wouldn't be properly secured.

While the Right side of GN 43741's doors are modeled open, for returning empty towards home.

This lead to a tendency for the doors to open themselves with the slack action in the trains.  On layouts with reversing loop staging, it is possible therefore to set up one side of the car as the "Loaded" side, and the other as the "Empty" side.  At La Mesa Model Railroad club, this trick is really only visible in two places (Caliente-Tunnel 2 and at Walong on the Loop).  

More Tricks!


For discussion during a video shoot with TSG Multimedia, I cut down a couple OwlMtModels 3004 lumber loads to make a lighter weight faux load for the Walthers boxcar.

In one of the TSG Multimedia videos I filmed a number of years ago on the new OwlMtModels 3004 lumber loads, I talked about putting them inside of boxcars in a cut-down form.

OwlMtModels 3004 Lumber Load inside Walthers DD boxcar.

So that's always an option too if you want to show an open door as the load and claim the closed door is empty!

SP 67789 with a stash of 3004 lumber loads hiding inside at King Lumber in Bakersfield, at LMRC. Jason Hill photo circa 2018.

Another option is the photo below, where I staged a photo at King Lumber to show the car being unloaded.

Pondering future options, it might even be possible to put magnets inside the lumber load to remotely move them back into the ends of the car to hide them. - Although, I've not actually tried this --- yet.

In Closing


The majority of my cars are now in good shape residing in the 43000-series!  However, one now has a new problem.  Next time I'll be having a closer look at the 43900-series cars which need end-doors.

Redecalled GN 43952 with tare date added.

This car is now renumbered to the correct 43000-series from the 41000-series, however now the 43900-series should have end-doors.  Not a problem as these cars came with the option for end-doors.  So I'll be digging out the old spare parts from 20 years ago to rebuild the A-end of the car, seen at left in the above photo.

Jason Hill

Related Articles:


Modeling Auto-Boxcars (Part 1) - Walthers 50ft Double-Door Single-Sheath Auto-Boxcars - An Overview

Weathering NP 11661 - A Rapido Double-sheath Boxcar - Some basics of weathering with Acrylics on double-sheath boxcar.

ATSF 129872 WWII War Emergency Boxcar Weathering with Pencils and Acrylics - Continuing the weathering on a single-sheath boxcar with Acrylics.

Sunday, September 17, 2023

Open Loads (Part 8 ) - Modeling High-Tension Steel Banding on Lumber Loads

I've been working on a large number of lumber loads this fall, including pilot models of the new OwlMtModels 3002/3003 "Short-Wide" kits, which are now available for pre-order.  

Finished OMM 3004 "Narrow" Lumber Load with ChartPak 1/64" 'Steel-Banding' replacing the wooden cross-ties.

I've been wanting to try the high-tension steel-bands, which started being used on lumber loads during the 1950s, and became widespread in the 1960s and beyond.  Modern modelers need to use high-tension bands on almost all of their modern loads, and even by the 1970s, wooden stakes were becoming very rare to see in prototype photos.

ChartPak to the Rescue!


My package of 1/64" ChartPak tape arrived yesterday... time to get tied up, or is that tied down?

The High-Tension Steel Bands - Hyatt Graphics sells 1/64th inch chart tape in 54 yard rolls for $10.30, which should last a number of lumber loads and other needs for steel banding around your model railroad.  Amazon and Walmart on-line also offer the same tape, but for more like $15.  I prefer to support the actual company that would be shipping the Walmart orders, so I went to Hyatt and talked with Nick.  Their phone number is (800) 234-9288 x630 if you want to talk to Nick as well.

Done Before?


Beautiful work on the steel-bands for this lumber load by Dave Maffei - Jason Hill photo at BAPM 2023 meet.

While I'm new to this technique, there have been plenty of modelers out there who have made wonderful use of this material.  The main difference in the application I want to explore here is the use of the ChartPak for replacing the wooden cross-ties on a load, not fully palletizing of each unit of lumber (aka bundle).

Tools?!


The "Special" tools I used for this project.

I did dip into my tool kit for some unique tools.  Including at least 3 self-closing tweezer/clamps.  I've used tools like this before when rigging ship models and fishing line "iron-wire" for freight car loads.  The clip/tweezer is a great and fast way to attach weight to a line and get it to hang straight while you tie knots or do other things to it.  The pen is a Silver ink, fine tip from Uni-ball that I picked up at Michael's Craft Store (along with my white "chalk marking" Gel-pen).  

Getting Started


As I've mentioned, my modeling era is just before these steel-bands became wide-spread in the lumber industry, but were used for other loads starting in WWII when it was developed.  I probably should have started with getting familiar with the tape on a unitized or palleted load, but hey, I didn't want to do that on this load, so I'll just show the process that it took to get it to work for me.  (The last build-photo I'll be talking about what finally worked well for going forward!)

After messing with a couple tries, I started getting some ideas...

The vinyl really likes having something to stick to and be burnished against.  Free-floating and anchoring very lightly around the stakes is not the ideal use for the tape.  I think you need to be a mutient 12-armed octopus to be able to do this without 'mechanical hand' help holding.  Two hands to hold the ends of the tape tight, another two to work No11 blades (wait, don't cut the tape!) or fine tweezers to get the tape to lay in the right place while glue dries, another two or three to work the ACC bottle and get a wire applicator to put the glue on the over-lapping section of tape/banding.  Then at least a couple more to grab another set of mini-clips to hold the two layers of tape together for the glue to dry!

That's one down... starting working number two on the right.

The basic idea is to get the loop of tape fairly tight, which usually means extra material is needed out both ends, over each side.  The tape won't want to lay on top of itself at the stakes.  In the photo above, I was able to get the lapped section of tape to bond with the ACC glue, but the 'under' layer of tape us pinched against the stake, if that slips or comes out, it will slacken the band-set... so not ideal.

Silver craft fine-tipped pen to make the steel clips that crimp onto the steel-bands.

The completed band... time to grab the silver gel-pen and mark where the tension clips are holding the steel bands together.  The ink flows fast and makes a slightly larger mark than I was hoping, but I may come up with ways to 'black ink' it smaller again, - but that will have to wait for the next post on using steel banding.

Annoying challenges continue, the tape won't want to lay on top of itself at the stakes, as we can see at the left-stake here. - At first, don't worry about that.  You can come in after the band is 'done' with the flush-cutters to clip off the excess from the 'inside' of the loop-band.

Victory! - ?


Finally, I got the hang of this, I think!  It gets rather busy in the foreground of this photo, so I'll try to explain.  

My final anchoring solution - wrapping around stakes/boards & Mini-clips!

There's two mini-clips, each is weighting down one end of the tape.  The tape has been wrapped around a post/brace to anchor it off, then the clip provides the weight to keep it there.  (The tackiness of the tape isn't reliable with this much force.)  I've already fitted the longitudinal bracing over the top of the tape bands, which gives me something more to anchor to.  The tape was fed under and around the bracing and stakes to form nearly two complete loops between the stakes.  The 'inner' one is at the lower far right, the front loose end is the one coming diagonally from the left stake, around the close stake and brace, then clipped off with the mini-clip.  In this jury-rigged mess, the two far-side loops of tape are laying on top of one another that I can apply some ACC with an extra piece of plastic stake material (anything will work, wire, etc).

Once the glue has set, I can clip off the extra material with the flush-cutter and put some silver inked band-clips on with the pen.

The new load is designed to fit Walthers 46ft USRA Gondolas, so let's sit back and enjoy the finished model.

Of the 6-sets of banding that I did for this load, I tried probably a dozen times to get the tape to start.  The tape stretches too, so it is very tricky to use.  

More of an end-view of the steel banding.

I will also say, the ideal way is probably to use some ACC and let it fully dry tacking the band  to the end-side of one stake to provide an anchor.  

Covert Chalk Markings


The Walthers 46ft USRA Gondolas are good for many different prototypes, which could be reloaded with lumber.

On a couple of my USRA 46ft gondolas, I've marked on the outside where the inside stake pockets are located, so I can quickly align the loads as I place them in the car.  There's nothing actually inside the car to keep it aligned fore-aft in this position.

In Closing


Other side of the PRR 316083 gondola with the load bunched together, towards the center of the car.

Perhaps form a single loop to enclose one stake, then close it off, that will provide the anchor, then wrap it around the other stake and back to the first after the glue dries.  This from above would form a loop, but with a 'crossover' between them.  Rather like a 4x8 layout with a track cutting across the center of the loop, forming two reverse loops. - I'll probably try that on the next steel-banded load I do.

Jason Hill

Related Articles:


Open Loads (Part 7) - Shifted Lumber Loads - What happens when your load moves?

Open Loads (Part 5) - Lumber Loads on Flats & Gondolas - Examples of Open Lumber Loads.

Open Loads (Part 2) - Lumber in Boxcars - Ideas for building lumber loads inside boxcars.

Lumber Load in Gondola SP 160522 - MDC Kitbash - Modifying OwlMtModels 3004 Lumber Load for gondola with false-load below gondola sides.

Saturday, November 26, 2016

Mt Nebo (Part1) 10-Section-Obs-Lounge

Don't overlook that "old" or "cheap" passenger car model!


That's the lesson I learned from building the Mt. Nebo.

Pullman's Mt. Nebo, right side, as completed before lighting
Pullman's Mt. Nebo, left side, as completed before lighting.

About two years ago a friend sent me a photo of a model he was looking at in a hobby shop.  I pretty quickly identified the model as a 10-Section Observation Lounge, which I'd been keeping an eye out for modeling the Owl and West Coast, as well as the SP 120, San Joaquin business car.  After confirming that the La Mesa Model Railroad Club would have use for such a car, he bought it and sent it to me to be upgraded to club mechanical and detailing standards.

New in-box of what the Mt.Nebo started life as

It turns out the model was a late production old metal Walthers passenger car kit.  These models had stamped metal sides, wood floor and underbody details, and the late production models had an injection molded roof.

Parts in-box, notice the stamped metal sides.

I didn't get any good photos of the car before I started working on it.  Recently another old metal 10-Section-Observation Walthers kit has come into my possession, so I am including the photos of it here to show what the construction of the Mt. Nebo looks like if I'd been the one to build it up from the kit.

Here's the parts spread out for what will become the 10-Section Observation "Mt.Breckenridge".

This new kit that I have, I plan to eventually build into a model of the "Mt. Breckenridge", which was a historically accurate 10-Section-Lounge-Obs used on the Owl when it derailed at Lerdo in 1947 (Link to my Modeling the Owl - Part1).

Repainting and Researching the Mt. Nebo


The built-up model was painted in Pennsy Tuscan with Pullman lettering.  The paint wasn't holding up too well and the decaling work wasn't anything to write home about.  So the car was obviously going to need to get a new coat of paint before being put back into service.

I did some poking around and already knew that the La Mesa Club could use a 10-Section Lounge Observation car.  The Superintendent of the San Joaquin Division had his car, the San Joaquin (SP 120), kept in the Pullman Shed at Bakersfield.  The SP 120 was converted from a 10-Section Lounge Observation, however further research showed that the SP 120 was heavily modified and would be a major project to convert this stamped metal sided model to represent.

A bit of research into the cars retained by the Pullman Pool after 1948, showed that the prototype series of 10-Section Observations (Plan 3521) were of some interest.  Many of the cars in this lot were never sold off, and stayed in the Pullman Pool until the early 1960s.  I like choosing long lived prototypes, so that if someone wanted to run a late 1950s train, it would still be plausible that the car could still be around in the earlier Green scheme.  Many extra Pool cars were kept in Government storage until they're release from the Pool and sold for scrap in the 1960s.  One car name in the Mount-series stuck out to me in particular, the "Mt.Nebo".

The Mt. Nebo was a Plan 3521A 10-Sections and Lounge Observation built in Lot 4998 of 30 cars in November and December 1926.  The Mt. Nebo specifically was retained by the Pullman Pool in 1948, and was sold for scrap in June 1961.  One advantage of staying with a Pullman Pool car is that in modeling the car in the 1948-1954 era the we can use the car for a Korean War troop train (MAIN Train) on either ATSF or SP, extra passenger service on either the SP or the ATSF, or we could use the car for a 1947 Owl consist.

I also had another reason to choose this car name, the La Mesa Club's original layout was built in La Mesa California a building called Nebo Hall, I decided it would be a good name for the rebuilt car.

Work on the body of the car was started by repainting it with a mix of SP Dark Olive Green and Engine Black paint by StarBrand.  This mix is a close match to Pullman's Green, which is not the same as SP's color.  The "Mt. Nebo" was decaled with pieces from the various other car names in the UP Tourist Pullman decal set (87-????) from Microscale.  I used the same set's "PULLMAN" for the letterboard.  While the set has car names and Tourist Car numbers for cars that were historically run or assigned to the UP, the set is really good for making 6-8 HW tourist sleepers for troop trains and other trains needing Tourist Cars.

Mt Nebo after repainting and with A/C ducts installed. - Notice the old Pullman 1910-trucks under the car.

Starting at the Top


Work on the roof of the "Mt. Nebo" started with taking it off.  The roof is held on by a very long screw (about 4-40 thread) through from the bottom center of the underframe.

Unmodified roof from the kit that will become the "Mt.Breckenridge"
The roof was of the clerestory type and did not include A/C ducting, which most cars of this type had after the mid-1930s.  New England Rail Service A/C ducks would be fitted and the roof painted a custom mix of my "off-black" which has a bit of gray to represent sun light faded roof paint.

Mt Nebo with the roof off showing window glazing being installed.
By this photo I had already reinstalled the glazing after the car was repainted.  At first I was a bit concerned that the stamped metal sides wouldn't hold up against scrutiny with higher level brass and injection molded HW passenger cars.  Most of those concerns were unfounded after the car was repainted in Pullman Green there's not much light that will actually bounce off the details of even the nicest models.  The challenge of gluing the glazing in with canopy cement will probably be better on the future kits like this that I build up from kit form.  I plan to include a interior superstructure of styrene inside the metal sides to which the glazing can be mounted.

Underframe and Mechanicals


For a time I thought about completely rebuilding the underframe of the car with my standard plastic version, however the original builder of the car did a VERY good job attaching the stamped metal parts to the wooden core.  Even after 30-40 years it was still holding strong.  The car sides near the front vestibule were slanted in slightly, but this wasn't worth trying to fix, and the stampings did flex somewhat.

Original trucks removed and new centersill and bolster for use with modern Walthers Trucks installed.

The original metal trucks that do not meet the LMRC's mechanical standards were removed and a new section of centersill was fabricated from strip styrene to mount the Walthers Pullman 242 trucks.  The old coupler boxes which were mounted too far out for use with the new diaphragms were also removed to be remounted.  The original floor was kept and for the moment the wooden underbody details are also retained.

Forward end of the Mt.Nebo's underframe rebuild mostly done.

Completed rear end of the Mt.Nebo's underframe rebuild, ready for installation of the trucks.

The bolster screw locations were worked backwards off the size of the trucks and the offset mounting holes that I drilled in them to clear the vestibule steps and underbody detailing.

The car weight is plenty with the wood and metal construction and the additional interior and Walthers 242 metal trucks that will be installed.

I did my usual rebuild on the Walthers trucks to get them to roll really well and also regauge the wheelsets slightly wider in gauge.

Here's the Walthers 242 Trucks completely disassembled and ready for upgrading.

The axle bearings in the sideframes are usually painted over by Walthers and are also a bit too narrow on gauge, especially when I regauge the wheelsets, which makes the tip-to-tip of the axles about 0.015" longer than stock.  Usually I need to ream about 0.010" out of each sideframe to get the wheelsets to roll properly in the trucks (and much better I will add).

Reamed bearings in sideframes ready to be reassembly
Even if the bearings don't need to be made wider, I usually would take a pass on them on metal trucks to make sure there isn't anything in the end of the bearing or paint on the pickup surfaces of the bearings.

I almost **Never** have to do this work on plastic trucks of freight equipment, because the engineering plastic truck sideframes with metal wheelsets is an ideal bearing already.  Only ream engineering plastic truck bearings if there is flashing inside the bearing from the injection molding process, and then keep it to a minimum.

Center marking and drilling new bolster hole for 2-56 screw.

With the trucks reassembled, I can now mark the new bolster screw location on the truck for a 2-56 machine screw.  The trucks are painted with the same mix of "off-black" that I use for the roof and underframe, this includes the wheel faces.  The painting is then followed up with a small Q-tip dipped in thinner to remove the paint from the treads and flanges of the wheels.

Note: Many manufacturers don't clean the cutting oils from their wheelsets any more.  This "dirty" oil doesn't help the pickup of the models or the layout on which they are run.  Make sure to clean the wheels of your new cars before running them!  This can be as simple as dropping the wheelsets out and washing them in dish soap for 10 minutes or running them through an ultrasonic cleaner before painting.

Interior


The interior sheet styrene floor marked for the various partitions and 

The majority of the work on the "Mt. Nebo" was spent on the interior and rebuilding the truck and coupler mountings on the wooden underframe.  The interior is made on a sheet of 0.015" styrene from Evergreen.  The lounge seats are Palace Car Co. and partitions, mirrors, and men and woman's salon/lounge were salvaged parts from an Athearn-Genesis 77-C-3 that unfortunately melted in a car for about 2 days in the heat.

The melted Athearn-Genesis 77-C-3 frame and interior next to the new scratch built Mt.Nebo interior

Looks like the Athearn bathrooms and men's and woman's lounges will transplant nicely!

I decided to salvage as much of the wrecked 77-C-3 interior as I could.  The men's lounge walls were pretty badly warped and as the 10-Section-Obs car's men's lounge was a bit smaller and different configuration, I decided to scratch build those walls.

Some of the salvaged parts from the Athearn car.
I started on the new interior with the forward vestibule wall and womans toilet. The sinks, walls, chairs, and curtain from the woman's lounge that I removed from the 77-C-3 frame were going to be reused on the new car.

Woman's lounge and toilet, the vestibule wall is to the left, and the 10-sections to the right.
I fabricated sheet styrene walls for the sections that the salvaged walls wouldn't work for.  Marks on the floor of the interior showed where the walls were to be glued.

3M Scotch Tape used for the etched glazing on the toilet windows.

I didn't bother with installing the toilets because the windows to those rooms would be covered with 3M "foggy" Scotch Tape and not be visible anyway.

Women's Lounge and forward isleway complete with fabricated walls.

I then moved to the men's lounge and toilet area of the interior.  One section of the wall I was able to salvage had a nice little radius section to it, so I reused it.  I also shortened the wall section as shown in the photo below.

Starting the men's bathroom section.  The main Observation Lounge is to the right in this photo.

Here's the completed men's restroom-lounge

The sofa from the Athearn car's men's restroom was also reused and a new rear wall was fabricated to adjoin the main lounge area.

In this view the partitions are all in place, but the seats have not been installed.

I had a set of 30 Lounge Seats from Palace Car Co. #5004-30 which I picked up several years ago.  I've been using them on various projects over the years.  The Mt. Nebo floor plans call for 12 Lounge Seats in the Observation section of the car.

Lounge seats from Palace Car Co. - Only 12 needed in this project.


In this view not much is left from the 77-C-3 salvaged car, what remains will go to a deluxe chair car someday.
I flipped through some of my reference materials of what HW Observation Lounges looked like and settled on Sea Foam (light green) for the interior walls of the bathrooms and isle ways, tan for the sleeping section of the car, and in the lounge a deep red with brown, gray, and seafoam green lounge seats.  I painted the walls of the Observation section a light tan color as well.

Here's the completed main lounge area, with writing desk and stationary.
Just before painting the interior I read the note that stated that the partitions in the lounge were not full height and cross checking some other photos showed that the walls stopped just above the backs of the lounge chairs.  Correspondingly I cut down the partitions and prepped the interior for paint.

Window Treatment


At the time I didn't have any extra section seats in the middle of the car, so lowered the window shades to hide that fact.  Also with open sections, the screw holding the roof on would be completely exposed with no good way to hide that.

Window Shades for the sleeping sections marked and ready to be cut out.

A ruler and pencil is used to lay out the size and heights for the window shades.  I usually then use a metal rule and No.11 Xacto blade to cut out the shapes.  I try to keep the pencil lines on the inside of the car to keep from being visible on the exterior of the car.

Windows in the sleeping sections installed with Tamiya Painting Tape

The window shades are made from manila file folder stock cut into approprate sized pieces and taped in place with Tamiya brand masking tape.  The lighting I install is pretty dim compared to many HO Scale lighting kits.  I find that the use of the thicker file folder material is enough to absorb most of the light when the car is lit, so that even the light colored shades will not be translucent.

Window shades in place - Left Side

Window Shades in place - Right Side

The final window treatment is fabricating the two sections of safety bars that keep people from being slammed into the windows along the isle ways of the car while traveling on rough track.

Safety bars installed on the isle way windows.
I bent some 0.015 phosphor-bronze wire for the safety handrails that were standard appliance on all isle way windows in passenger cars.  The railing was glued in place with Testors Canopy Cement.

Detailed view of the finished parts on the Mt. Nebo, including the Walthers Pullman 242 Trucks installed.

Diaphragms


The Mt. Nebo is almost done at this point, but the car needs to have a diaphragm installed on the front end of the car.  My standard now is made by Hi-Tech Details.  As I have a couple of HW observations to finish, I am not worried about "breaking up a set" of diaphragms and only using one.

Hi-Tech Details #9003, used for the Mt Nebo's front diaphragm.

I have covered the use of these kits in the past on several other car builds, I'll show a few photos I took of the installation on the Mt. Nebo here.

Here's the coupler and the front end of the Mt Nebo after the old paper Walthers Diaphragm was removed.

Hi-Tech Diaphragm about to be installed

After the Diaphram's installed, I then marked the crosslines for the center for the coupler box.

Mounting the coupler after the diaphragm installation is better because then I can mount it at exactly the right position compared to the diaphragm striker plate.

Here is the Diaphragm and couplere installed on the front end of the Mt. Nebo.


Conclusion of Part 1


That pretty much covered the major rebuilding of the Mt. Nebo and preparing it for service.  I will cover lighting of the car, marker lights, and possibly adding more details to the underframe in Mt. Nebo (Part 2).

Right Side of completed Mt.Nebo
Left Side of completed Mt.Nebo
Mt. Nebo sitting in the Pullman Shed at Bakersfield, California Dec 24th, 1952.

Jason Hill

Links to other related pages:
Mt. Nebo (Part 2) - Lighting
Kitbashing SP 6102 from MDC/Athearn Parts (also rehabbing a 18 year old model).
Modeling Index for HW Pullman Cars
Kitbashing Pullman 16-Section Tourist Sleeper 4242
Modeling Indec for HW SP Cars