
 |
| Kitbashed OwlMtModels Marker Light installed on Santa Fe's 6-6-4 "Chama Valley" by Walthers. |
I decided that I should get caught up a bit in my blog posts about the OwlMtModels 10002 Pyle National Gyralite Marker Light and Tailgate kitbashes. The stock kit is good for SP, UP, GN, Amtrak, etc who used it after about 1954 until the built-in markers of the Amfleet and Superliners of the 1980s. However, other railroads like Santa Fe, used their own marker lights, often home-built designs. So let's see how I kitbashed the OMM kit into a Santa Fe "light box" style marker.
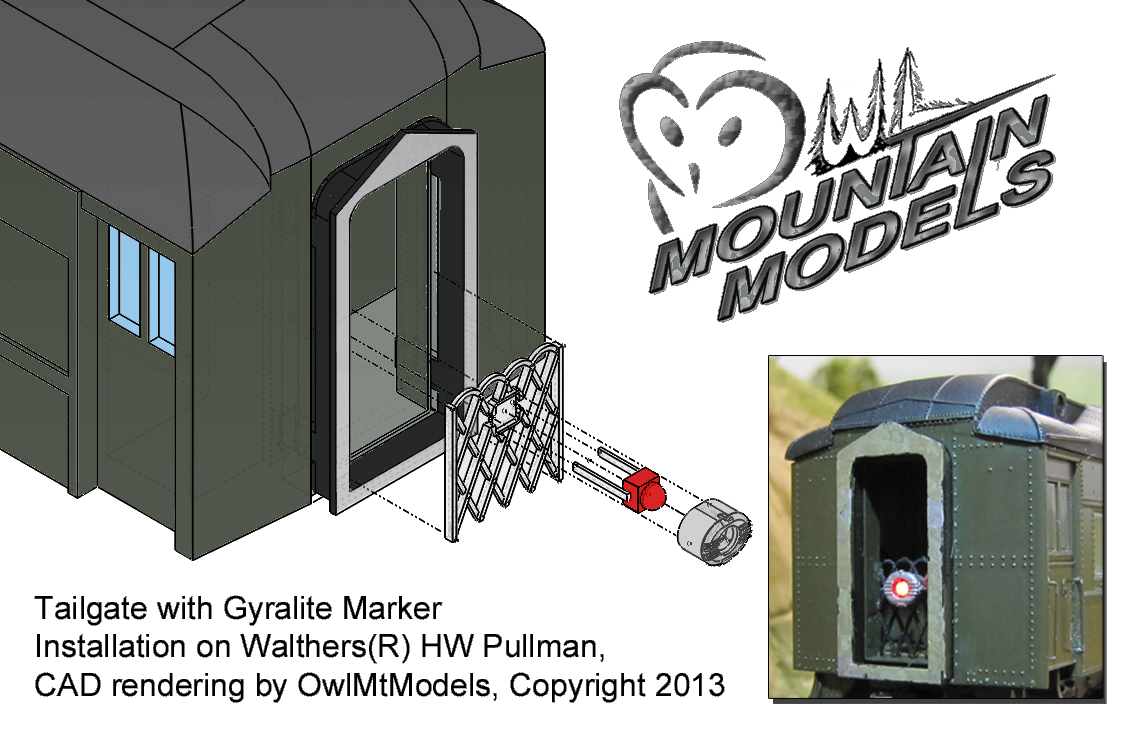 |
| Basic assembly illustration of installation on a Walthers HW passenger car, by Jason Hill - Copyright OwlMtModels 2013 |
The main change to the assembly of the marker is in not using the Pyle-Gyralite housing for the LED, but instead to fabricate a new face plate from styrene sheet. The sheet needs to be painted black, ideally from both front and rear to prevent light leaking through it.
The central hole is drilled for No.50 (same as 2-56 tap-drill size) to fit the LED's boss. At this point I glue the plate over the LED with CA/ACC type glue and let it dry.
I cut the outside edges of the styrene plate are then trimmed to match the outside square body of the LED. If I want a flatter profile to the LED, I file or sand down the boss on the LED to be only 0.005" or so proud of the styrene plate. The sanded surface of the LED can be smoothed back into a lens with a layer of Canopy Cement (by Testors).
I glue the LED onto the gate part with ACC/CA glue. There will still be light leaks around the outside of the LED, so I use some liquid electrical tape (black rubber goo) and fill in the outside edges to prevent light leaks. I suppose a modeling putty might work as well, but I like the liquid tape as I am sure it will not cause shorts between the two conductors of the LED.
 |
| Unlit view of the modified tailgate and marker light, the black on the diaphragm is 9+ years of in-service rubbing on the striker. |
The Santa Fe seemed to paint their marker housings silver or black, so either works in this case. Once the LED is glued onto the gate, mask the face of the LED and then I can paint the gate and marker the finish color.
In Closing
Normal wiring of the LED, etc goes normally, per standard installations. If a DCC decoder or DC directional lighting is desired, then testing of the LED to be sure the direction of current is needed. As my markers were going to just be running on straight DCC with no lighting decoder, the polarity didn't matter.
 |
| Low-light view of Santa Fe rear marker on "Chama Valley", looking a little worse for wear on the light leaks after 8-9 years at LMRC. |
Huh, I thought I did better aligning the grabs on the Chama Valley, but that was 9 years ago, and the car's seen regular service at LMRC. So I'm guessing that the grabs got tweaked a bit and a few light leaks developed. It also looks like the lower horizontal grabs are missing too... so the Chama Valley needs some shopping work to repair the little dings it's received in service.
Jason Hill
Related Articles:
Installing OwlMtModels 10002 Pyle-National Gyralite on Athearn-Genesis SP 77-C-3 Chair Car - including links to video on YouTube.
SP 2701 (Part 3), Lighting a 60-CC-1 by Model Power - More installation blogging on markers.
No comments:
Post a Comment
Please identify yourself at the end of your message. Please keep comments relevant to the post or questions to me directly.
All comments are moderated and must be approved, so give me a bit of time to approve them.
No random solicitation in comments. Spamming and phishing comments will be deleted or not allowed to post.