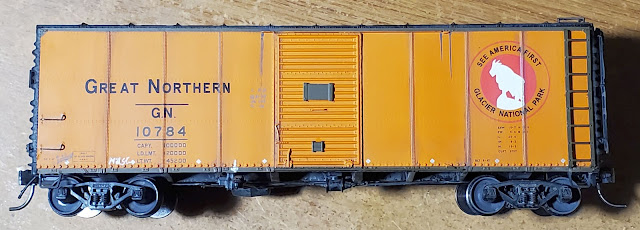
Time to dive into weathering my new Bridgetown 2023 acquisition, a GN "Plywood" boxcar. Normally, I've thought these cars were gaudy and strange.
.jpg) |
| Orange... in a freight?! |
To be fair, I'm not much of a GN researcher, but I do want to model GN cars as foreign cars showing up on my Southern Pacific layout. Over the last two years or so is that these cars did run across the area that I model, namely Tehachapi and even the Jawbone Branch.
Great Northern Paint Schemes?
While I'm more used to the classic brown GN boxcar fleet, adding this bright orange car will certainly be an outstanding model, drawing attention.
Timeline of GN paint schemes:
1941: Side Facing Goat Herald introduced. First FT's delivered (first orange and green livery).
1948: New/repainted freight cars use "Great Northern" instead of "Glacier Park" in logo.
So oddly, the IMWX/IMRC kit has the post-1948 herald with the Great Northern, not the Glacier National Park phrasing in the herald. Orange/Green paint scheme on the plywood car started back in 1941 with side facing goat. - Good to know, I'll have to change the tare date anyway on the brown car kit, which will work to be a 1948 repaint, probably just remove the "NEW" and leave the "F" date.
.jpg) |
| IMRC 46055-03*, a RTR GN "Plywood" panel boxcar in orange and black. |
These cars were built in 1947 at the St. Cloud Shops with the upgraded post-war steel ends, and retained pre-war design of panel roofs. It looks like there were two groups of cars, one of 500 cars built in 1945, then 400 cars in 1947. The GN 10784 would be in the second group of 400 cars. It would also appear that within the first three years, about 7 cars were destroyed and struck from the roster.
| GN 10000-series 'plywood' composite boxcars ORER data 1950. |
These were some of the first cars built with plywood sides. Some PFE reefers were also rebuilt/built with plywood sides, but ended up being changed back to other materials within 5-8 years as the early plywoods failed faster than standard board or steel-side construction. I don't really know what the disposition of the plywood-sided boxcars on the GN, but clearly they existed into the early 1950s and roamed freely.
Minor Repairs
Somewhere along the route from IMRC's Chinese factory to my hands the car seems to have been dropped and had the steel weight knocked loose from the inside of the floor. Thankfully, there was not very much glue holding the roof to the upper body edges, and I was able to remove the roof to reattach the weight.
 |
| Interior with re-glued weight. |
I used some standard automotive RTV-Silicone. Don't forget to be sure the weight is centered on the floor and with a bit of RTV around the edges to hold it firm. Then the RTV was allowed to gas-off for a couple days before reattaching the roof with MEK (Tamiya glue).
Weathering Goals
Generally, I want to keep the weathering on this car moderated. The 1947 build date can mean that it showed up on my railroad within the first year or two. Given that I model into 1954 with RSD-5s, then I could have them with nearly 7 years of weathering. I'll aim to go with some grime weathering on the lower car, and also some washes on the panel-edges.
 |
| Some basic roof weathering with Pavement and Territorial Beige highlights along the running board. |
Dusty/sooty roof gets a bit of typical weathering. Rain washed-effects of the Pacific North West should play a part in the weathering too, which will extend onto the car side.
Weathering with Acrylics
 |
| Right side with weathering starting. Ladder mud/boot kick marks onto the side. |
The trucks and underframe are Pavement wash and highlighted with Territorial Beige.
 |
| Left side with panel lines. |
Most of the side weathering at this point is just highlighting the panel edges with grimy wash and a bit of Pavement from Apple Barrel.
Weathering with Chalk Marks
 |
| Right side chalk marks. |
A couple light chalk marks for release lever and hand written "Seattle". Dark chalk mark of "21" at the left end of the car. I decided to make the sharp dirt/soot drips from the ends of the door track with my new dark gray Gelly-Roll pen against a straight edge ruler.
 |
| Left side chalk marks. |
On this side I went with a "Mill St" chalk mark and a very faint tally mark set to the left of the door. I also did the same dark gray Gel-pen marks from the door tracks. Generally these streaks can be done with a fine brush, but I wanted to try making sure that they were straight by using the straight-edge and pen method. It seemed to work. I can also use a bit of 70% iso-alcohol to feather the end of the streak down a bit more.
Routing Cards
On many of my cars starting in October 2023 and moving forward will have a couple of the OwlMtModels 1220 Routing & Grading Cards applied.
 |
| Right side with routing card |
On the right side I put a simple routing card under the 7 of the car number. The car's plywood sides could be hammer-stapled to, thus allowing the cards to be placed pretty much anywhere, although I'm sure GN would prefer the clerks to use the card boards, fitted low on the doors!
 |
| Left side with routing and a grading card. |
The left side has a Grade "B" card over in the right side data block, below the herald. There's also a routing card placed over the "Mill St" chalk mark.
In Closing
The basics of weathering this car to this point only took a little over an hour. So don't be afraid to do a "quick and dirty" weathering pass on a model.
.jpg) |
| Wrapped up and ready to roll. |
I may experiment with some chipped paint showing a section of the plywood layer failing in a follow-up Part 2 post. I may also make a light pass with the airbrush to blend everything together a bit.
Jason Hill
Related Articles:
Routing & Grading Cards with OwlMtModels 1220 Decals - Prototype Routing & Grading, demonstrated on NC&StL 15337.
Consist Photo Analysis (Part 2) - Owenyo Local, Circa 1950 - GN Plywood Boxcar at Little Lake
GN Paint Schemes - off-blog reference resource
GN Paint Schemes - off-blog reference resource


.jpg)


.jpg)


.jpg)
.jpg)
.jpg)
.jpg)

.jpg)
.jpg)


.jpg)
.jpg)

.jpg)


.jpg)