Friday, July 30, 2021

Modeling Scale Test & Repair Car - (Part 2) - SPMW 790 & 438

In the last post of this series (Modeling Scale Test & Repair Car - (Part 1) - SPMW 790 & 438), I covered the back story of my model of SPMW 790 (Scale Test Car), the first part of the upgrades to the 790 and starting work on SPMW 438 (Scale Repair Car).

SPMW 790 and 438 where we left off on July 18, 2021.
 
In this post I'll be finishing the kitbashing and getting both models close to finished with painting and lettering.

Continuing Modifications


SPMW 790 - Adding Handrail


SPMW 790 with soldered handrail stanchions.

In the last post on this car, I had cleaned out the grabirons, replaced them with wire 'dropped' grabs. Twelve grab irons are needed for this model.  I also drilled the ends for air hoses, which will be installed after the paint and decalling is completed.

Cal-Scale 190-289 brass brake wheels used to replace plastic Walthers brake wheel

I decided to use some Cal-Scale 190-289 brass brake wheels.  I mounted a spare ratchet and pawl off an OwlMtModels F-50-series flatcar on the wire brake staff.  The brake wheel is solder in place on the top of the brake staff.

SPMW 438 - Windows & Finishing Details


SPMW 438 - Cropped photo from Eddie Sims collection, circa 1958-1962 probably.

I'm not sure the reason for the two different smokejacks on the prototype car.  The one in the right side of the photo is the standard top seen on the SP's regular cabooses, so this might be for a normal stove.  I've not been able to get any drawings for the interior layout of this special type of support car.  I could see the scale repair man possibly having one end of the car set up as living quarters, and the other end as work shop and storage for repair equipment, unfortunately at this point I don't know, but that's my assumption.  The other photo I  have of the SPMW 790 scale test car is with a large ex-16 section bunk car... which may or may not be related to the scale test car's movement.

Window Frames


This is the only photo I have of the 438, so much of the function inside the car is a guess at this point, as are the windows on the other side of the car, which I decided to just mirror from this side.

Windows are framed with 2x4 styrene strips.

I cut the vertical parts first, and am able to match the lengths.  The top piece is then cut, slightly long to overhang the vertical frame pieces.  The two bottom pieces are then cut, one being glued horizontally and the other vertically like the rest of the pieces.

The door was framed out.  Wire grab irons formed and installed.

For the grab irons I fabricated the 6 standard 0.012" grabs from the OMM F-50-series jigs.  The vertical grabs needed for the modified door, measuring 40" scale.  For custom length grabs I use my serrated tipped needle-nose pliers to hold the wire and provide an edge to make the sharp 90 degree bends.  The end points of the grabs are marked with my carbide scribe and then drilled with a No.78 drill bit.

Smokejacks


The stacks on the SPMW 438 are from City Classic's HO Roof Top Detailing Set, the SP smoke jack is shown above the skylight on their website.  The rest of the detailing set are useful for other projects.  

Right A-end shortened upper smokejack installed on small styrene platform.

The top of the SP smoke jack is cut down and used at the A-end of the car.  I fabricated a small platform out of a 2x4" styrene strip and a small square of 0.02" styrene sheet to form a level platform for the stack.

B-End with brake staff and wheel installed, grabs, and lower smoke jack.

The remaining part is used at the B-end of the car with the tip pointed.

Center Step Assembly


Here's the first step of center step fabrication and installation.

The center steps are formed from 0.020" PB wire to fit the two pre-drilled holes.

Lastly I formed the center steps and soldered an upper step rung across between them.

  A rung is cut to fit between the vertical parts and is soldered in place.

Roping Staples


Here's a bottom view of the Roping Staples installed.

Roping staples are installed under the bolsters.  I cut notches in the frame to accept the OMM 1010 roping staples.  I'm still working through the prototype photos as to the exact orientation of the staples, and the B-50-10 staples might be different, but I think this will work for now.  

Roping Staple installed on Bolster

The castings are rotated down 90 degrees from the usual installation on the F-50-series flatcars.  A hole is drilled along the edge of the side and I notched the bolster to accept the shelf of the roping castings.

Brake Cylinder & Rods


Spare AB Cylinder taken from OMM 2002/2003 F-50-series kit.

I decided to upgrade this car to use an OMM AB Brake Cylinder and hand brake rod.  Later on I can fabricate some brake levers and brake rods to connect to the trucks.

Trucks


The prototype used Vulcan trucks with leaf springs, which will require some further tinkering.  At this point some shop Kadee sprung Vulcan trucks are test installed.  I'm not sure if I'll take the coil springs out of these sprung trucks and fabricate some leaf springs, like I've done with some of my cabooses in the past, or if I'll get a new HGC set of Vulcans from Kadee.  

Part of the issue with both the RC Andrews which I had on the car earlier when it was primer sand color and the sprung Vulcans is that the car rides too high.  Removing the springs and fabricating shorter height leaf springs will allow me to lower the height of the car at the bolster-sideframe joint, and also make the trucks rigid, which I prefer, but I'm not sure that's the way I want to go with it.

Painting & Lettering


These two cars are painted with Star Brand Black on the 790 and SP Freight Car Red (FCR) on the 438 with a double-action Iwata TRN-1 airbrush.  

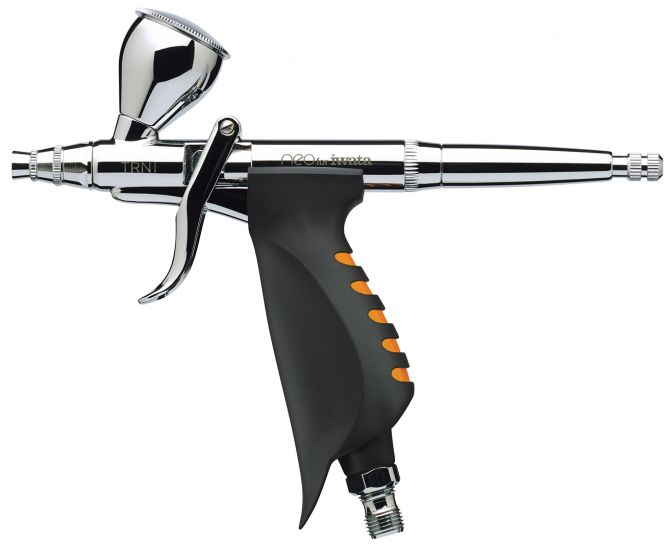
Iwata TRN-1 Airbrush - I've used since around 2017.

I like the TRN-1 because of the excellent grip and finger trigger, which is more comfortable to me than the 'standard' top controls of other brushes.

All decals are given a dose of Micro-Sol decal softening fluid which helps them snug down over the board details.  The side lettering usually gets 4-5 doses.  The first half-brush load of Micro-Sol is usually applied with the decal still slightly damp, which helps wick the Micro-Sol under the decal and the decal's already somewhat softened and able to pull the fluid in without any pre-existing airbubbles under the decal.

SPMW 790 - Scale Test Car


SPMW 790 nearly fully detailed and painted black

I painted the whole car Star Brand engine black, gloss coated the vertical sides in prep for the decalling.  

SPMW 790 painted all-black with decals from OMM 1210 and MS 87-911 sets.

The decals themselves are a mix of sets from my "spares box" of decal fragments.  The "SPMW 790" and "SCALE TEST" are from the OwlMtModels 1210 set, which is included in the 2002 and 2003 flatcar kits.  The "SCALE TEST" had to be formed from nearly single letters, mixing the "RELIEF TENDER" and reporting marks.  The "WT" comes from the spare tare data, along with the "3-27" from the new dates.  The "BLT" comes from the MicroScale 87-911 SP single sheath boxcar set.  I replaced the "100000" weight with a "8" from the tare dates section of the set.

I'm debating if I'll be painting the vertical ends of the hand rail and maybe some of the grab irons while, like the SP cabooses have.  Because I don't have a photo of this car in the black scheme, I'm not sure if it had white visibility paint on the grab irons.

SPMW 438 - Scale Repair Car


Normally, I would have added a portion of either faded FCR or Light FCR to my FCR mix on the 438 but I forgot to do that.  I like to vary the FCR slightly and it also would help bring out a bit more detail on the boards.  This car was converted to this assignment in 1950, which is close to my modeling era, and even the gray prototype photo shows the car in pretty good condition paint-wise.  I think I'll just go with the full strength FCR and then add a bit of light weathering after everything is done.


Decals applied to the side of SPMW 438.

The decals for the carside came from both MicroScale 87-911 for the "SP" reporting mark and the rest is OMM 1210 set spares with individual letters forming the "SCALE REPAIR CAR" lettering.  The LT WT is roughly what these cars would weigh, and I took a little liberty to put on the tare date from when the car was retired and assigned to Scale Repair service.  The repack stenciling at the far right end is from the OwlMt decal set.

End lettering is pretty standard for SP lettering.

The end lettering is gathered from the SPMW 87-155 set.  

In Closing


The twin project of the SPMW 790 and 438 is almost done!  The 790 only really needs to be clear coated to seal the decals and some light weathering on the journals.  I'll install the air hoses after the paint work is done.

The SPMW 438 and SPMW 790 as of July 30, 2021

I guess at this point on the 438, I'll leave the truck modifications for a future post.  I'll also need to do some finishing up with some window screen material, some light weathering, and perhaps some other small details such as running board end supports (a classic missing part from the Accurail boxcars), and I may do some door locks for the man-door.

Jason Hill

Related Articles:

Monday, July 19, 2021

Modeling Scale Test & Repair Cars - (Part 1) SPMW 790 & 438

Over the years I've bee researching the SP, there have been many interesting prototypes that have popped up.  As time moved forward more research materials came to light.  Often this process would allow me to finally build or rebuild models of them.

SPMW 438 "Scale Repair Car" and SPMW 790 "Scale Test" in their post-1958 MW Gray color scheme - Eddie Sims collection

One such project is a "Scale Test & Repair" outfit.  The January 1956 SPMW Roster shows several scale cars, including the SPMW 790.  This didn't mean a lot, other than finding a prototype for my Walthers 4-wheel Scale Test Car, which I built about 20 years ago.  Recently, Eddie Sims shared a photo with me of the SPMW 790 with an unknown car, which had a number that was hard to read.  However this mystery car is stenciled "Scale Repair", and I had a good guess as to the number range, which I looked up in the roster.  Turns out this is the SPMW 438, an ex-B-50-10 class boxcar, converted in 1950 for use as a Scale Repair Car.  I've read about such repairs and servicing, which the track scales need to be checked on a regular basis, and when needed, repaired.

SPMW 790 - Scale Test Car


The Early Years


Stock Walthers 4-wheel Scale Test Car painted black and lettered with some goofy scrap decals in the early 2000s.

The Walthers model is plastic without much weight to it.  Brass models are available, but I didn't get one of those.  Several 1/4 oz lead weights were fitted inside the plastic model and the axle reliefs in the floor were cut larger so the detection chips used for the LMRC signal system (Chubb based) would function.  I also fitted "Scale" KD-58 couplers.  Intermountain 33" wheels were fitted.

Prototype Photos


SPMW 790 with 16-section sleeper - about 1960 - Victor B D'Agostino collection

More photos showed up over the last couple years, including this one from Victor's collection.  While also a later era shot, it shows the SPMW 790 moving with an ex-16 Section sleeper bunk car of some sort in a train.

Operations


Note that the scale test car must be operated near the rear of the train, but it may NEVER be operated as the LAST car in the train.  The scale test cars do not have working train brakes.  The hand brake is only to hold the car when spotted on the scales.  The cars are designed to not change weight at all, thus allowing for accurate measurement and calibration of the track scales.  Some more modern scale test cars, like the 'master' calibrated cars are not allowed to be moved on their own wheels between the master scales across the country.

Upgrades


The Walthers model I felt was lacking in 2019 when I was shown Eddie Sims' collection photo of the 790, which clearly shows the lettering it received after the 1958 change to overall light gray.  Change the body back to black and the lettering to white, and I'll be able to model it before the change to light gray.  The decals I'll be using are from Microscale 87-1013 and left over fragments from OwlMtModels 1210 SP F-50-series white decals, from when I've built several of these models.  Mostly I'll be using the OMM reporting marks and number decals.  I'm also planning to make up the "SCALE TEST" from the single letters from the relief outfits and other words in the right size.

Grab Irons


The first step is removing the decals and then the grab irons.

I removed the old details with some MicroSol on a brush and some light scrubbing with a toothpick to rub the white decal ink away.

Grab Irons removed and sanded/filed clean.

I started upgrading the details of the scale test car by cutting off the cast-on grabirons and replacing them with 0.012" wire.  New grab iron holes were center marked with my carbide scribe and then drilled at 0.015".

The plastic hand rails removed.

I also noticed that the stanchion hand rail was damaged and so I'll be replacing that with metal wire pairs fashioned by hand and cut to the right height.  The two mid-rail stanchions will be soldered to the continuous section.

The new grab irons partially installed, the end grabs will be next.

I'll be painting the grabs white, along with the vertical sections of the hand rail.  I'll probably also install the air hoses for the through air pipe on the car, as it has no air brakes.

The cleanup for taking down the cast-on grabs has really done a number on the paint job.  The next step will be the repainting of the model black.

SPMW 438 - Scale Repair Car


The photo I'll be using to model SPMW 438.

The starting point for the SPMW 438 is an Accurail 40ft single sheath 8-panel boxcar with wood doors and wood ends, basically a great starting point for SP's B-50-8/10/11 class boxcars!  Originally the SPMW Roster shows the 438 as a B-50-10 class car, but the original car number is 25831 converted to MW service 8-7-1950 and assigned as 'Scale Test (Repair)'.

Basic Construction


The basic construction of the car follows the normal process for an Accurail boxcar.  Sheet lead is cut for the floor weight and to fit between the centersills in the underframe. Screws 2-56 are used for attaching the coupler box lids and trucks.

Underframe Changes


The prototype car appears to be riding on leaf-spring equipped Vulcan trucks, so I'll probably be using the KD HGC Vulcan truck with scratch built leaf-springs.

The bolsters will need to be modified to include the roping staples, which are visible above the trucks.

Body Changes


The obvious changes to the body start with the removal of the door and cutting four windows.  A smaller change, but I feel worth while doing, is adding the extra diagonal straps, which many B-50-8/10/11 class cars have at the corners.

Marked body with mechanical pencil, laying out the changes.

I started several months ago by laying out the changes with a mechanical pencil.  I roughed out the locations for the new diagonal braces and windows.

Carving off the diagonal braces where the windows will go.

I started by carving off the diagonal braces from the panels where the windows will be cut later.  A No.17 Chisel Blade was used to carefully whittle down the ribs.  I tried to avoid carving into the wood board detail. 

The fourth panel diagonal is now removed.

Once I got it down to nearly the same level, more fine work with the chisel blade, carbide scribe, and No.11 X-Acto blade.  The wood grain is basically restored in the photos above and below.  The gusset plate at the top and the lower edge are retained, as on the prototype.

Starting to mill down the center of the door area.  Lead strip in the centersill is visible.

I started by milling out the inner parts of the door in several steps with 1/16" and 1/8" 4-flute flat endmills, held in my drill press.  I need to get my full XY table going, but for this process a good drill press with Z-stop and judicious use of clamped "fences" to keep the model aligned worked.

Can't See Black - Primer!


At this point I shot some Tamiya Sand as a primer so I could see my pencil on the carside.

At this point I continue milling down into the carside to the depth of the wooden sideboards.

Left side door milled down and 'man door' cut into the door area.

In a couple of places the endmill bit and lifted the carside, digging a bit deep into the door area, but did not punch through the carside.  The deeper gouge of the 1/8" endmill above the door will be filled in later with Squadron Putty and primed over.  I would have preferred not to have the gouges happen, but at least they're easy to fix.

Window holes cut in the right side of the car, notice this is the reverse side from previous photo.

I remarked the window locations and drilled through with two 1/8" plunges of the endmill.  I opened the rest of the window opening with my key-hole razor saw.  Then I finished the openings for both the door and windows with No.11 blade and files.

Diagonal Bracing & Man-door Framed


Progressing with the Man-door and diagonal corner braces.

I started framing the door way with 2x4 scale styrene strip with Tamiya liquid plastic glue.  The man-door is made from a piece of 0.020" styrene with 0.040" V-Grove sheet.  The doors are cut 4ft wide and 6.5ft high.  I also made a backing piece pf sheet of 0.020" styrene which mounts to the back side of the carside.  The door V-grove piece is then mounted to the backing piece.


Diagonal 2x4 braces added.  I scrapped the primer off of the carside so the glue will bond well.  After installing the braces, I filed/sanded down the thickness of the braces to appear stacked at the top gusset joint.  The right side diagonal braces were fun to cut and fit around the cast-on ladder.

The last step on the carside in this series will be to frame out the windows with plastic strips, which I'll cover in Part 2.

End Modifications


Stock end with outer vertical brace from the right side of the end.

SPMW 438 prototype photo cropped - Eddie Sims collection

The end modifications include removing the right side vertical brace column.  The SP cars in these classes had diagonal braces instead.

End with diagonal 2x4 braces installed and 3x6 door header added to end.

I also cut down the grab irons and center marked the replacement metal grabs with my carbide scribe. I'm going to leave the ladders alone, as the Accurail ladders are very fine, and I can hide the cast-on look with painting and weathering.

B-end of the SPMW 438 with diagonal brace cut around brake platform.

In Closing


I plan to install A-line stirrup steps will be installed as I get closer to completing the model.  New wire grab irons will also be installed in the non-ladder corners.  The man-doors will receive a center lap-joint board and some other small framing details.

SPMW 790 and SPMW 438 status wrapping up work on July 18, 2021.

I'm going to wrap up this blog post here as it is getting rather long.  I'm looking forward to painting both models and decalling them, but a number of the next steps will come before I can do the final painting.

Jason Hill

Related Articles:


Modeling SPMW Cars with Musical Parts - Kitbashing SPMW 174, 3165 & 1168 from other cars.


Sunday, July 4, 2021

Five Years of Blogging and Counting (Review)

Well, another year of writing blogs has passed.  Much has happened in the last year, and much hasn't happened as well.  Let's dive in and see what the highlights have been in the last 12 months around here with the NightOwlModeler.
 

Stats of the NightOwlModeler Blog


Not to blow my own whistle, but let's take a quick look at what you all have been looking at this last year.

Screen shot of monthly views over the lifetime of the NightOwlModeler blog.


The all-time view count is now over 250k, covering 162 posts and 196 comments.  Most months average around 5000 views.  I'm glad to see many people still finding the blog posts useful and interesting to reference for their modeling and research.

Most "Viewed Posts" during the last 12 months.

Surprisingly the SP 1050 rebuild and upgrade of my Walthers HW Paired Window Coach leads the pack with 501 views, this post from 2016 just keeps drawing the views!  In second place, the classic SP Road Switcher - Small Engines post with modeling notes with 488 views.  My new Jawbone Branch post then takes spot number three with 481 views, followed by several more Jawbone posts in the top 10 posts list.

Most "Viewed Pages" during the last 12 months.

The top 10 Pages haven't changed much, as these are my reference pages that you should be able to quickly find on the right side of the blog and go to, which then branch out to other posts.  It is good to see that they are still being used by many people and touch-stoned regularly.

New Videos This Year


Let's look at the videos that I've been posting to YouTube in the last year.

Link to my newest video on YouTube - My trip on Private Car "Tioga Pass" in 2017.

In May I finally edited together the video on Weathering Tutorial on Flatcar Deck that I shot in early 2020.

Link to Weathering Tutorial for Flatcar Decks.

I have a couple more videos that are shot, which I'm working on editing together, so hopefully those will be published soon.

Highlights of Blogging in 2021


Let's take a quick recapping look at the July 2020-July 2021 posts.

SP Jawbone Branch


SP 2335 & SP 2350 mid-Owenyo excursion for arrival of SPNG #1 - Oct 1954 - Alden Armstrong photo

In November 2020, I started planning a new layout for my shop space based on the northern (RR Eastern) end of the Owenyo Branch out of Mojave, CA.  In January 2021, I started construction.  So far there are 27 posts in this series! (Link to Jawbone Branch Index Page) The posts cover everything from construction to research and planning.

Kitbashing SP C-8/9/10 from Bachmann-Spectrum 2-8-0 with OMM Conversion Kit


Bachmann-Spectrum 2-8-0 with pre-production OMM dome, cylinder and yoke/rod conversion kits installed

This is a new series to help fellow modelers sort out what prototype engines they can model with the upcoming OwlMtModels conversion kit for the Bachmann 2-8-0 engine.  There's still room on the order as 2020 delayed starting of production, so get your email off to me and get in on the reservation.  Things are finally moving, so hopefully we can get this into production in 2021!

Converting Athearn-Genesis 120-C-6 Tender for Brass Engine Pairing


I did a quick post on converting the drawbar mounting on Athearn-Genesis 120-C-6 plastic tender.

This class of tender is hard to find in brass, so I converted the odd Athearn-Genesis drawbar system to a more conventional screw mount, which will work with standard brass engines.  Future posts will cover the rest of getting this engine in service with sound and DCC, etc.

Tender Swapping (Part 2) - Tender Migration


Tenders move in pairs during migration

I continued playing with tenders with the long awaited Part 2 of Tender Swapping series.

Modeling SP Boxcars


SP B-50-21 class from Branchline-Yard Master series (Atlas)

This last year I also launched into a long dreaded modeling topic I've avoided for 15+ years... Modeling SP boxcars!  In several posts I've covered:
Supply Boxcars, B-50-12 (USRA-Single Sheath),
SP Pre-WWII Boxcars (B-50-18/19/20/21/23 classes),
SP Post-WWII Boxcars (B-50-24 thru 33 classes),
Plastic Options for SP B-50-8/10/11 class Single-Sheath Boxcars.

In Closing


Hopefully, I'll be able to keep posting new and interesting modeling blogs on various projects through 2021 and into 2022!  Also note that Blogspot is discontinuing email notifications of new posts.  Please email me at NightOwlModeler at g-mail (dot) com if you want to be placed on a personal blind-carbon-copy email notification which I'll send out each time I post.

Jason Hill