A couple months back, I remember seen some questions about what freight car models I prefer. While I'm not going to list my whole roster here, I think I'll go ahead and make a "short list" of the models I will be relying on to provide interesting variety for my Jawbone Branch layout.
 |
| Some of the cars I'm working on at Owenyo on my Jawbone Branch, 2022-06-25. |
For those following my Jawbone Branch, I have listed some of these already in my
SP Jawbone Branch (Part 4) Freight Car Roster article. This post will be an updated and at some point I'll go through making a list including some basic quantities to show what I'm planning for my operations.
Hopefully this post will give you some ideas of the variety of foreign boxcars and how to expand your fleet in general as well.
Boxcars
Most all foreign road boxcars would be in general service bringing in supplies or possibly reloaded for shipment back towards their home roads. Outbound loadings off the Jawbone for foreign cars could have been low enough that a sizable number of the inbound foreign loaded cars were probably returned to Mojave, LA or Bakersfield and maybe as far as Roseville to be routed for potential reloading.
.jpg) |
| SP 3237 switching several foreign boxcars at Bartlett on the Jawbone branch - Leo Barusch photo - Inad Akeb Collection |
|
The first car behind the engine is a Seaboard boxcar. I might get a resin model kit for one of these someday, because it's clearly documented as having this example on the Jawbone during my era!
WWII War Emergency Boxcar - IMRC
ATSF 129782 BX-38
 |
| ATSF 129782, Bx-38 class from IMRC (RTR) |
A few years ago I learned that Intermountain was producing the WWII Emergency Boxcar. I had to wait for another run, but then I was able to snag one example. I love the funky composite door on this single sheathed car. I'm looking forward to doing a bit of weathering and putting this car in service!
ATSF 129782 Weathering with PrismaPencils and Acrylic Paints
PRR X29 & ARA 1923 Standard Boxcar - Red Caboose
One of the most common freight cars in the early 1920s was the PRR's tens of thousands of the X29s were built and lasted many years. About 1/3 of the X29 fleet was rebuilt heavily into X29B class cars with new AAR-style wider bodies by the 1950 era, so I may eventually either kitbash or get a resin model of one of those, but here are two of my plain X29s.
PRR 100305 - X29
Back around 2006 I was unable to find any of the Red Caboose PRR X29s, but was able to find a pair of gray "Battery Service" PRR MW X29 kits. The plan was to repaint them and use Speedwitch PRR X29 decals on them.
 |
PRR 100305 weathered Red Caboose kit.
|
One of the kits I started building this model around 2007-2009. This one made it as far as being painted and lettered as PRR 100305. It will be one of my X29 class boxcars to use in general service on the Jawbone or send to LMRC.
PRR 100305 - 2022 Update
 |
A bit of light work over the decals with my fiberglass brush to de-weather it.
|
I decided after studying more photos over the last 10 years, that I'd over-weathered the lettering on the car. So I de-weathered the lettering with my fiberglass brush. Note that there's no need to strip and repaint a car because of a little over-weathering. I did experiment with patch-painting the door as a replacement with some PRR FCC, trying to match closer to the Red Caboose pre-painted model of PRR 100813 (below). I think it's slightly too orange and not quite as a good a match to the nearly Zinc Chromate Primer red that the RC car is painted with.
One small mistake is that when I was de-weathering, I went a little too deep on the LD LMT and LT WT stenciling, scratching down to gray plastic, so those decals will have to be touched up. I'm looking forward to weighting the car, putting on the rest of the grabs, and details to get this long-toothed X29 car in service.
PRR 100813 - X29
 |
| PRR 100813, a fresh kit X29 from Red Caboose kit. |
I was finally able to pick up a decorated PRR X29 kit about 5 years ago, so this will be a 'cleaner' X29 model for my fleet. It is too bad that I've not come across one of the RC X29 models with the 'patched sides' which most X29s were fitted with after rusting out after around 1940. It seems that version is very hard to find in PRR lettering.
CGW 85240 - ARA 1923 Standard
 |
| CGW 85240 from Red Caboose tooling, IMRC RTR version |
In late 2019, I was able to find a non-PRR X29/ARA 1923 clone. Note this version from RC has the common prototype steel patches along the lower sides to fix the rust problems that many X29s had in the later years. I'll probably see if I can fabricate some partial patches on one of the ex-PRR Battery Car kits that I mentioned above, like the PRR 105305.
NYC Standard Steel Boxcar - MTH
The NYC ordered thousands of their new standard steel boxcar in early 1920s. They continued to be built and pushed competition to become the ARA 1923 Proposed Standard Steel boxcar against the Pennsy X29.
NYC 111869
 |
| NYC 1923 ARA standard steel boxcar, by MTH (RTR) |
The NYC still had 17,229 of these cars in the 1950 ORER showing rating at 55-ton nominal capacity, 2955 cu ft capacity! While being replaced with newer post-war boxcars, these cars certainly still showed up regularly.
A minor note on these cars is that they require exceptional force to re-gauge the wheels to LMRC standards... ouch. I'm generally replacing the wheels with IMRC wheels.
"ACF-Buffalo built 2,000 of these cars; assigned by NYC to Lot 489-B. In 1936 they were renumbered into the 107000-108999 series." comment on-line by Doug Chapman. The 107000-108999 series in the builders photo shows with a panel door. Obviously the group Doug is talking about is a slightly older series than the 111800-series shown here, but they were built to the same design, and I'm guessing the cars were rebuilt with new Youngstown style doors.
NC&StL 15337 - Fowler Boxcar - 6ft Door
 |
| New kitbash in process - 2022-06-20. |
Kitbashing the new Accurail model from 2018 into
NC&StL 15337, hopefully something that I can use on the Jawbone.
CP/SooLine - Fowler Boxcar 5ft Door
 |
| New CP/Soo Line 36ft Fowler from Westerfield |
Yup, I'm building two flat-resin-kit Fowler boxcars. I'm going to have to scratch build a new metal roof for the cars and get some after-market decals as the 'second hand' kits didn't have any. This cars will probably for grain loading from the Mid-West and central Canada.
NP 11661 - Double Sheath
 |
| NP 11661, Rapido Double-Sheath box car - 2022-06-18 |
One of Rapido's excellent NP Double-Sheath box car. These are R-T-R models, very nice with minimal upgrades needed. I just dove into
Weathering NP 11661 car in June 2022. A short blog post covers the use of Prisma pencils and acrylic paints.
B&O 381303 - M-53
 |
| B&O 381303 M-53 |
I picked up a pair of M-53s from Fox Valley around 2011 when they came out. They are very cool and unique cars. I look forward to operating at least one on the Jawbone. I'm working on several F&C Resin "Wagon Tops" for use on the Jawbone Branch. So, they will probably make an appearance soon.
MILW 21078
 |
| Roughly assembled MILW 21078 by Accurail, still needs some of the detail parts added. |
The Milwaukee's "signature" boxcar was known as the "Rib Side" box car because, well, it had ribs horizontally along its sides. While the B&O's "Wagon Top" had the ribs vertically that covered the sides and the roof in the same piece of metal, the Milwaukee's rib-side cars were just another way of cover an all-steel boxcar.
The kits that I'm looking at are the slightly retooled rib-side car from Accurail, which originally was tooled by Rib Side Car many years ago.
A Note About My SP Boxcar Fleet
 |
| SP B-50-12, one of 1000 USRA boxcars assigned to the SP during and after WWI |
Many of my SP boxcars I've already posted about between the Pre-War All-Steel Boxcars, Post-War All-Steel Boxcars, and my Modeling SP B-50-8/10/11/13/14 class 'standard' boxcars that the SP had 8,000 of basically each group. So I'm not going to be showing those cars again here in any detail, but I do plan to have about 6 pre-war all-steel boxcars, a couple of the post-war at some point when I kitbash them, and probably 5-8 of the wooden single-sheath boxcars, including a pair of resin B-50-15/16s to build.
B-50-15/16 Progress!
 |
| Sunshine B-50-15 boxcar under construction. |
Upcoming Rapido B-50-15/16 RTR Model
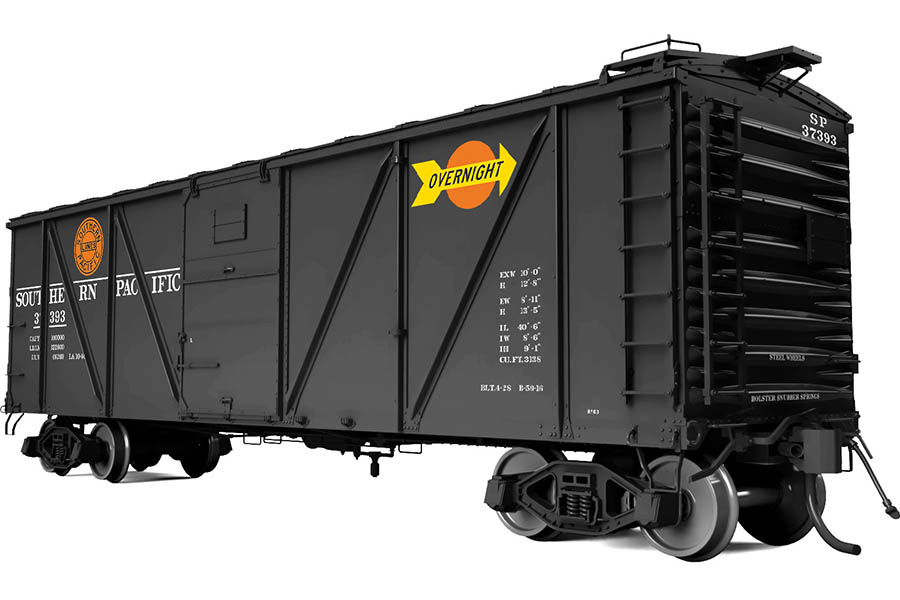 |
| Rendering of steel-resheathed B-50-15/16 in "Overnight" scheme from Rapido's website. |
I also have some of the not-yet-released
Rapido SP B-50-15/16s on order, which will round out my fleet of SP boxcars when they show up. I want to get a little farther with the resin kits and I'll do a write up on the B-50-15/16 service history to help in selecting which versions are most accurate for your era.
Gondolas
 |
| SP Mike leads a train on the Jawbone with four gondolas, one piled high with white mineral/ore. |
Probably 1/3 of the cars in an average Owenyo Local were gondolas. On the Jawbone they were primarily assigned to mineral and ore loading. Occasional loads of lumber could be coming in and maybe a load of pipe from the east or metal building kits, etc for the farming communities that were still hanging on. There was also a small amount of lumber milling preformed at Bishop, so there could have been local lumber shipped on the NG and occasionally a carload out of Owenyo.
SP G-50-15/16/18/22 Enterprise GS All-Steel Gondolas
.jpg) |
| SP 151454, G-50-22, all-steel GS gondola. |
The SP's all-steel GS gondolas were used on the Jawbone Branch for mineral and ore service, mostly dumped from the NG transfer trestle dump into the SG cars.
SP G-50-20/23 Enterprise GS Composite Gondolas
 |
| SP 150143, G-50-23, composite GS gondola. |
The SP usually used the 2500 composite GS gondolas in sugar beet service around California and wood chip service in Northern California and Oregon.
UP G-50-11 Enterprise GS Composite Gondola
 |
| G-50-11 kitbashing from RC Composite gondola |
At least one of these ex-composite cars which had been re-sheathed with steel sides was photographed at Owenyo, probably in ore/mineral service. I'm looking forward to making some new ends for it and finishing up this car.
UP G-50-13 Enterprise GS All-Steel Gondola
 |
| UP 65003 G-50-13 RC steel gondola |
It seems that the SP also sent UP all-steel gondolas up onto the Jawbone Branch. I'm not sure what loading these cars had coming in, maybe coal or coke for the various mineral processing and general consumption by communities on the NG. Possibly inbound lumber, unfortunately the photos don't really show loads for them. I wonder if these cars were making empty somewhere else on the SP and were on their way back to somewhere like Los Angeles, and were sent for loading on the Jawbone with loads to LA or Long Beach, then to be handed back to UP at the LA area interchanges.
Greenville/AAR 52'6" 70-Ton Gondola
First produced for the Erie RR starting in 1940, the design for a 52'6" mill-gondola with drop ends quickly became the standard for thousands of cars produced during WWII. These cars continued as an industry standard for nearly 20 years. By the post-war years, cars of this size would probably be bringing fabricated steel products to California and in my case the Owens Valley.
NKP 66031
NYC 712675
 |
| Walthers/Proto2000's 52'6" as NYC 712675. |
The NYC 712675 is another example of a P2K 52'6" gondola that I put a slider pad under.
SP G-50-13 Kitbash
 |
| SP 94248, a kitbashed P2K G-50-13 |
This is my original 1990s G-50-13 kitbash using a Proto2000 kit, shortened with a Athearn fishbelly centersill installed. I based this kitbash on a photo in one of the MircroScale SP decal set. That's about all we had before the wonderful Tony Thompson SP Freight Car book series came out about 5 years later.
Other Mill Gondolas
SP G-50-13 50-Ton 48ft Gondola
 |
| Westerfield G-50-13 with Tangent Dalman 2-Level trucks. |
Speedwitch SP G-50-13 resin gondola. I'm planning to finish up two of these cars. These resin models are more accurate to the SP prototype than my kitbash from the late 1990s. These cars were used for steel and lumber loading.
B&O 259798 O-59
Tangent "Bethlehem" 52'6" gondola. Thanks to Tangent offering the Bethlehem and all-welded Greenville mill gondola (below) in the last 5-10 years, we have several more options now to run cool "rust-belt" gondolas to bring machinery and supplies to the our modeled areas around the US.
Tangent G31B class PRR gondola, built to the new all-welded design post-war from Greenville. The PRR had about 9,200 52'6" gondolas in 1950 with more on the way, such as the G31Bs! Certainly could be common to see one wondering on to the Jawbone Branch.
USRA 70-Ton Gondola
"The USRA version was based, with few if any changes, on a pre-USRA design built for W&LE and later owned by NKP. USRA versions and copies were built for B&O (0-27 & O-27a), NYC, P&LE, PMcK&Y, PRR (G25 & G25b), and RDG (GMK & GML). It's an utterly essential freight car for Eastern modelers, with thousands of examples carrying various liveries. Available from Walthers or Westerfield. Westerfield is the superior model. Erie also had a somewhat longer version of the same design. This info came to me from a well known Hagerstown rail historian who prefers to avoid the limelight." Quote from Tom Davidson
PRR 316083 G25
 |
| Weathered PRR 316083, circa 2006. |
Walthers 46ft USRA gondola. The PRR had about 10,000 46ft long gondolas in 1950 in addition to the 52'6" cars mentioned above. That's a LOT of gondolas! So I figure I should be able to justify having a couple of examples.
This car's one of my favorites with weathering on the interior with Prisma Pencils, sketching the look of the collapsed stake pockets. This photo shows the car with one of the large tank loads, also from Walthers.
Flatcars
Flatcars did show up in photos of the Jawbone Branch. Probably mostly used for shipping machinery, possibly lumber loads into the Jawbone Branch.
F-70-6/7/10 Class - 53ft Flat - RedCaboose or SPHTS
SP 140500-142549-Series
 |
| Example of an F-70-7 class riveted car. - RC RTR model shown |
I have a couple of undecorated kits from SPHTS for the car shown above. I plan to make F-70-2/5/6/7 class cars from the kits. The F-70-7 was certainly the largest class with 2050 cars built in 1949! See my
SP Flatcar Index page for more details on roster info.
SP 142617 |
| SP 142617, F-70-10 class welded car - SPHTS kit |
The SP continued to need 70-ton flatcars and ordered another 1000 cars, which were delivered in 12-53 and into early 1954. This series of cars lacks the rivets, but also has these large T-shaped exposed steel structures of the top of the bolsters and draftgear. One of these F-70-10s was photographed moving SPNG 1 (diesel) to and from the shops at Bakersfield for mechanical work.
I have a couple of the F-70-10 models, but they do push my 1953 modeling cutoff date into 1954. If I'm pushing much into 1954, then the Jawbone Branch may need to be worked with an RSD-5 instead of the Mk-2/4.
F-50-5/8/9/10/12 Class - OwlMtModels kits
Some prototype photos clearly show several SP/UP F-50-series flatcars on the Jawbone Branch in the local freight. However, from the angles of the photos it is hard to see if they are SP, UP, or SPMW.
SP 38892 F-50-8
 |
| SP 38892 F-50-8 - OwlMtModels kit |
This SP F-50-8 originally was owned by the PE and transferred over to the SP reporting marks in 1940.
SP 43745 F-50-8
 |
| SP 43745 F-50-9 - OwlMtModels kit |
PE 3669 F-50-8
 |
| Kitbashed PE 3669 F-50-8 - OwlMtModels kit |
The last batch of PE F-50-series cars was being absorbed into the SP reporting marks in 1950, so it's possible to still see a PE car operating under the SP ownership during my layout era.
SPMW 3605 F-50-5
 |
| SPMW 3605 assigned to T&M gangs - OwlMtModels 2002 kit. |
I don't think I'll be using SPMW 3605 for the Jawbone MW "outfit" which was photographed at Lone Pine, which had a rack over-head, fuel tanks, compressors, etc.
SPMW 215 F-50-5
 |
| Lone Pine SPMW Outfit F-50-flatcar - owensvalleyhistory,com - ebay47_lone pine_sml |
I've done a new car to make this car, which is really cool! I think this car was used for water service department. Lots of tubes, looks like 3-4" pipe. Some sort of compressor or generator is located under the rack.
 |
| SPMW 215 - custom-built rack on OMM F-50-series flatcar. |
It is a cool looking car! Of course I've back-date this to FCR, pre-1958 era version. I still need to build the detailing parts to go on the deck.
F-40-7 Class - Kitbash Walthers/TM 42ft
T&NO 23454 - F-40-7 Kitbash
 |
| T&NO 23454, kitbashed Walthers/TM flatcar with kitbashed OwlMtModels beet rack, sagged to match the hog-backed flatcar. |
In the early days of the Jawbone Branch, the trestle dump at Owenyo was shown as a "Beet Dump". However, early on in the Jawbone there was still shipments of beets out of the Owens Valley, before the water was sucked up and sent to Los Angeles in the LA Aqueduct.
I have several of the F-40/50-7 cars that I'm kitbashing. One revenue car is T&NO 23454 which is fitted for use with a modified OwlMtModels Blackburn sugar beet rack. I've gone ahead and weathered this flatcar and rack fairly heavy dust/dirt from the beets being dumped out of the rack.
SPMW 810
 |
| SPMW 810, Walthers/TM kitbashed with new truss rod underframe. |
The other is SPMW 810 which will probably see most of its use either on the Jawbone Branch or Tehachapi with the MW forces supplying material or Track & Maintenance gangs. At this point, I'm still working on the details, replacing the cast-on grabs, mounting new stirrup steps. Truss rods are also going to be installed.
 |
SPMW 810, Walthers/TM kitbashed and weathered with new trucks & truss-rod underframe.
|
Here's a photo of SPMW 810 after the underframe trussrods and stirrups have been installed.
Tankcars
AC&F Type 21 8k & 10k Gallon - Proto2000/Walthers
HTCX 1621
.jpg) |
| Harbor Tank Car Line 1621 from Walthers/P2K ACF 8,000 Gallon Type-21 tankcar |
Harbor Tank Car Line was based out of Los Angeles, CA and would have been a common shipper of petroleum products over the Tehachapi Pass and on the Jawbone Branch, probably to stations such as Lone Pine, which show having fuel dealers in the aerial photos of 1944.
UOCX 8018
 |
| Union Oil of California 8018 from Walthers/P2K ACF 8,000 Gallon Type-21 tankcar |
Union Oil of California (UOCX) was another large oil company in California which would have been supplying petroleum products to the Jawbone Branch, probably to stations such as Lone Pine, which show having fuel dealers in the aerial photos of 1944.
UTLX 75022%208K.jpg) |
| UTLX 75022 from Walthers/P2K ACF 8,000 Gallon Type-21 tankcar |
Standard Oil moved their products under the UTLX reporting marks. These cars show up many places around the country, and were also provided to other companies needing leased tank cars.
AC&F Type 27 8k Gallon - IMRC
SCMX 918
 |
| SCMX 918, an 8,000 gallon ACF Type-27 tankcar. |
A few years ago I was able to pick up another Shell Chemical Company ACF Type-27 tank car (SCMX reporting marks) kit. These cars are longer and smaller in diameter than the earlier Type-21 cars of the same capacity. The plant at Bartlett may be able to receive loads from Shell Chemical, if not the acid service cars by Tangent (shown below).
PQCX 111
 |
| PQCX 111 - IMRC ACF Type-27 8,000 Gallon Tankcar |
Another example of something I could maybe send to Bartlett... I'd have to do more research into Silicate of Soda, and where it was used. P.S. This is what the SCMX 918 will look like when built-up.
HTCX 1739
I also have a Harbor Tank Car Lines lettered kit that has been partly built for almost 20 years, Gasp! Basically it just needs metal safety appliances installed. At some point I'll finish it for some additional variety in my tank car fleet. I'll also do some de-weathering to minimize the brush strokes from 17 year old me, and re-do some better weathering on the top with my current bag of weathering tricks.
ACF Welded (1949) 10k Gallon - RC
ROX 10015 - Richfield Oil
 |
| Richfield Oil, ROX 10015 - RC (RTR) |
I'll probably do a little finishing work on the Richfield tank car and use it for gasoline and fuel oil service to the Jawbone Branch. Because this car represents the start of post-war all-welded tank cars, I'm going to keep the weathering to a minimum.
Acid Tankcars - Tangent
While not as likely as petroleum products on the Jawbone, there may be some precident for cars like this serving the plant at Bartlett (modeled) or the US Navy Base at China Lake (which I'm not modeling).
GATX 81082 - Stauffer Chemical |
| GATX 81082 in Stauffer Chemical Corp acid car - Tangent (RTR) |
I picked up a couple of the Tangent Stauffer Chemical Corp cars for the sulfuric acid service to Trona and West End. While I probably won't regularly need these cars on the Owenyo side of the Jawbone Branch, but I like the look of these cars and may be able to occasionally send one to Bartlett. These cars were pretty new in the early 1950s, so I'll be keeping them fairly clean.
GATX 54539 - General Leasing
 |
| GATX 54539 - general lease scheme acid tank car - Tangent (RTR) |
The General American Tank leasing company kept a number of their cars in general service black scheme. These could be seen just about anywhere in the country for any of the assignments these cars are suitable for. I picked up one of these to mix up the cycles of the two following scheme cars. I may still get to send one of these cars occasionally, or a Stauffer car to Bartlett.
GA 1917 Tankcars - Tangent
UTLX 10673 - Hercules Powder Co.
 |
| Tangent GA 1917, painted as UTLX 10673, assigned for service with Hercules Powder. |
While Hercules Powder works had a plant located along the San Francisco Bay at Giant, these cars could show up over Tehachapi. I guess I should have nabbed one in the plain UTLX scheme, but these came out a couple years before I started on my Jawbone Branch layout... so unless I finish one of my two undec's as a UTLX, I'll have to live without.
SP (Ex-EPSW) or UTLX Lease
 |
| GA 1917 10k gallon undec RTR Tangent model |
I have two of these Tangent 10k gallon 1917 tank cars undecorated, but painted black from the factory. I planned to do them both as SP's ex-EPSW 10k gallon cars which were absorbed in 1924, which would require some kitbashing to the dome platform walkways and ladders.
As they are undecorated, I may decide to do one in UTLX scheme to supply the Standard Oil needs on the Jawbone at Little Lake and Owenyo. My mind is not made up to which scheme at this point in June 2022. Given the difficulties in getting good quality SP Tank Car Decals over the last year from Tichy, I may have to open up to other ideas and options regarding these cars.
Reefers
I've never been much of a reefer modeler, so I don't have many finished cars to show off and only one currently in progress that is painted.
R-30-9 Red Caboose
PFE 92990
I have one of these kits that I built about 23 years ago. I may get some photos of it at some point, but for now my PFE fleet of the Jawbone will have to be other models.
R-30-18 P.F.E.
PFE ?????
One of the late Terry Wegmann's PFE R-30-18 kit. I look forward to building this model. Jay Styron has recently built two of these models and they look very nice.
R-40-2/4 Tichy
PFE ????? & ?????
Tichy Train Group standard PFE flat plastic kit. I'm currently assembling two of them. I'll do a separate update on them.
R-40-26 - Accurail
PFE 9785
 |
| Left side of roughly assembled Accurail PFE 9785, R-40-26. 2022-06-24 |
I've started the kitbash by marking and cutting out the notched lower sidesill of the car. If I want to go all out with the kitbash, I'll need some other items such as belt-driven fans. Some other details, like the small routing card boards and stirrups still need to be attached. I will say that the hand brake details and underframe details went on very easily and look good.
Modeling Accurail R-40-26 PFE 9785 (Part 2) - Minor ModificationsThe Heralds look a little weird, so I may see about using some decals from MicroScale or other good artwork decal sets to touch up the lettering on this model.
In Closing
.jpg) |
| Some of the newer freight cars I've been working on in 2022 at Owenyo on my Jawbone Branch |
This has been a bit of a long blog post, but I hope it inspires my fellow modelers out there to try some kits a little farther out of the comfort zone than your regular shake the box kit. For those RTR and shake the box kits, try snazzing them up with some upgraded decals, chalk marks, and weathering to help add some variety to your fleet.
Jason Hill
Related Articles:


.jpg)


.jpg)


.jpg)

%208K.jpg)


.jpg)