Thursday, September 29, 2022

Open Loads (Part 4) - Building a Bridge Timber Load for Red Caboose GS Gondola


A sideview showing the crazy arrangement of bracing dunnage that was used on the prototype for the load above the sides of the gondola.

This post is going to be a modeling flashback to 2004, when I built this load for the pool of Red Caboose GS gondolas.  I based this load on a photo in Thompson's SP Freight Car Vol.1 of SP 151382.

Building the Load


I fabricated the main box of the load with dark stained/painted scale wood strips of appropriate size for the big bridge timbers.

Interior of the load.

I made the sides extend one timber below the sides to help "key" it onto the body of the gondola and minimize how much material and weight I was adding to the model.  The diagonal braces inside are ME stained ties that I used to keep the top layer of timbers from breaking apart.

Cross-ties fabricated using the 'twisted' fishing line with small sections of roughly 2x4 fragments.

The side dunnage rails of 2x6 boards were probably nailed to the beams.  Then the vertical posts were nailed to the longitudinal rails.  

OwlMtModels diagram showing AAR's standard for making iron wire ties between vertical posts.

Then iron-wire cross-ties are made following the AAR standards shown in OwlMtModels' lumber loads.  The banding is made from 6-pound test fishing line, blacked with Sharpie marker.  Once the cross-ties are made between posts, then the iron wire wraps around the tops of the posts are made.  

Close-up of the Ends


A-end of the load.

End bulkheads were built up with thinner planks and two vertical posts, which I cut off at the top of the gondola ends.  

B-End of the load.

This seems to be the way the prototype photo was, however, I would probably make them continuous into the inside of the ends for more support.

In Closing


The whole load at this point becomes tied together, so the posts are both more fragile and strong at the same time.  After 18 years at LMRC, this load has only broken one or two post boards, which I was able to fix with another small drop of ACC/CA glue.

Completed Bridge Timber load.

This load has been a fun one to see around the layout since 2004.  I would suggest anyone wanting to build their own to put one together.  It will probably take a couple of evenings to build it and put on all the iron wire ties and be well worth the investment of time with a unique load for either through movement or local MW use to fix that short trestle that's been needing it for the last 6 months before the coming winter.

Jason Hill

Related Articles:


Open Loads (Part 1) - Building a Steel Load - Also examples of returning loads with SCOs.

Open Loads (Part 2) - Lumber in Boxcars - Open doors & removed doors

Open Loads (Part 3) - Deck Weathering - No Loads? Means modeling the deck weathering too!

Sunday, September 25, 2022

Modeling Express Reefers of the 1950s (Part 1) - REA & PRR

Passenger service service express reefers were used for over 50 years to move perishable goods, often fruit and vegetables across the country at high speed, beyond the speed that regular reefer blocks could move.  Equipped with 90 MPH steel wheels, signal and steam lines this meant the cars could move in mail trains and special express perishable blocks.

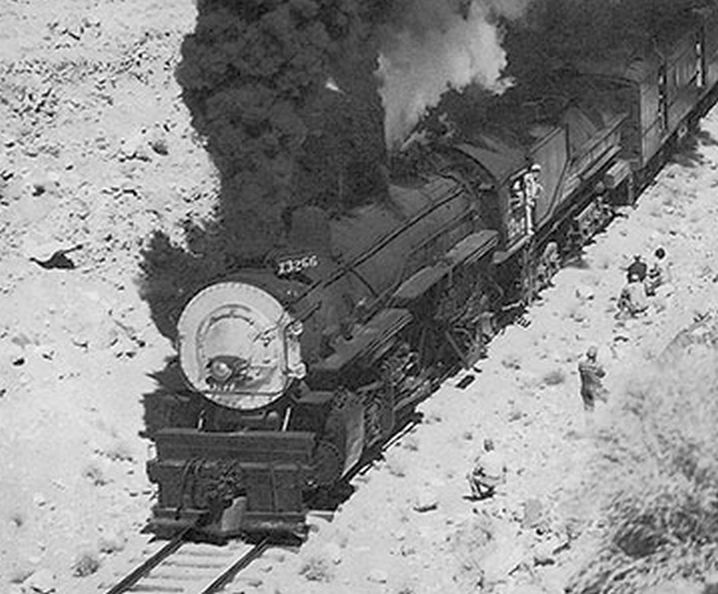
ATSF No.7 drops into the siding at Bealville meeting ATSF No.4 with a large express reefer block on the head end.

There was always a shortage of express reefers, pushing the owning railroads to pool their cars into the Railway Express Agency.  The REA was comprised of 37 railroads which could lease cars or even partial space within the baggage, express boxcars, or express reefers to move express traffic anywhere in the country regardless of who actually owned the car.

Classic 50ft Wooden Express Reefers (REA & Others)


Athearn


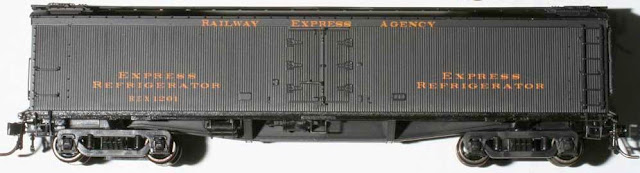
Athearn stock model lettering with large 1953 herald removed

These models date back to at least the 1980s.  I believe this example was produced in the 1990s.  Like most older mold-base Athearn models, they are shortened to a 50ft body length, which is a couple feet short of the standard express reefers after about 1920.

I did re-truck these Athearn models to 8ft express trucks.  Athearn's newer offerings of this body style I believe has these trucks and I was able to buy the trucks to refit my older models, like REX 1256 here.

Walthers


In the early 2000s, Walthers produced a new set of tooling for wood-bodied express reefers.

Railway Express Agency


Apologies for the poor lighting I don't recall where I was able to get this photo from.  This is an early-scheme REA car.  Some had reporting marks over both trucks.  This might be a BLI car, described in the next section.

Most cars would have still been in their original REA scheme, which was a more drab color of Pullman green.  The most notable thing about this scheme's lettering is the "EXPRESS REFRIGERATOR" low on the carside over each truck.


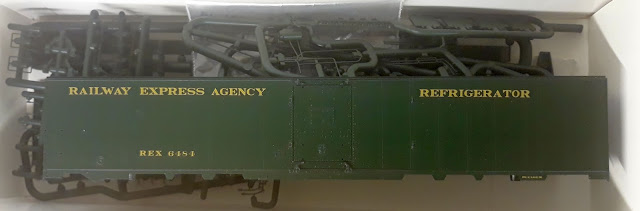
REX 300 - Hunter Green, with removed large herald and corrected reporting marks size

The Railway Express Agency owned several hundred express reefers in several number series.  This is a Walthers model with the large 1953 red and white herald removed to back date the car for pre-1953 scheme.  

REX 1417 (Stock Walthers version)

The REA introduced the large red and white herald to the Hunter Green paint scheme in 1953.

BLI


This is an early-scheme REA car.  Some had reporting marks over both trucks.  This might be a BLI car.

BLI has also produced models very similar to the Walthers models, with 52-53ft length over the body.


Steel Reefers


REX 6100-series (500 cars) in original 1947 stripped scheme, which didn't last long...

Branchline-Atlas (1947 Welded)


Fourth run "Early 1950s" Scheme on 1947-welded express car Branchline kit.

Unfortunately, over the years, I only found a single Branchline welded kit.  Atlas has taken over the tooling from Branchline, and should be offering the steel cars again at some point.  They did make the as-delivered silver/green stripe scheme (below), but I wasn't able to snag any of those.  So all my stripe-scheme models are slightly incorrect with the riveted body and some small details being from the later cars.

Walthers (1957 Riveted)


Walthers fobie of 1947 original REA paint scheme on the riveted 1957 model.

The Walthers models are actually the 1957 version which was riveted, in a seeming reversal of normal construction techniques of the time.  The original striped scheme didn't last long because of the complicated painting work.  The strips didn't hold up well when the cars were washed.

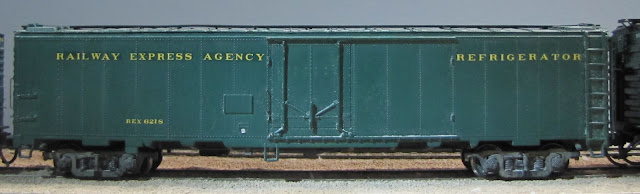
REX 6218 after repainting circa 1950 to the plain Hunter Green scheme without the REA logo

Within a couple years the REA decided to repaint the steel cars into a new scheme which used the same lettering positions, but with overall Hunter Green and yellow lettering.

REX 6318, with large 1953 herald.

The second scratch-painted Walthers model that I built in the early 2000s has the 1953 herald for some variety.

Brass - Various Manufactures


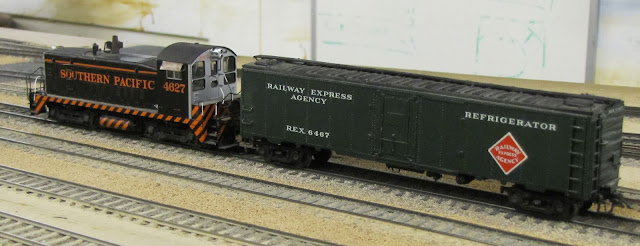
SP 4627, an SW8, switches REX 6467, a late-series (1957) express reefer in Bakersfield.

This is an example of one of the brass all-steel express cars painted up with large herald and incorrect (I believe) white lettering.

PRR R50B


Walthers


Pre-war PRR scheme with moderate weathering. These often had olive colored trucks.

For my modeling era, I generally try to avoid pre-war paint schemes that would have been repainted by my era of 1948-1953.  The pre-war PRR R50B scheme, shown above, has a different style of lettering as one of the main give-aways to its era.

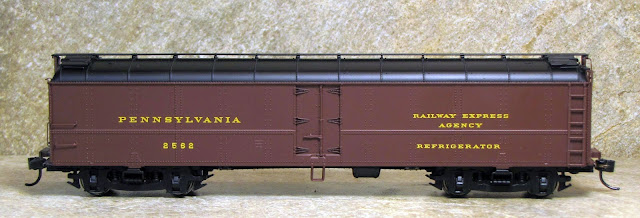
PRR 2562, an R50B class express reefer, lettered for REA leasing. - Stock decorated model for post-WWII era.

One of the large suppliers of reefers to REA was the PRR, still providing 358 express reefers in 1953.  There's even photos of 25+ of the R50Bs at Los Angeles Union Station, being stored on a back track during the same era.  This shows that the R50Bs certainly were on the west coast and available for express perishable loading.

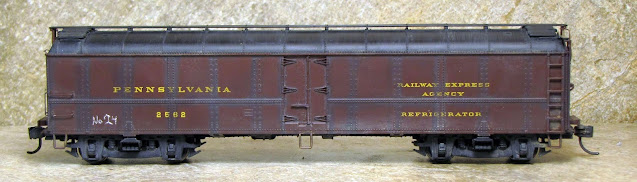
PRR 2562 after weathering with grime and east-coast soot along the rivet rows and western dust along the lower body and trucks.

This particular model was weathered with eastern grime/soot and a light splast of western dust along the lower body from high speed travel through the deserts.  The chalk marks are for Santa Fe No.24, the Grand Canyon, which would have been a common routing out of the San Joaquin Valley at Bakersfield, via Barstow to the TransCon, to Kansas City or Chicago diversions to the destination.

Operational Notes


The use of express reefers on the west coast is primarily eastward perishable loadings.  Westward loads certainly could be perishables, but the express reefers (and even plain SFRD/PFE reefers) could be loaded with publications, such as weekly or monthly magazines and catalogs.  The REA leasing express-reefer cars would then have their hatches locked in the down position and used as express boxcars with bags of the published materials hand-loaded through the narrow doors.  There was certainly express movements from just about every growing area in the US, but there would be found some load within a few hundred miles to get them off on their next trip.

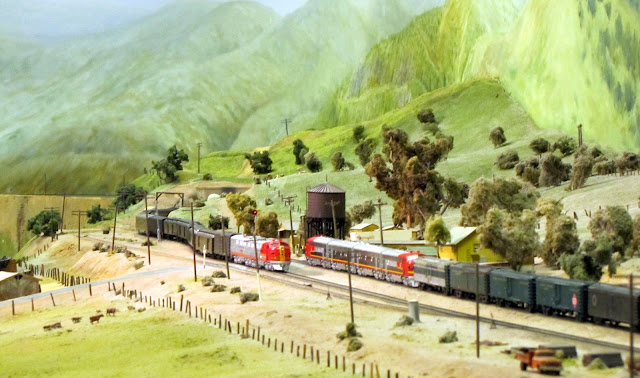
A Santa Fe GP7 leads a string of express reefers through Kern Jct. towards early grape loading at Arvin.  LMRC layout, TT/TO Session "Jan 8,53"

In the photo example above, the majority of the provide cars in this train are REX (REA owned) cars with a couple foreign line reefers at the rear end including a GN steel express reefer ahead of the caboose.  The GN cars could easily be moving apples, black berries, etc around late in the year and then being loaded out of Southern California to pretty much anywhere in the nation, as REA leased cars didn't have to return to their "owner" at the end of each trip.

In Closing


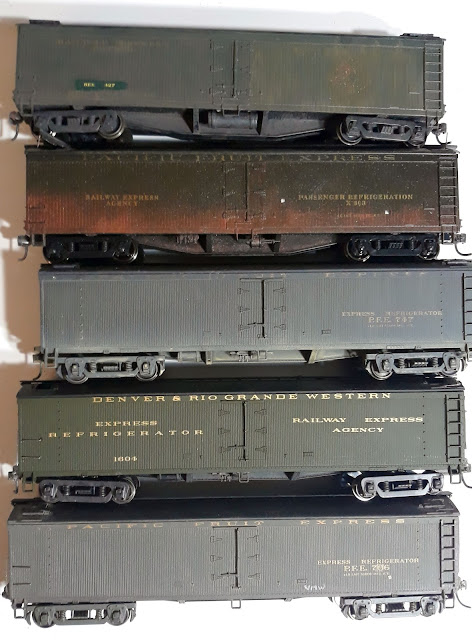
Collection of Athearn (top two: REX 427 & PFE X603), and Walthers (PFE 747, DRGW 1604, PFE 706)

I don't have much more to say in closing.  Probably in a few weeks or maybe next month, I'll be uploading Part 2 covering other railroad's express reefers, such as PFE and SFRD.  Tony Thompson and several other blogs have done articles on Express Reefers, so I'm putting some of those links below.

Jason Hill

Related Articles & Links:


Express Refrigerator Cars - Anthony Thompson blog

PFE Express Reefers, Part 2 - Upgrading PFE wooden express reefers

Thursday, September 22, 2022

X31 & X32 Boxcar (Part 3) - PRR X31F Turtle-Roofs from Boswer

The X31F class boxcars were rebuilt during the early days of WWII with the center portions of the roof raised to allow taller vehicle loading, such as stacking inclined jeeps, etc.  These cars result in a very unique look in a regular freight train.  Nearly 700 cars were rebuilt into this form, they certainly did make their way around the country after the war for a number of years.


According to the 1950 ORER there were still 457 cars in XMR (Note: A & E) service with fixed automobile racks which could be retracted into the roofs in the 81200-81889 series.  In addition, 233 XM (Note: A & G) plain boxcars filled out the 81200-81889 series.  See Notes E and G for exact car numbers for which AAR class car desired.  This series filled number range, to-the-car, at the end of the X31A series below and butted right against the X41A series above.

PRR 81205 - XM (Plain boxcar)


PRR 81205, earlier Bowser X31F "Turtle Roof" boxcar, painted for general service

One of my older X31F kits built up as a general service boxcar.  The lettering for the "PENNSYLVANIA" seems incorrect compared to the 81348 (below) being a bit too large and tall, this seems to be fixed on the newer models.  Decals from National Car Shops/ex-Speedwitch should be able to fix this, but would require repatching the paint before replacing the road name.

PRR 81348 - XMR (Auto-Rack)


My newer swap-meet bought unbuilt kit shows the car stenciled with "Return when empty to PRR Canton Baltimore MD" assignment stencil, which gives the car's home station.  When the car returned to that station, the Freight Agent there would then assign the car to go to an auto assembly plant for loading.  These cars were called "boarded empties" and would be returned directly by fastest route to the named station.  Certain freight symbols were specifically indicated to handle high priority loads and these "boarded" empties to expedite their return for reloading.

Pennsy X31F class "Turtle Roof" automobile boxcar, newer Bowser kit version.

Looking up in the notes, the PRR 81348 shouldn't have the racks fitted, per what the door marking says, in 1950.  However, as the car's tare date shows the stenciled September 1948 date, it's possible the car was still assigned and fitted for automobile service with Evans racks.

B-end of Bowser X31F which needs the brake staff linkage fabricated.

Like the other Bowser kits from this era, I'll be needing to fabricate a brake staff and bell crank for the handbrake.

Underframe with modified air reservoir position on the basic underframe.

Underframe with air reservoir moved and turned 90 degrees from most other non-PRR cars.  I may install some lead strips between the centersills to help the Center-of-Gravity moment on the car.

In Closing


X31F PRR 81209 XM in a string of interchange cars at Kern Jct., Jan 4, 1953 TT/TO Ops LMRC

These cars of mine have provided some variation "Standard steel boxcar" look of the 1950s fleet at LMRC for most of 20-odd years in automobile service and auto-parts service in trains such as Santa Fe's 59, WGFX, and BK symbol freights, and regular transfers to the SP to connect to  the Bay Area from Bakersfield on Altamont West (AW), returning on Altamont East (AE) symbols with auto-parts.  Auto cars in general service showed up in other symbol freights such as: VXE, VXW, NCP, OCM, etc.

The newly built PRR 81348 and another sister X31F kit, yet to be assembled, will be available for service occasionally on the Jawbone Branch.

Jason Hill

Related Articles:

X31 & X32 Boxcars (Part 1) - NP Correction in Era - Correcting Bowser NP X31 & X32 class models.

X31 & X32 Boxcars (Part 2) - PRR X32A from Bowser Kits - Both plain and Evans Automobile cars from Bowser kits.  Also Automobile and Auto-Parts History.

Modeling SP 3266 (Part 2) - More History & Installing Clam-Shell Smoke Stack


Photo of the upper boiler and smoke deflector on SP 3266 which I'm installing in this blog post.

For this post, I'm going to branch out in my skill set, build one of the brass smoke deflector sets, and install it on this model.

An example of the smoke deflector on Sunset T&NO 910, 2-10-2 Deck, obviously a different set of castings.

To show a completed one, I grabbed my Sunset F-5 class Deck (T&NO 910) which has a smoke deflector as my reference for assembling the new brass parts on the SP 3266.

Prototype History


The Jawbone Branch used primarily standard SP C-8/9/10 class 2-8-0s and after about 1949 smaller Mk-2/4 class engines became assigned and specific engine numbers listed in the ETT and Special Instructions Tonnage Ratings. 

SP 3266 near Olancha with excursion in 1952 - Phil Serpico - owensvalleyhistory,com - southern_pacific012_t - Cropped

For a period of time SP 3266 was also listed in the Special Instructions and there's photos of it operating the May,30, 1952 passenger excursion to Owenyo.  On October 28, 1952 the engine was vacated at Bakersfield, and sold for scrap on December 5, 1952 at Los Angeles.  However, on my Jawbone Branch she will run on once I get this model in service!

On With the Smoke Deflector!


Removing Straight Stack


Stack barrel removed with resistance soldering unit.

I used a resistance soldering unit to heat and remove the upper barrel section of the stack to start.  At this point the stack base flange is still soldered to the smokebox barrel.

SP 3266 smokebox top with stack flange removed.

The stack base flange was mostly held by about 1/4 of the diameter soldered at the front.  Heating this area with the resistance soldering probe tweezers worked really well to loosen the flange piece and remove it.

Fitting the New Stack


Mockup assembly of the new smoke deflector pieces.

The smoke deflector is cast as three pieces.  (Spoiler) I ended up cutting off the operating mechanism and attaching it separately to clear the train indicator boxes in the last step.

New stack base soldered in place.

I worked my way around the stack base with the resistance probes heating the stack and smoke box right around the base.  Using the flux liquid and I was able to flow some rosin-core solder into the joint.  I also double checked at this point that this smaller stack centered on the boiler top, and also lengthwise, in line with the cylinder supply pipes and train indicators.

Pencil marks for drilling 0.025" holes in the smokebox shell for the pins on the feet of the front deflector.

The front deflector casting has two legs which rest on the top of the smokebox, each foot of the leg has a pin which I want to mount into a hole, to form a good mechanical joint to the boiler shell.  I used a pencil to draw longitudinal lines at the proper spacing for the brace legs.  The edge of the cleaned brass is where the holes need to be drilled.  I would have liked to clean the smokebox shell farther back under the train indicators, but wasn't able to with the fiberglass brush.  My Dremal mounted the 0.025" drill bit and was easily able to drill through the shell.

Installing the Front Deflector


Top-view of the forward smoke deflector installed.

The front deflector is soldered in place by the two mounts that fit against the stack.  Then I soldered the two pins on the front legs into the holes drilled in the smokebox shell.

Front smoke deflector, all soldered in place.

Train indicators still showing the old engine number, 3244. - Those will eventually be replaced when I get the redecalling and detailing done on the engine.  I used some solder-wick braid to pull excess solder off the support legs.

Installing the Rear Deflector


Rear stack deflector installed.

The rear stack needed a hole drilled in the band of bolts at the rear edge of the smokebox barrel.

View from the other side showing the rear deflector.

  The solder joint at the back edge of the stack are pretty ugly in this photo, but a bit of solder-wick soak up the extra and cleans it up.

View from the front of the deflectors.

I cut off the deflector operating piston mechanism piece as it was fouling the left train indicator box.

Installing the Operating Mechanism


The deflector actuating mechanism installed on the left side of the stack.

I was able to get the piston piece to fit in again after trimming the bottom mounting pin.  A quick hit with the resistance soldering iron fixed it in place.

Smoke stack deflector installed in the open position.

Close-up of the pretty well finished smoke deflector installed.

Sanding Rods?


Stack installed on Balboa Mk-5/6 class model.

Stack in place on the engine, needing to work on the cab decals.  Note: the flaking of the paint on the eccentric radius rod.

The radius rod after light sanding with moderate grit sanding pad.

After touching up the black paint on the model and painting the drivers, the radius rods started flaking off the paint almost immediately.  To give the surface more "tooth" for the paint to stick to, I sanded it with a moderate sanding pad.  This is a photo after that is done.  When I go back and touch up the rod's steel color this should all be wrapped up.

In Closing


Decalling the cab side with San Juan Decals lettering gray SP steam set.

So, since this photo, I've started putting the cab decals on, starting with the road number.  An Athearn-Genesis 120-C-6 tender is ready to go and decalled to match.  At this point, I've not completed the drilling of the hole in the front of the tender frame to accept the Balboa drawbar with screw.  The motor currently is disconnected from the tender drawbar due to damage to the rear engine frame, which I'll be showing how I fixed it in the next part.

Left side of SP 3266 at present time.

Given how easily I was able to drill through the smokebox barrel, I might actually decide to drill and mount eye-bolts for bell and whistle cords.  I'm planning to fit the engine for crew figures.  The train indicators will have a strip of material put in place to make the decalling easier.  The train indicators will probably be set up as "X3266" as the 3266 would be running as an extra on the Jawbone Branch basically exclusively.  

Better focused photo of the upper boiler and smoke deflector on SP 3266.

There's still some brush marks on the smokebox from some previous owner, so I might do some tight spot sanding/fiberglass brush work to smooth that out before doing my touch-up work from installing the stack deflectors.

Right side of SP 3266 at present time.

Eventually, after all the other work, I'll be weathering the engine to some extent to match the first 3266 that I worked on a couple years ago.

Jason Hill

Related Articles:


Modeling SP 3266 (Part 1) - History & Fixing Frame Damage - History of Mk-6, SP 3266 & resoldering rear frame failed solder joints.