Sunday, December 31, 2023

Happy New Year 2024, Highlights of Modeling in 2023

 
Minor photoshopped picture from January 2018 LMRC 'Winter on Tehachapi' TT/TO session.

I want some of my favorite articles of 2023, and those articles which you all voted for by viewing the most.

Most Viewed in 2023


1st Place with 435 Views

Open Loads (Part 7) - Shifted Lumber Loads - This article heralded the introduction of the new OwlMtModels Modular Lumber Loads in October.

2nd Place with 429 Views

Routing & Grading Cards with OwlMtModels 1220 Decals - The kitbash of this Fowler boxcar was also one of my personal modeling highlights for 2023 as well as 2nd place in Views.  Because this model was over a year waiting for decals and finishing the model, it received multiple posts of the build, so in some ways this project should be one of the highest views.  I think the finished model matches up with the prototype photograph well.  

3rd Place with 372 Views

Lumber Load in Gondola - SP 160522 - MDC Kitbash - This has been a fun project which keeps giving.  I started the kitbash about 20 years ago, but 2023 brought a custom load for this car... with a twist.


4th Place with 348 Views

Chalk Marks - A New Method - This article was fun to break my skill set and try a new method to make chalk marks. - I expect to do an update on this topic soon, as I found some other ways to change the end result!

5th Place with 301 Views

SP Jawbone Branch (Part 39) - A Ferro-Equestrian Archaeology Field Trip - This was also one of my personal highlights for 2023, as it was a trip that I've wanted to do for several years.  It also kicked me into working more on the structures for Owenyo and by extension the Jawbone Branch project.

My Favorites of 2023

Personal 1st Place

Routing & Grading Cards with OwlMtModels 1220 Decals  The kitbash of this Fowler boxcar was also one of my personal modeling highlights for 2023 as well as 2nd place in Views.I think the finished model matches up with the prototype photograph well.

NC&StL 15337 - Fowler -TRRA photo, East St Louis, July 1948, Illinois, Joe Collias coll, Bobs Photo - Ted Culotta collection

Because this model was in the shop for over a year waiting for decals and finishing the model, it received multiple posts of the build, so in some ways this project should be one of the highest views. I actually started mocking the car up in late 2019! 


NC&StL 15337 (Part 3) - Wrapping Up & Weathering - Other articles on this Accurail 36ft Fowler kitbash are linked at the end of Part 3 article.


I enjoyed going to Portland this year to see all the RPM crew up in the Pacific Northwest.


October 2023 was crazy for me, wrapping up the month in Bakersfield and reconnecting with old friends for the first time since my last visit to SPHTS Conventions in 2018.

What's Next on the Line-Up for 2024?


Admittedly I'm focusing most of my modeling on aspects of the Jawbone Branch project... so that will be a main focus for the upcoming year of projects and posts.

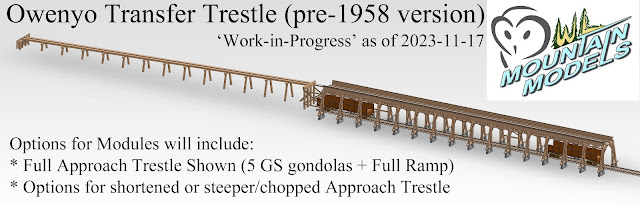
Jawbone Branch - Owenyo Modules to Sparks/Reno Convention?
SP 3203 at Owenyo with UP steel-sheathed composite gondola. Eddie Sims collection

I'm hoping to get to work more on the Jawbone Branch in 2024, specifically focusing more on the scenery, track work, and structures at Owenyo, with the possible goal of having the three modules with some 'whisker' leads able to be displayed at the upcoming SPH&TS Convention in Reno/Sparks, October 2024.  It would be great fun to play with some switching (think Operations Road-Show style) with friends at the convention.
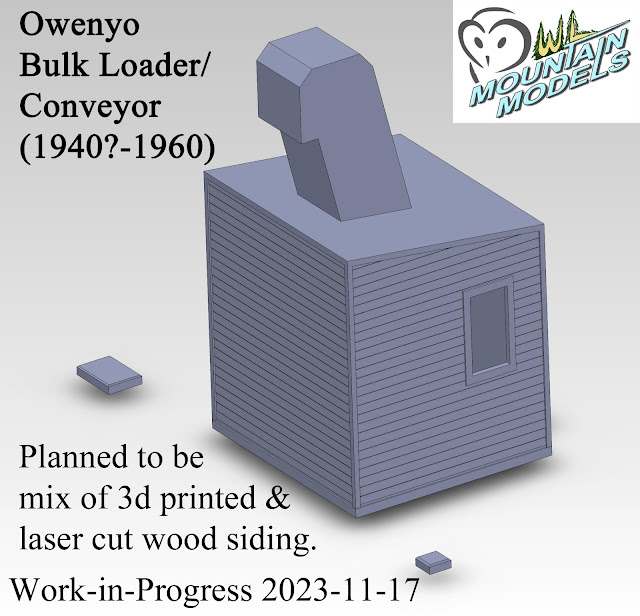
Owenyo Buildings

If I really plan to take the Owenyo modules as a working layout to Sparks Reno... then I'm going to be pushing to get some of the big signature structures built.  Wiring will have to be moved up the priority list to get the layout working.  I'm also looking at making some new switch point bars and moving the ground throws over for more track clearances... and some basic scenery, which I've only done some testing of painting the ties so far.

UP GS Gondola
UP Steel Gondola - Owenyo Trestle - SG side - unknown calender photo, circa 1951 - Ronald Grau collection (cropped to show only foreign gondolas)

A linked project is the foreign GS gondolas showing up at Owenyo for mineral loading, so a project already in the works is my heavy kitbash of the UP ex-composite GS gondola.  So I hope to get this model wrapped up this year.  Previous posts on this model are: UP Steel Re-sheath Gondola (Part 1) and Modeling UP Gondola (Part 2) - Re-sanding & Painting.

SP B-50-28 Post-war Boxcar
The first Tangent B-50-28 that I picked up to review, which will probably get a renumber soon!

Another linked modeling project will by my hope to be doing some more modeling with the Tangent B-50-28s for Owenyo, along with some weathering on a nearly new car.

In Closing


I want to close this post with a thank you to all of you out there in the community who are supporting the NightOwlModeler blog and engage in communications to help the community grow.  As for other future posts, I'm sure that other topics and surprise topics will come up in 2024 and I'll write on those.

Jason Hill

Related Articles:

New Year 2019

Friday, December 1, 2023

Modeling UP Gondola (Part 2) - Re-sanding & Painting

I left off on this project in 2021, when I had filled in the board grooves on the side of the car around the ribs to replicate the replacement steel siding.

UP Steel Gondola - Owenyo Trestle - SG side - unknown calender photo, circa 1951 - Ronald Grau collection (cropped to show only foreign gondolas)

Here's a new photo from 1951, with a freshly resheathed UP ex-composite gondola.  Oddly this photo also shows a D&RGW steel gondola, I'm not sure why there's a Rio Grande car at Owenyo.  One thought is that they were shipping in coal from UP and D&RGW, but then they probably would have had to be unloaded by hand across into the NG cars.  Another thought would be if they were empties from somewhere else, like Monolith or LA, and then planned to be reloaded for movement towards home.

Continuing Work on Red Caboose Model


See my previous post: UP Steel Resheath Gondola (Part 1).  I also sanded the interior walls to remove the board details.  The next step is to shoot some primer color over the body and see how the new side finish looks.

Steel sheathing of UP ex-composite GS gondola

I "witness coat" of light FCR StarBrand paint used to check how the fill has been done on the body.

Other side of Steel Sheathing of UP ex-composite GS gondola

This sanding work is done with the tip of a narrow sanding stick over the Squadron White putty.  Since these photos, 

Sanded & Primed Interior Steel Sheathing

I've picked up some Tamiya liquid putty, which I look forward to using on projects like this in the future.

Other side - Sanded & Primed Interior Steel Sheathing

One of the challenges of this new car, is that these cars I believe should have flat-plate drop doors, which I'll have to deal with making.  I probably won't modify the bottom of the doors, as it will not be seen on my layout when it's completed.

Underframe primed with lightened SP/UP FCR

I went ahead and primed/painted the underside of the main body at this point.  

Second Round of Sanding

Left side of UP Steel Sheathed Gondola

At this point I went through a exhaustive round of detail sanding to get the 'steel' sides heet sections smoother than the 1st time.Some sections still show brown pain in the lines between the old boards.

Right Side of UP Steel Sheathed Gondola

By this point, I've sanded down to the tops of the original board level and even into that slightly.  The goal is to get everything smoothed out.  I don't mind a few 'wrinkles', as the prototype steel sheathing can have some ripples and dings from various loads being dropped into the car over the years, although I'm modeling in the period of only a couple of years after the steel sides were installed.

What's the Final Coat of Paint Going to Be?


Now it's time to give the body another try at a witness coat, and if it's good it will also become the body paint for the finished car.  This UP car will get special 3d printed ends, so I'm not too worried about building the body up at this point.  Also some weight materials are on their way to me.  So soon I'll be able to assemble the body and put the extra weights into the floor.  The floor with plate doors may need to be 3d printed as well. 
 
The other UP cars I have are a lighter orange-ish shade of FCR than the stock SP/UP FCR from StarBrand.  As I'm also working on some PRR X29s right now as well, which need paint I'll probably mix SP/UP FCR with some Daylight Orange and see if I can get a 3/4 match towards the lighter color to give some variety in my fleet.

Standard Steel UP G-50-13, built 1951 showing the lighter orange-ish FCR from Red Caboose.

We'll see how that goes.  Until I get around to really super-kitbashing the composite side UP gondola, I may just build up one of the UP steel gondola kits that I have as a stand-in model.

In Closing


Here's the photo from the original post that sucked me in.  I believe this may actually be the same day, as both photos have lineage back to the collection of Ronald Grau.  I'm looking forward to pushing this car forward a bit more as I get back to building the Transfer Trestle over this winter.

SP 3203 at Owenyo with UP steel-sheathed composite gondola. Eddie Sims collection

After looking at the prototype photo again, I might stay a bit closer to the original UP/SP FCR StarBrand color, and plan to do light dust weathering, with maybe only a small amount of orange in the mix.

Jason Hill

Related Articles:


UP Steel Re-sheath Gondola (Part 1) - Blanking Composite Sides on RC gondola. (My first post on this series)

Utahrails net Info on UP G-50-11 Gondolas - Researched by Dick Harley circa 2017
Built Feb-March 1943
UP 64000-64999 composite, LT WT 49300 lbs
July 1947 UP Lettering from White to Yellow.
1950-1951 convert to steel sheathing, LT WT 51800 lbs
One-Inch reporting mark bars removed Nov 1952.
"Be Careful" Slogan added in June 1953

Notes: My model should be Yellow lettering, with bars and without slogan for as-rebuilt version.  The new photo near the Trestle shows that the car in question still has the bars over and under the lettering.

UPHS org Info on Lettering Drawings for UP cars - G-50-11, and others 

Dick Harley's UP Smugmug page has some useful information as well.


Decals by National Scale Car 
https://nationalscalecar.com/product/d160-union-pacific-g-50-11-13-14-gs-gondolas/ - Probably better than the Tichy set I bought so far... I'm probably going to get a set of the NSC decals soon to actually finish this car with.

Friday, November 17, 2023

New Series of Structures from OwlMtModels Under Development

Just a quick cross-post from OwlMtModelsNews Blog Page

Owl Mountain Models is working on several fun projects which have been behind closed curtains until now.  The Owenyo structures which we need for the demo/photography layout will be made available in very limited production to meet reservations, which are open as of 2023-11-17.  No down-payment will be required, as we're still early in development of the CAD models.  Both HO and S-scale versions are planned to be offered.  Price is currently TBD until designs are finalized and we get quote from 3d printer.


Researching this structure has required many hours studying photos, aerial photos, and modern archaeological measurements.  We want to produce the best kits, balancing details and final finish looks.  This results in currently planning that the upper boards will be stain-able strip-wood, while the bents and lower structural members will be 3d printed with NBW details already in place.  Basic wood-effects should be pretty easily added to the 3d printed resin parts, like the finishing on our plastic lumber loads.


The full length of the trestle with NG approach from level grade over the SG Tell-Tales is over 7 feet long!  That's why we'll be offering the trestle as modular pieces, so that it can be fit onto smaller layouts.  The OwlMtModels photo-demo layout trestle will be shortened to only 4-GS gondolas for the dump section and most of the Approach Trestle will be truncated into the backdrop wall.

High-angle view of the dumping section of the trestle.

Jason's been working hard looking at all the photos he can to check for the details.  The CAD allows all the pieces to be worked out in 3d, resolving and solving questions about the prototype photos, which he's not seen solved in previously published drawings. Hopefully, this will be the best researched model of the Transfer Trestle yet produced.  Research is still continuing in 2023.

Water Tank


Rough CAD rendering 2023-11-17, subject to redesign and detailing.

The water tank at Owenyo was moved from Diaz in 1952 according to the Employe Timetable station ans services list.  There's still much more to add to this CAD model, but it will make an amazing little tank for any small engine facility.  The footing should be about 2.5" diameter and estimating about 4" tall for HO scale.

Bulk Loader/Conveyor Shed


Partly drawn as of 2023-11-17 work-in-progress

Another structure which is researched from many photos and modern archaeological research of remains.  This structure will also make a great little loader for boxcars or covered hoppers on any small layout, for those not modeling Owenyo specifically.

Pump Houses


We have some research on the Water Pump House and photos, which should allow a model to be produced.  As of 2023-11-17, Jason hasn't started the drawings for this structure.  The Fuel Oil Pump House will also be made, but research is minimal at the current time, and the CAD model has not been started at this time.

Reservations Contact


Currently, two customers have expressed interest in kits for these parts.  Please show your support by contacting sales@OwlMtModels.com to submit reservation, specifications of what size and scale is desired.

- End Cross-posted Article - 

Jason Hill - OwlMtModels

Tuesday, November 7, 2023

Open Loads (Part 10) - Athearn 40ft Flat with OMM 3002 Lumber Load


Time to upgrade my old Athearn 40ft flatcar with a new 3002 OwlMtModels Lumber Load!

Many years ago I upgraded an Athearn 40ft flatcar and recently I wanted to put a nice lumber load on it from OwlMtModels' new "Short-Wide" series.  While some of my previous Open Load posts have covered more unique loads, this time I want to cover a more 'classic' load, but with it's own twists.

The Flat Car


Originally, the Athearn flatcar I used was one that had some holes in the deck to attach the plastic blocking for the cabin cruiser boat from Athearn.  The old load supports were simply removed from the car by un-snapping it.

New 'Old" Deck


When I upgraded the car with scratch-built deck from strip-wood sticks.  I also cut-down the plastic deck of the car, even with the steel sides.  The SP's 40ft 1949-built F-50-16, which this car was a stand-in for had overhanging deck boards, which were even with the outer edge of the stake pockets.  The deck was cut back around the stirrup and grab-irons around the car's end, so likewise my deck is notched back.

I also fitted the car many years ago with some scrap wood stakes and also glued a piece to the deck to represent some bit of left over dunnage and blocking nailed to the deck.  Thankfully, it's close to the brake wheel end of the car, so it stays out of the way of the upcoming load I will build for the car.  I can always pull out the two wooden stakes if I want to.

Repainting


The next step was to repaint and then decal the model, I believe I used either Floquil FCR or suitable acrylic paint, I honestly don't remember 25-odd years ago when I did it.  I think the decals I used were a mix of MicroScale 87-911 for the road number, and weight data. and probably the "SOUTHERN PACIFIC" in small font from the old MicroScale SPMW decal set.

Weathering


I weathered the car overall with a dark gray road-grime coat, including over the reporting marks.  I probably would have done more 'clerk wiping' of a rag over the road number to keep it more legible.  The car must have had several bad trips in a row to be this dirty in only 1-2 years given that I now claim to model 1949-1953, and the car was new in 1949!

SP 140195 stand-in Athearn car for SP F-50-16 class car, built in 1949, set up as idler car for over-length gondola load.

In this condition I had the car in service at LMRC for about 20 odd years.  The only real damage was the plastic Tichy brake wheel was broken when I brought the car home.  While it was not accurate for the SP's prototype 40ft F-50-16s, this car acts as a stand-in.  Note that I've posted an article on kitbashing a more accurate car from Red Caboose F-70-7 kit SP 140234 (Part 1) - Kitbash RC F-50-16 from F-70-7

The Lumber Load


The new OwlMtModels 3002 "Short-Wide" Modular Lumber Load kit is slightly shorter than the 3001 kit from 2015, are ideal to build a load for this car. 

I decided to do a 'messier' load than some of the ones I've built before.  That is a load which isn't exactly stacked cleanly on the length of the car.  Instead I want the upper units of lumber to have shifted and started to impacted into the adjacent stack, but not so much that the boards are damaged or the stakes being broken.

Other end showing.

This load can be shifted around in and out one stake pocket on this car to get more separation between the load.  When close-fitted on the car, the load has started to shift towards the far end, so the train crews should probably keep an eye on this car!

The random-end lumber loads

One of the fun parts of the OwlMtModels lumber load is the busy look of the 'random ends' of the lumber stacks.  This end-view also gives a good angle to see that on this load I left the lateral wooden bracing about 3-4" above the main part of the load.  The longitudinal board bracing was also done with some shorter fragments.  Either to simulate repairs or the original shipper not having enough of the length that they would have ideally had to match AAR standards.  There is photo evidence of some prototype cars being even more jury-rigged than this car!

I'm still working on making my loads with "wonky enough" bracing to match the photos I've seen.  So I've actually been sticking "to the book" more than some loads had.  Although, to be fair many single-car/load photos were actually to document something wrong, so maybe those photos were documenting the poorly braced loads.  So there's always room to critic your work and look for ways to make it more prototypical.

Wood-Color


The final color adjustments was made with Apple Barrel 21186E Golden Sunset, and then a wash of darker gray-brown. to make more accent to the board edges, etc.  

I did some wash on the lumber load to make it more orange.

I like this combination of coloring and accenting wash.  This load is also a fun one to swap around to change the look of it.  If a group of 2-3 loads are finished at the same time, then the stacks could be shuffled between cars, and not kept as a 'set' for a single car, which would obviously vastly increase the lumber of combinations that could be seen on consecutive load/empty cycles.

In Closing


This has been a good old reliable flatcar from 'old school' model railroading with classic tooling.  With a little bit of work, they can be brought up to fairly modern standards and the addition of the modern load brings it in-line with my other examples in my flatcar fleet.

Jason Hill

Related Articles:


SP 140234 (Part 1) - Kitbash RC F-50-16 from F-70-7 - Kitbashing a more accurate F-50-16 flatcar.

Open Loads (Part 8) - Modeling High-Tension Steel... - How to use Chart Tape for Steel Banding.

Open Loads (Part 7) - Shifted Lumber Loads - Modeling unique loads which have shifted in transit.

Thursday, November 2, 2023

SPH&TS 2023 Convention at Bakersfield


Need to cool off and kill 90 minutes?  Stop in at the "Tehachapi Loop" at Walong Siding's over-view.

Driving from Nevada down to Bakersfield was nice, but I stopped for a bit at the Loop because I was actually running ahead of schedule.  It was great to get out of the toasty car and cool off in the stiff breeze which regularly flows over the Tehachapi mountains.  The day was pretty clear and in the 70F range, which was extremely pleasant.  After about 20 minutes, it was back to the road again and following the back roads down into Bakersfield to Kern Jct.  Then over to the Santa Fe on Truxtun Ave to Oak, and up to the Double Tree, which was the convention hotel.

Vendor Room & OwlMtModels Table


The afternoon was filled with registration and setting up for the convention.  I enjoyed the clinic given by Mike McGinley on the SPMW, which was very interesting to hear his experiences 'working on the railroad.' 

OwlMtModels Table at 2023 SPHTS Convention.

Much of the rest of my time was spent in the Vendor Room chatting with all the fellow modelers and SP aficionados, something I've missed over the last 4 years not being able to attend the convention since 2018.

Tony Thompson's photo of the Vendor room with me surrounded in the middle - linked from his blog covering the SPH&TS 2023 Convention.

The vendor room was pretty full, and was quite busy at times with the 140 attendees to the convention.  The room also became quite loud at times with all the conversations!  Ah good times.  My throat felt this for the next couple of days after the meet, but it was certainly worth the later discomfort!

San Luis Obispo Roundhouse


San Luis Obispo Roundhouse by Bob Schrempp of Prawn Designs, LLC.

A very impressive work-in-progress is this SLO Roundhouse model in HO-scale.  There was an accompanying note book full of photos and research materials on the table with it.  It will be very nice to see this model completed!

1:1 Scale Headlight!


Very nice Pyle Sunbeam Headlight made by PLA 3d Print by Peter Savoy

Peter Savoy made this very nice full-size replica of a classic SP headlight and smokebox front mounting bracket made from PLA plastic, a form of 3d printing larger items.  I first saw this model at the RPM in Reno earlier in 2023, so great to see it again here!

Dismantled for transport!

I was able to snap another photo when he'd disassembled it for transporting after the show.  It certainly looks nice when it's all put together at the shows!

Saturday - RPM Room


Beautiful PNW Resin Boxcars in the RPM Room by Gary Laakso


I'm impressed with Gary Laakso's very nicely finished resin boxcars, mostly from the GN and NP, which I harbor some interest in modeling from the interchange perspective with the SP's lumber trains.  While I don't believe any of these are interesting truss-rod steel cars that lasted well into the 1940s and maybe even early 1950s, they certainly are great examples of cars from these roads!

Westerfield, I guess 40ft USRA Double-sheath

Classic double sheathed boxcars from the early 20th Century, very nicely molded with the late side-view goat herald.

Westerfield, I guess 40ft USRA Double-sheath

A slightly earlier car with the more front-facing Mountain Goat herald.  Also notice the interesting Andrews-style trucks under these two cars.

GN 50ft door-and-half car from Westerfield

While not a full double-door car, this is a more proper example of the correct bracing on a GN 50ft single-sheath car.  Unlike my Walthers DD stand-in cars I talked about last month.

NP 36ft fishbelly side-sill from Westerfield

Interesting that the NP still had these cars wandering around, while similar to the SP's earlier B-50-series cars with the pressed-steel fish-belly side sills, but with NP's classic radial roof.  The car also has the interesting trucks, I wonder if these are the NP-style trucks from Tahoe Model Works?

Westerfield 36ft Southern DS boxcar.

While from the other end of the country, these 36 Southern boxcars are certainly interesting.

SP&S Double-Sheath from Westerfield

And not to be outdone by the other bigger roads, here's a very nice SP&S boxcar with periods, suggesting pre-1931 era lettering.

Dave Maffei's Beets & Lumber Loads!


Dave took up two tables with his wonderful 1960-1970s SP freight train consists.

Seeing Dave again after the Bridgetown Meet and BAPM meets earlier this year was a treat!

Dave's done a couple clinics on the beets in the SP's extended side (post-1957) "Beet Racks".

The "Beet Racks" continued the legacy of calling them "Racks" from the Blackburn Racks 70 years earlier.  Basically, he's modeling what I do, but about 20 years newer in era!

Golden Empire Visit


Beautiful scratch-built Ice Machines on the Golden Empire HO-layout.

I also made a detour Sunday morning to visit the Golden Empire HO-scale club in Bakersfield.  They had a couple of very nice scratch-built Mechanical Ice Deck Machines on their Santa Fe style Ice-Deck.


Dave Maffei caught a short video of our trains meeting.  I put together a train with many of the OwlMtModels Lumber Loads on it, which turned into quite the sight rolling along behind a double heading "Hog" and "Deck."  Thanks to the guys at the Golden Empire club for hosting the running session on Sunday!

In Closing


In general, the trip to visit the SPH&TS Convention in Bakersfield was great fun, and a wonderful chance to visit with friends who I've not seen since the last convention I attended in 2018.  An additional bonus was stopping on the way home at Owenyo to wander through the remains of the SP transfer station with the narrow gauge.  I posted about that experience in my SP Jawbone Branch (Part 39) post.

Jason Hill

Related Articles:


SP Jawbone Branch (Part 39) - A Ferro-Equestrian Archaeology Field Trip - Messing around in the back country of Iyon County to get more first-hand research for my layout construction.

A Month Away - Modeling on the Road - My visit to the SPH&TS 2016 Convention in Palm Springs, CA.

Wednesday, November 1, 2023

SP Jawbone Branch (Part 39) - A Ferro-Equestrian Archaeology Field Trip

A friend of mine said a number of years ago that he was a ferro-equestrian archaeologist.  That is a study of iron horse historical places and remains.  This post is another of my small ventures to one of the places where the ferro-equestrians once roamed.

Looking east to the mountains which will be my backdrop for Owenyo

So on the return from the Southern Pacific Historical & Technical Society 2023 Convention in Bakersfield, I decided to stop over in Lone Pine and then drive up the east side, stopping at Owenyo to do some in-person research of what remains of the buildings.  This would give me the chance to make drawings of the remains to build the models for my Jawbone Branch layout.

Edit 2023-11-02
Blueprint of Owenyo - rick olson 01_owenyo blueprint_sml owensvalleyhistory,com

A recent find on the owensvalleyhistory.com website, helps see the locations of everything.  I'm happy I found this Nov 2, 2023, as I'll be able to help scale out the size of the buildings and some of the placement.  The original date is from Dec 31, 1923 and the revision date for the leasing of three structures is July 19, 1940.  The 1923/1940 dates explain why I don't see the water tank or the transfer ramp between the two gauges in the lower right corner.  Also interesting is the "To San Francisco to the left and Hazen to the right, so it must be SG to SF left and NG to Hazen right - perhaps because they're thinking to extend the standard gauge?

Transfer Trestle


Owenyo Trestle - SG side - unknown calander photo - Ronald Grau collection

I spotted the abutment remains from the road and pulled off.  Walking over, I found that the NG and SG around the area were actually on a bit of a fill.  Even the trestle approach grade was rather in a pit as well, probably from the old days when they dug down to get some more solid ground to put the trestle bents on.

Sadly, not much left of the transfer trestle other than these footings, looking northward.

I took some time getting out and measuring the dimensions of the foundations.  This should be the last piece of information, which should allow me to build an accurate model of the trestle for my layout.

The footings looking south, into the sun.

The SG track's pit has collapsed somewhat, as the transition from the grade to the trestle over the SG track has sluffed into the pit.  Although there must be some level of washing out the lower parts of the pit, because on a couple of the concrete footings for the trestle, even the connecting concrete is visible.  I think this means that the floor is about a foot lower than it historically was.

Owenyo Transfer Trestle - owensvalleyhistory,com - sp_narrow_g37a_sml

Looking at the above photo, shows that at the time it was taken, the wood bases of the legs are even with the ground, which means that concrete footings are completely buried.  The concrete footing bases seems to then be flush with the ground in the pit.  I'll be analyzing this more and covering the results in future posts.

Tell-Tail 


Tell-Tail from 1954 - cropped - unknown calendar photo - Ronald Grau collection

With any vertical or horizontal obstruction the railroad had to put tell-tails to warn anyone riding on top of the cars that there was a problem if they stayed standing. - To my eye, I think this tell-tail isn't low enough to provide proper warning, but the ETT warns specifically about not shoving boxcars, etc onto this track.

The remains of the foundation for the tell-tails.

All that's left today is three and a half concrete blocks with rusting torched off pipes for the tell-tail.

Old Owenyo Road


60-10-Goods-Transfer-Platform-_sg-on-far-side__-Owenyo-V_2 - PacificNG

The old turn-off from the road into the area behind the Narrow Gauge still has remains of the old 'oiled dirt', which is still sticking together even after 65+ years in the desert.  

Owenyo transfer decks with road crossing looking north - owensvalleyhistory,com - ebay35_owenyo_sml - (Lightened)

As I pull up and park, the footings of the water tank are visible immediately off to my right, and a set of foundations to my left catch my eye.

Bulk-Transfer Conveyor


OWRN boxcar Owenyo Perlite Transfer from SPNG, SPMW water cars, Sept 19, 1950 - owensvalleyhistory,com - mark_van_klaveren04_sml

The transfer facilities at Owenyo include this bulk-conveyor at the south end of the main area.

Remains of the conveyor as it was dismantled in 1960. - Rich McCutchan owensvalleyhistory,com - daton01_t

Sadly, the end came for the conveyor in this 1960 view of the whole facility being destroyed.

Owenyo Conveyor Foundation - NW Side

Now, all of the foundations that remains of the bulk-transfer conveyor building.  Thankfully these cast concrete bits are still there!  I spent some time making drawings of this to base my model on.

Water Tank


Water Tank - Owenyo station with tank and 5501 RSD-5 - Andrew Brandon collection - Cropped

Turning towards the water tank and heading that way, to my surprise I find several other things in the area.  

Tank foundation remains at Owenyo

A couple of plugged concrete slabs, with what looks like remains of underground piping - perhaps part of the pump house-water tank or connection to the long gone SPMW water tank cars. 

Water Pump House


Owenyo SG water Tank - 1960 - Alden Armstrong - Cropped - 

The foundations of the pump house are there as well.  Thankfully, I think I can work out the base for my model now.  Looking in the foreground, left-front of the pump house tower shows the cistern that is still there today.

Water Pump House foundation remains

Also there is a large cistern which is half covered by a mound of dirt... almost in the road, where it crossed the yard.  I'm not sure if that was there 65 years ago, or if it was more recent.  There's an open cover about 12" in diameter, and the sounds of hollow space below.  I stayed clear of it, as I didn't want to find myself down a well or the like.

Company Houses?


1944 Fairchild Aerial photo - cropped

After the pump house, I decided to walk up past the company buildings and see if I could locate anything of their footings... however with very large bushes overgrowing the whole area, I decided not to look very hard.

Oil Pump House


Fuel Pump House & Tanks - Cropped Owenyo Hotel decom - Rich McCutchan - owensvalleyhistory - c_n_c40_owenyo_1960_859_sml

Next up, as I was walking to the north, I decided to continue and see if I could locate any of the old engine spot remains, and maybe get more information on the oil tanks and pump house located on the north curve of the wye.

Engine Spot remains.

I was able to find a very thick slab of oil-dirt or asphalt covering between the long-gone rails, but still covering the ties, which is where the steam engines sat 100 years ago, dripping steam oil and grease for nearly 40 years.

Engine Spot - end of track crossed-ties?

It seems that at some point the SP gave up on the wye, probably after the end of steam on the branch, I'm guessing around 1956-1960.

Remains of the Oil Pump House - Not much left of the tank structures.

There were a couple of small foundations and other patches of asphalt/oiled-dirt, but not anything that I could really recognize as anything of what the photos once showed there.

In Closing & The Long Trip Back


After about 2 hours looking around, I decided it was time to get going.  I quickly set up my tripod and shot a series of photos of the White Mountain range to the east for when I go to make the backdrop.  Then I hopped in the car to get going.  In hind-sight, I should have returned down to CA-136, and back to US 395 at Lone Pine, but feeling adventurous I continued north. 

Who says there's no water in the desert? Manzanar Road 2023-10-30 closed!

The Manzanar Road was closed due to flooding, so it forced me to continue on for another 5-6 miles of worse dirt road and old railroad right-of-way. Unfortunately, the heavy winter of 2022-2023 which kept snow on the ground for over 90 days at our house in Nevada, also did a number on these back country trails as well.

I would not recommend trying to drive the north-side access drive in anything other than a Jeep or 4-wheel pickup truck (which I happened to leave in NV!).  I did get through it, however with some new pin-striping and nearly getting stuck in soft sand about 5 times.  At approximately 4-5 places my vehicle found high rocks or badly worn tire tracks which could have high-centered lesser cars.  At one point the road was not passable to my vehicle, due to a fast rising trail of nearly 8", which would laterally high-center me.  This  requiring me to back out about 400 ft, turn around and then back track another 1/4-1/2 mile, then break trail across to the other road, about 50 yards away.  

Once I was able to get onto good road again at Citrus Rd, the rest of the drive back west to US 395 at Independence was without incident.

Jason Hill

Related Articles:


SP Jawbone Branch (Part 26) - Engine Spot & Water Track Detailing

Jawbone Branch Index Page - Main index for my Jawbone Branch (only) blog page.