Time for a "catch-up" post on how the Jawbone Branch is coming along. East Owenyo is coming right along.
Yes, I've been laying the switches and spiking them in place. I need to do a little more final spiking here and there, but the track's all in gauge now and the cars can roll through the spiked over switch throw bars.
 |
| Here's a low view of the east Owenyo switches before I put in the points and closure rails. |
Here's about how the east end of Owenyo looked at the end of Part 23, where I started to cover the switch components and laying out the ties. The stock rails are in place, setting up the frame work for the closure rails and points to be put in place.
Points & Throw-Bars
Following LMRC standard, we cut out the roadbed which will be covered by the throw-bar. This is nice to do so the 1/4" long 00-90 screws can just be fed through the throw-bar and not foul the movement of the switch on the roadbed.
 |
| Dremal out the area between the rails, headblock and 1st tie. |
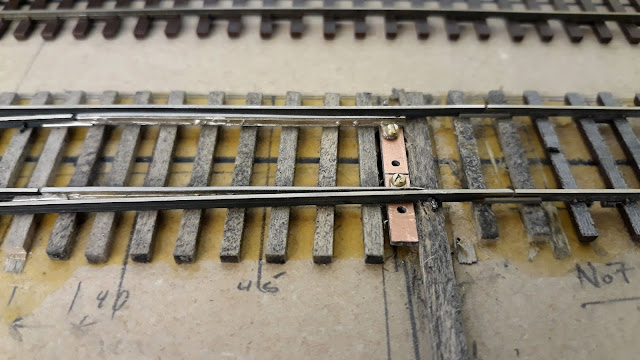
I'm using some temporary throw-bars, and plan to have some new ones CNC'd soon. Some how my drawing from 8 years ago changed and we drilled the new batch with the holes in the wrong spot... Oops! So, time to triple measure this time before making powder.
 |
| A close-up view of the switch points and a temporary throw-bar made from PC board. |
These are proof's I hand drilled the holes and changed to club standard 00-90 screw thread. I don't know why, but the new DTW instructions say to use 0-80 screws and give tap drill info to do that. The 0-80s I could find have WAY too high and wide of heads to work.
Point Drill Jig
 |
| I made a jig out of scrap MDF to drill the throw-bar clearance screw holes. |
The points all need to be drilled for the 00-90 screws. While the white-brass point castings are stronger than the white metal guards, I feel that the support of the wood strips will keep them from the risk of getting bent or catching on the drill bit, spinning out of my grasp as the bit breaks through.
Switch Progress
 |
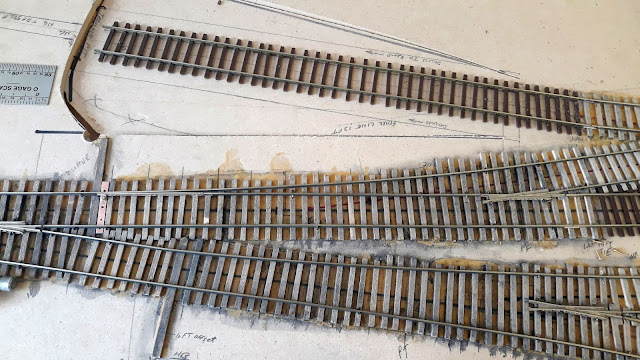
| The switches are now pretty much done, alignment-wise. |
A high-angle shot of the east switch complex at Owenyo. All the points are in, closure rails. I'm still working on the exact method I'll be using for the switch mechanism. The LMRC club uses PFM switch machines, long out-of-production. So I'm looking at basic manual-mechanical options with a micro switch for the frog contact. I'll probably build a couple mock-ups to test and standardize my design before doing any modifications to the layout structure.
 |
| Here's a part-way progress view of the closure rails, points and throw-bars going in. |
Hopefully this photo will show better the details as I was laying the closure rails and points in. This process actually went very fast. I think I did the whole east end in one longer evening. I stopped just short of doing the switch the transfer pit at the top of this photo.
SG-NG Equipment Transfer Ramp/Pit Switch
 |
| SG switch to the end-to-end SG-NG equipment transfer ramp/pit. |
That switch and adjusting the alignment through the 3/4 right hand No.5 wye switch took a bit of time the next evening to get the gauge right and with a good flow through both routes. Yes, it looks like a standard No.5 RH switch, but the left side is actually also changing alignment to meet the main track at a No.7 alignment and the diverging right hand route is more along the line of a No.6 or so, thus the No.5 frog angle works out. Just west of the headblock is one of the angled transfer platforms, so everything is rather tight here. Selective compression strikes again!
I'll be covering more on this spur in an upcoming post dealing with the NG trestle to get the equipment up on top of the SG flatcars.
I'll be covering more on this spur in an upcoming post dealing with the NG trestle to get the equipment up on top of the SG flatcars.
Switch to House Pocket Stub
 |
| The little stub spur pocket No.5 switch between the "perlite" loader and the stock transfer pen. |
I still need to finish up this No.5 switch off the middle of the house track. This track needed shortening. Somewhere along my early measurements of the room, it showed about 3" longer between the doors. I'm not exactly sure how that error crept in, but I know the wall is about 3" shorter than my original CAD drawings! So I've shortened the spur a bit, and will also want to move the stock transfer platform slightly east and/or shorten it a bit too. This should allow me to move the west switches of Owenyo east enough to account for the shorter space. Changing this switch to a No.5 alignment definitely also helped!
West Wye Switch
 |
| West switch of the Owenyo wye is basically a No.5 frog with a long point alignment. |
The wye's west switch is basically the easement coming out of the 26" radius wye curve, which stretches out the points towards the length of a No.7 switch. I went ahead and installed the DTW white metal guard rails. LMRC standard is to fabricate (bend) up rails and hold them with spikes until they can be tack soldered at the two ends. I'm going to try the DTW guards and see how they hold up. The white metal is very soft.
I drilled holes at each end of the temporary throw-bars and spiked the switches in place, so I can check the operations through that route. I'll have to keep doing this method until I get the switch mechanisms up and working. - Plenty of things still to do!
Next Steps
The next major step will be cleaning the rail sides for about 1/16" to solder the feeder drop wires on. After that, I'll be taking the layout apart, flipping the modules over, and wiring them. Then they will come right-side-up and the painting of the ties with Krylon Almond-color spray paint will start.
I'm planning to paint the ties at a high angle, to hopefully get it to only land on the tops of the ties. Effectively making the whole area look like it has been covered in mud and dust. Then when I do the sifted dirt and "ballast", which was minimal in the yard at Owenyo, should provide a nice match. Detailing to the ties with stains will then bring the fine details. The sides of the rails will probably be weathered with my airbrush.
 |
| Sample flex track painted, checking color against my SP 3259 weathering. |
I'm planning to paint the ties at a high angle, to hopefully get it to only land on the tops of the ties. Effectively making the whole area look like it has been covered in mud and dust. Then when I do the sifted dirt and "ballast", which was minimal in the yard at Owenyo, should provide a nice match. Detailing to the ties with stains will then bring the fine details. The sides of the rails will probably be weathered with my airbrush.
 |
| Owenyo's DMV motor-pool! |
I've decided to pull out a CMW tractor which was painted and decalled by Jim Elliot of the SPH&TS, which he was selling several years ago at the Conventions. I also picked up a couple of (less expensive) Woodland Scenic automobiles. This is a black coup, which I forget what it's trying to be... and the tan coup is close to a '40 Ford. I think I sent my resin 1940 Ford coup to the LMRC's DMV modeling expert... so I don't know if that one will come to the Owenyo Branch or if it will go to the LMRC. No worries. Since this photo, another of the larger coups in a mixed tan color and a black '36 Ford from CMW arrived. I plan to have a few of these HO automobiles around Owenyo and Bartlett's company villages. Little Lake will probably need forced compression down to 1:100 or 1:120 (TT) scale to fit, so I'll need special vehicles specifically for that scene.
In Closing
 |
| SP 3203 with loaner tender during test running. |
Annoyingly, test running the Sunset Models Mk-2/4 SP 3203 around through some of the switches pointed out that this model has VERY tight gauged drivers and pilot/trailing wheels. It will need a substantial amount of effort put into it to fix these issues. Given that I'll need to scratch built the correct tender for the 3203, I'll probably be working on getting SP 3266 or one of my RSD5s running for early operational testing.
Jason Hill
Related Articles:
SP "Jawbone" Branch Index Page - Links to all my blog posts on my new Jawbone Branch layout.
Kitbashing OwlMtModels (Part 4) F-50-Series Deck Weathering - I finally finished up the editing of this video after 13 months! - So these two posts are up on the same day. Videos take 18 hours to upload... ouch!


No comments:
Post a Comment
Please identify yourself at the end of your message. Please keep comments relevant to the post or questions to me directly.
All comments are moderated and must be approved, so give me a bit of time to approve them.
No random solicitation in comments. Spamming and phishing comments will be deleted or not allowed to post.