
 |
| Photo of the upper boiler and smoke deflector on SP 3266 which I'm installing in this blog post. |
For this post, I'm going to branch out in my skill set, build one of the brass smoke deflector sets, and install it on this model.
 |
| An example of the smoke deflector on Sunset T&NO 910, 2-10-2 Deck, obviously a different set of castings. |
To show a completed one, I grabbed my Sunset F-5 class Deck (T&NO 910) which has a smoke deflector as my reference for assembling the new brass parts on the SP 3266.
Prototype History
The Jawbone Branch used primarily standard SP C-8/9/10 class 2-8-0s and after about 1949 smaller Mk-2/4 class engines became assigned and specific engine numbers listed in the ETT and Special Instructions Tonnage Ratings.
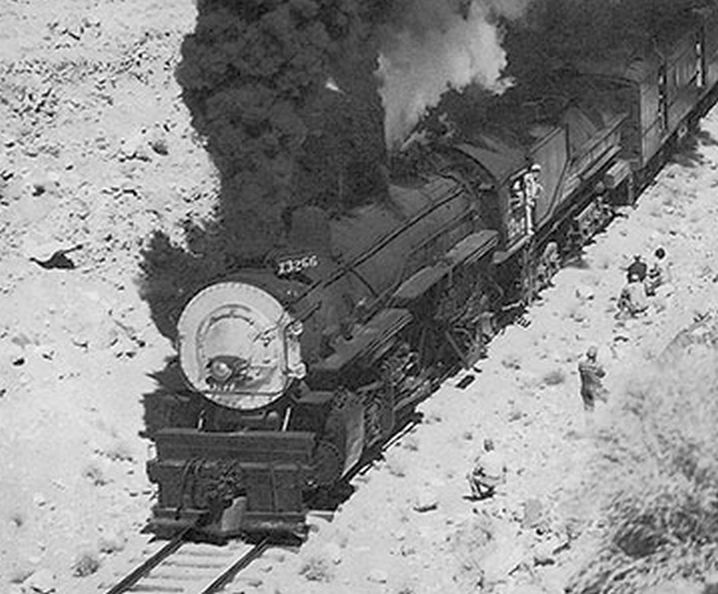 |
| SP 3266 near Olancha with excursion in 1952 - Phil Serpico - owensvalleyhistory,com - southern_pacific012_t - Cropped |
For a period of time SP 3266 was also listed in the Special Instructions and there's photos of it operating the May,30, 1952 passenger excursion to Owenyo. On October 28, 1952 the engine was vacated at Bakersfield, and sold for scrap on December 5, 1952 at Los Angeles. However, on my Jawbone Branch she will run on once I get this model in service!
On With the Smoke Deflector!
Removing Straight Stack
 |
| Stack barrel removed with resistance soldering unit. |
I used a resistance soldering unit to heat and remove the upper barrel section of the stack to start. At this point the stack base flange is still soldered to the smokebox barrel.
 |
| SP 3266 smokebox top with stack flange removed. |
The stack base flange was mostly held by about 1/4 of the diameter soldered at the front. Heating this area with the resistance soldering probe tweezers worked really well to loosen the flange piece and remove it.
Fitting the New Stack
 |
| Mockup assembly of the new smoke deflector pieces. |
The smoke deflector is cast as three pieces. (Spoiler) I ended up cutting off the operating mechanism and attaching it separately to clear the train indicator boxes in the last step.
 |
| New stack base soldered in place. |
I worked my way around the stack base with the resistance probes heating the stack and smoke box right around the base. Using the flux liquid and I was able to flow some rosin-core solder into the joint. I also double checked at this point that this smaller stack centered on the boiler top, and also lengthwise, in line with the cylinder supply pipes and train indicators.
 |
| Pencil marks for drilling 0.025" holes in the smokebox shell for the pins on the feet of the front deflector. |
The front deflector casting has two legs which rest on the top of the smokebox, each foot of the leg has a pin which I want to mount into a hole, to form a good mechanical joint to the boiler shell. I used a pencil to draw longitudinal lines at the proper spacing for the brace legs. The edge of the cleaned brass is where the holes need to be drilled. I would have liked to clean the smokebox shell farther back under the train indicators, but wasn't able to with the fiberglass brush. My Dremal mounted the 0.025" drill bit and was easily able to drill through the shell.
Installing the Front Deflector
 |
| Top-view of the forward smoke deflector installed. |
The front deflector is soldered in place by the two mounts that fit against the stack. Then I soldered the two pins on the front legs into the holes drilled in the smokebox shell.
 |
| Front smoke deflector, all soldered in place. |
Train indicators still showing the old engine number, 3244. - Those will eventually be replaced when I get the redecalling and detailing done on the engine. I used some solder-wick braid to pull excess solder off the support legs.
Installing the Rear Deflector
 |
| Rear stack deflector installed. |
The rear stack needed a hole drilled in the band of bolts at the rear edge of the smokebox barrel.
 |
| View from the other side showing the rear deflector. |
The solder joint at the back edge of the stack are pretty ugly in this photo, but a bit of solder-wick soak up the extra and cleans it up.
 |
| View from the front of the deflectors. |
I cut off the deflector operating piston mechanism piece as it was fouling the left train indicator box.
Installing the Operating Mechanism
 |
| The deflector actuating mechanism installed on the left side of the stack. |
I was able to get the piston piece to fit in again after trimming the bottom mounting pin. A quick hit with the resistance soldering iron fixed it in place.
 |
| Smoke stack deflector installed in the open position. |
Close-up of the pretty well finished smoke deflector installed.
Sanding Rods?
 |
| Stack installed on Balboa Mk-5/6 class model. |
Stack in place on the engine, needing to work on the cab decals. Note: the flaking of the paint on the eccentric radius rod.
 |
| The radius rod after light sanding with moderate grit sanding pad. |
After touching up the black paint on the model and painting the drivers, the radius rods started flaking off the paint almost immediately. To give the surface more "tooth" for the paint to stick to, I sanded it with a moderate sanding pad. This is a photo after that is done. When I go back and touch up the rod's steel color this should all be wrapped up.
In Closing
 |
| Decalling the cab side with San Juan Decals lettering gray SP steam set. |
So, since this photo, I've started putting the cab decals on, starting with the road number. An Athearn-Genesis 120-C-6 tender is ready to go and decalled to match. At this point, I've not completed the drilling of the hole in the front of the tender frame to accept the Balboa drawbar with screw. The motor currently is disconnected from the tender drawbar due to damage to the rear engine frame, which I'll be showing how I fixed it in the next part.
Given how easily I was able to drill through the smokebox barrel, I might actually decide to drill and mount eye-bolts for bell and whistle cords. I'm planning to fit the engine for crew figures. The train indicators will have a strip of material put in place to make the decalling easier. The train indicators will probably be set up as "X3266" as the 3266 would be running as an extra on the Jawbone Branch basically exclusively.
 |
| Left side of SP 3266 at present time. |
|
| Better focused photo of the upper boiler and smoke deflector on SP 3266. |
There's still some brush marks on the smokebox from some previous owner, so I might do some tight spot sanding/fiberglass brush work to smooth that out before doing my touch-up work from installing the stack deflectors.
 |
| Right side of SP 3266 at present time. |
Eventually, after all the other work, I'll be weathering the engine to some extent to match the first 3266 that I worked on a couple years ago.
Jason Hill
Related Articles:
New Drawbar Mount for Athearn-Genesis 120-C-6 Tender - Fitting for SP 3266 (First)
Modeling SP 3266 (Part 1) - History & Fixing Frame Damage - History of Mk-6, SP 3266 & resoldering rear frame failed solder joints.
Where did you find the Clamshell Stack kit? That seems to be an "Unobtainium" bit of SP steam loco parts, although much needed. Tom Cockle
ReplyDeleteWhere did you find the Clamshell Stack detail kit? Although common to many SP steam Locomotives, they seem to be "unobtainium", alas. Tom Cockle
ReplyDelete