SP 5124 - The "Easy Kitbash"
Disclaimer - While I took a good number of photos during this build, I didn't take as many as my recent projects while posting the blog where I take pictures after almost every step. This results in there being some rather large gaps in the construction. These two cars are the ones that I had built before I started the SP 5199 project, and you can follow the detailed build of SC&F 69-BP-30-3 RPO car at my blogs linked here:
SP 5199
(Part 1),
(Part 2),
(Part 3),
(Part 4),
(Part 5), &
(Part 6).
 |
| SP 5124, a 70-BP-30-3, repainted as the protection car for the San Joaquin Daylight - kitbashed from SC&F resin kits. |
The basic concept is to take two Southern Car & Foundry 69-BP-30-2/3s and the body of a 70-B baggage car and combine them to make two 70-BP-30-3s (5124 & 5069). This became a bigger chore than I initially thought about half way through the 5124's build as you'll see below.
My research and the floor plans that I worked from came from the SP Passenger Cars, Vol.3, Head End Cars book, by the SPH&TS. There is so much good information in these books, they are certainly worth their weight in research materials. If you're happy just reading my blog posts, by all means save your $$$ for other things, but if you want the full research on these cars I highly recommend getting the volume you want.
Prototype Backround
Rebuilt for the San Joaquin Daylight - 1941
The Southern Pacific's old HW
San Joaquin train between LA and Oakland was upgraded with new streamlined passenger cars in 1941. The RPOs for the new streamlined consists were not new cars, but rebuilt 70-BP-30-3 class cars, numbers 5069, 5070, and 5124.
The 5069 and 5070 were rebuilt with new ends, roof sections, and skirting to match the new Lightweight Streamlined Pullman-Standard 1941 Daylight cars. The baggage section end was fitted with a full-width diaphragm (FWD). The RPO end was also fitted, but before going into service, the SP dropped the plans to have FWDs forward of the RPO in the consist.
Disposition After 1950 - Other Assignments
 |
| SP 5217, a rebuilt 80-BH-1 Horse-Baggage, now with a 60ft Postal Apartment for the San Joaquin Daylight. |
The RPO contract for Nos. 51 & 52, the
San Joaquin Daylight, was changed and called for 60ft Postal Apartment cars in 1950. The SP 5069 and 5070 were only 30ft Apartment cars, so two 80-BH-1 baggage-horse cars were rebuilt with 60ft Postal Apartments, SP 5217 & 5218. In 1954 the SP 5219 was also rebuilt and entered service as the protection car.
In the April 15th, 1953 Premier Passenger Car Assignment roster the SP 5069 is showen painted in Stainless Steel assigned to the
Golden State (Nos.3&4). The SP 5070 is still in Daylight paint for service on the
Shasta Daylight (Nos.9&10) as the protection RPO. The SP 5070 stayed in Daylight colors until 1958.
The SP 5124 is still shown in Daylight paint as a "Heavyweight Conventional-Type Car" for protection service on the
San Joaquin Daylight. Presumably until 1954 when the SP 5219 was released from the shops as an RPO car.
The Plan
My plan in 2011, when starting this project, was to kitbash two models. One would be a streamlined car, either the 5069 or the 5070. The other car would be modeled as the non-streamlined 5124 protection car.
Here is the parts from a
SC&F 69-BP-30-2/3 kit (for the SP 5199) to show what the kit contains.
 |
| Southern Car & Foundry Kit before starting. |
I contacted Jon from SC&F and explained what I was hoping to do. He was very nice and sent me the extra 70-B body for an extra $15 iirc.
 |
| SC&F 70-B-series resin body before being bisected. |
Here are the three car bodies laid out next to each other while I made some pencil marks on them to plan where to cut.
 |
| SC&F resin one-piece bodies |
One of the challenges that I'd only passed lightly when mentally planning this kitbash was the fact that I was trying to get two halves of the baggage car, with no loss of material AND I was needing to lengthen both 69-BP-30s into 70-BP-30, which means in the end there needs to be 12" more body length than there is at the start.
 |
| Stock SC&F 69-BP-30 underframe - needs to be 12" longer! |
The way I was at first planning to solve this was to simply cut off more of the 69-BP-30 RPO section, to get the extra 12-15", always plan 2-3" to be lost in sanding and fitting so your project doesn't end up being too short!


If you look closely you can see the offset of the RPO baggage ends, as I gain the extra 12" of body length.
The bodies are supported by splice plates made from 0.020" styrene sheet such as these. Note that splicing carsides like this only works if the parts are the same thickness or the outside will not be flush. This is especially tricky on a resin car body like this, as there can be variations on thickness of the sides. SC&F bodies seemed to be fairly consistent, but there are slight waves in the carside castings which can be seen before the work was started.
 |
| Splice plates from styrene sheet |
 |
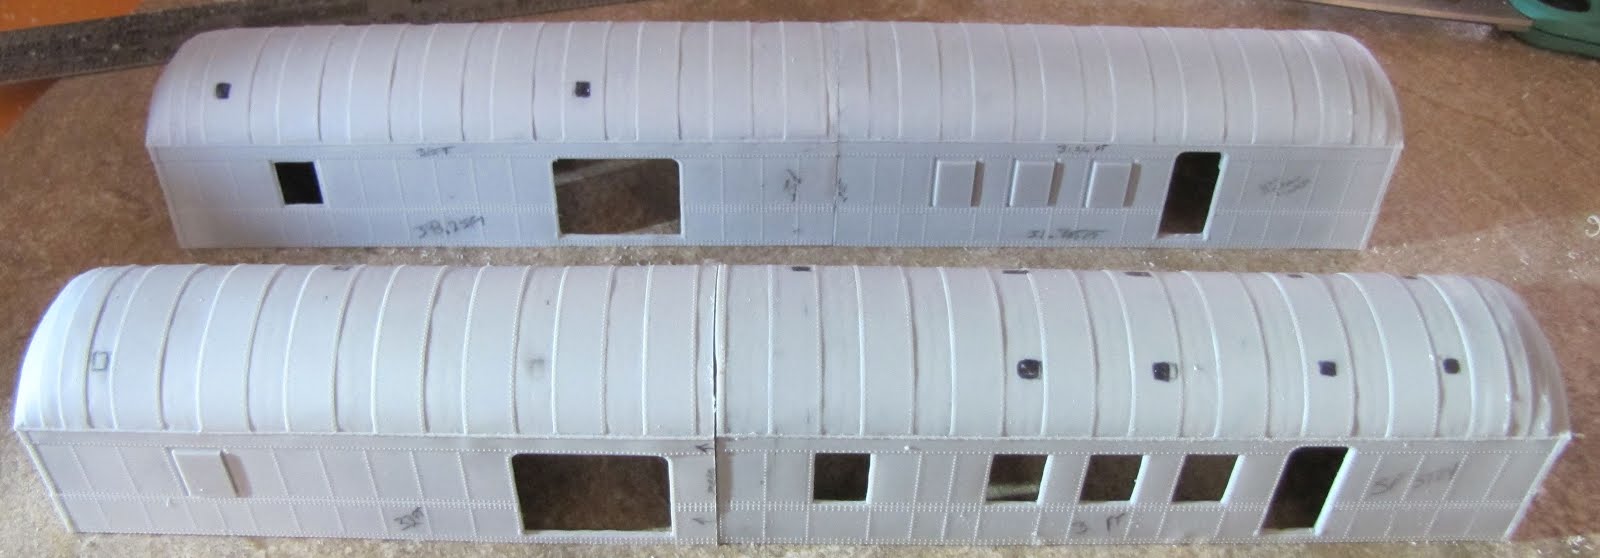
| 70-BP-30-3 bodies lined up for dry fitting. SP 5124 in front and SP 5069 in the rear |
The SP 5124 body parts were cut out and dry fitted. I Started working on the underframe at this point too.
 |
| Walthers current production 6-wheel truck being rebuilt and set up to run properly |
See my blog on the
SP 5199 (Part 1) for more details on doing the mechanicals on cars like this and the
Pullman Mt.Nebo (Part 1) has some nice photos showing a truck disassembled.
|
| Stock SC&F 69-BP-30 underframe - needs to be 12" longer! |
 |
| SP 5124 splice in underframe sills and floor |
 |
| New Bowser Coupler Box Lid with shims forming the Truck Bolster on the SP 5069 (SP 5124 is identical) |
 |
| Test fitting the underframe, truck, and coupler on the SP 5124's baggage end. |
 |
| Internal layout of RPO planning on floor of SP 5124 |
 |
| Notice the step up in the floor near the center where I stretched the car, and left a gap temporarily. |
At this point in the build the SP 5124 and the SP 5069 construction takes two separate paths. The SP 5069 body will need substantially more work to add the 1941 streamlined rebuilt roof and skirting, where as the SP 5124 was simply repainted into Daylight colors.
Not So Fast!
Well, here's where my assumption bit me, and why I should have done some extra checking. The SP did NOT have a standard of where the RPO door or windows were located along the car side. They are the correct spacing between the door and between each of the three windows. What is not the same between a 69-BP-30-2/3 and a 70-BP-30-3 is the space of blank wall between the end of the car and the door.
 |
| Cuts to fix the right side of the carbody - BEFORE |
 |
| After cutting and re-positioning the RPO section - AFTER |
The 69-BP-30-2/3 has more space, by about 24", than the 70-BP-30-3. Now many of you will say, well that's not that much, only 24"... well wrong. The difference shows up when you go to mount the steps to the door, and where that lines up on the trucks. Lettering also will not fit if the doors and windows are off by 24".
The simple way to have fixed this BEFORE I did the first set of basic cuts would have been to cut and section the end of the RPO section to remove the 24" out of that section, and take 24" more out of the additional 12" I was already taking from the middle section of the 69-BP-30 body when stretching the car to 70ft.
 |
| Cuts to fix the left side of the carbody. |
 |
| After cutting and re-positioning the RPO section - AFTER |
|
How to Fix the Mistake
The photos here show what I had to go through to fix the mistake once found halfway through the kitbash.
 |
| Left side plug removed |
 |
| Right side plug removed |
 |
| Left Side RPO section cut out |
 |
| Right Side RPO section cut out |
 |
| Left side with RPO repositioned |
 |
| Right side with RPO repositioned |
 |
| Splices on the SP 5124 - note the "puckering" of the lower rivet and side sheet above and right of my finger. |
 |
| Splices on the SP 5124 |
The laser cut window glazing was installed. The resin RPO doors were installed as well. The baggage doors for the 69-BP-30-2/3 kit are 4'10" doors, which are not correct for the 7ft openings of the 70-BP-30-3. SC&F makes the 7ft doors for their 70-B-series baggage car, which I'm using in this kitbash, however I didn't think to ask for the other doors. I scratch built the doors for the SP 5124 starting with a sheet of clear plastic for the window and then building up the strip styrene for the other parts of the door.
Painting & Detailing the SP 5124
The 5124 assembly went pretty much the same as the
SP 5199 assembly which I've shown in the previous blogs. The car was painted with Daylight Orange and Daylight Red. Black was then painted over the roof and underbody. SP Lettering Gray strips were then added from MicroScale at the top and bottom of the Orange stripe over the windows.
I didn't get any good shots during that time. I did some staged photograph the car at this stage at Caliente, on the La Mesa Model Railroad Club layout in 2012.
 |
| Resin battery box, and Cal-Scale Type-UC air brake parts installed |
 |
| Right side of SP 5124, the striping on the baggage end isn't yet complete. |
Hi-Tech Diaphragms were installed on the SP 5124, this was actually the first car that I'd used them on. I was impressed enough that they have now become my standard diaphragm of choice to use on all the passenger cars that I build or that come through for rebuilding and upgrades. The SP 5124 uses the "Oprah-Window" style striker plates, consistent with streamlined cars which had full-width diaphragms (FWD) installed at one time. The SP 5124 never did have them installed, but the did fit the car with that striker plate design.
 |
| HiTech Details "Oprah" Diaphragms on SP 5124 - Left & "FWD" Right on SP 5069 from MTH 79-PRO-1 Observation car |
 |
| SP 5124 cut into the San Joaquin Daylight, with SP 3300/3301 combine behind and second RPO ahead. |
At this stage in the construction I had installed the kit's supplied resin roof vents. I had not yet installed the modified roof vents which were over the RPO section, the smoke jack, mail catcher arms, grab irons on the side and roof, stirrup steps at the corners and doors, etc. The painting will still need a bit more work after the last of the roof vents are installed and the roof will be given a coat of flat finish to knock off the gloss reflections in these photos.
I will leave Part 1 of the
San Joaquin Daylight RPOs here for now. In
San Joaquin Daylight RPOs (Part 2) - SP 5069, I will focus on the additional modifications needed to model the SP 5069 or 5070. For details to finish the SP 5124, the are basically the same as I used in the SP 5199 (Part 1), (Part 2), (Part 3), (Part 4), and (Part 5).
Jason Hill
Links to other related blog posts & pages:
SP HW Passenger Car Modeling Index
Pullman HW Passenger Car Modeling Index
SP 5199 - 69-BP-30-3 (Part 1) - Series of build-blogs
Modeling a Mail Train - the Tehacahpi Mail, Nos.55/56
Modeling the Owl (Part 1) Nos.57/58


No comments:
Post a Comment
Please identify yourself at the end of your message. Please keep comments relevant to the post or questions to me directly.
All comments are moderated and must be approved, so give me a bit of time to approve them.
No random solicitation in comments. Spamming and phishing comments will be deleted or not allowed to post.