Showing posts with label Chalk Marks. Show all posts

Wednesday, October 18, 2023

GN 10784 Plywood Boxcar - Quick Weathering

Time to dive into weathering my new Bridgetown 2023 acquisition, a GN "Plywood" boxcar.   Normally, I've thought these cars were gaudy and strange.  

Orange... in a freight?!

To be fair, I'm not much of a GN researcher, but I do want to model GN cars as foreign cars showing up on my Southern Pacific layout.  Over the last two years or so is that these cars did run across the area that I model, namely Tehachapi and even the Jawbone Branch.

Great Northern Paint Schemes?


IMRC/IMWX boxcar kit painted in the 'normal' paint scheme for 1948-1956.

While I'm more used to the classic brown GN boxcar fleet, adding this bright orange car will certainly be an outstanding model, drawing attention.  

Timeline of GN paint schemes:
1941: Side Facing Goat Herald introduced. First FT's delivered (first orange and green livery).

1948: New/repainted freight cars use "Great Northern" instead of "Glacier Park" in logo.

So oddly, the IMWX/IMRC kit has the post-1948 herald with the Great Northern, not the Glacier National Park phrasing in the herald.  Orange/Green paint scheme on the plywood car started back in 1941 with side facing goat. - Good to know, I'll have to change the tare date anyway on the brown car kit, which will work to be a 1948 repaint, probably just remove the "NEW" and leave the "F" date.

IMRC 46055-03*, a RTR GN "Plywood" panel boxcar in orange and black.

These cars were built in 1947 at the St. Cloud Shops with the upgraded post-war steel ends, and retained pre-war design of panel roofs.  It looks like there were two groups of cars, one of 500 cars built in 1945, then 400 cars in 1947.  The GN 10784 would be in the second group of 400 cars.  It would also appear that within the first three years, about 7 cars were destroyed and struck from the roster.

GN 10000-series 'plywood' composite boxcars ORER data 1950.

These were some of the first cars built with plywood sides.  Some PFE reefers were also rebuilt/built with plywood sides, but ended up being changed back to other materials within 5-8 years as the early plywoods failed faster than standard board or steel-side construction.  I don't really know what the disposition of the plywood-sided boxcars on the GN, but clearly they existed into the early 1950s and roamed freely.

Minor Repairs


Somewhere along the route from IMRC's Chinese factory to my hands the car seems to have been dropped and had the steel weight knocked loose from the inside of the floor.  Thankfully, there was not very much glue holding the roof to the upper body edges, and I was able to remove the roof to reattach the weight.

Interior with re-glued weight.

I used some standard automotive RTV-Silicone.  Don't forget to be sure the weight is centered on the floor and with a bit of RTV around the edges to hold it firm.  Then the RTV was allowed to gas-off for a couple days before reattaching the roof with MEK (Tamiya glue).

Weathering Goals


Generally, I want to keep the weathering on this car moderated.  The 1947 build date can mean that it showed up on my railroad within the first year or two.  Given that I model into 1954 with RSD-5s, then I could have them with nearly 7 years of weathering.  I'll aim to go with some grime weathering on the lower car, and also some washes on the panel-edges. 

Some basic roof weathering with Pavement and Territorial Beige highlights along the running board.

Dusty/sooty roof gets a bit of typical weathering.  Rain washed-effects of the Pacific North West should play a part in the weathering too, which will extend onto the car side.

Weathering with Acrylics


Right side with weathering starting.  Ladder mud/boot kick marks onto the side.

 The trucks and underframe are Pavement wash and highlighted with Territorial Beige.

Left side with panel lines.

Most of the side weathering at this point is just highlighting the panel edges with grimy wash and a bit of Pavement from Apple Barrel. 

Weathering with Chalk Marks


Right side chalk marks.

A couple light chalk marks for release lever and hand written "Seattle".  Dark chalk mark of "21" at the left end of the car.  I decided to make the sharp dirt/soot drips from the ends of the door track with my new dark gray Gelly-Roll pen against a straight edge ruler.

Left side chalk marks.

On this side I went with a "Mill St" chalk mark and a very faint tally mark set to the left of the door.  I also did the same dark gray Gel-pen marks from the door tracks.  Generally these streaks can be done with a fine brush, but I wanted to try making sure that they were straight by using the straight-edge and pen method.  It seemed to work.  I can also use a bit of 70% iso-alcohol to feather the end of the streak down a bit more.

Routing Cards


On many of my cars starting in October 2023 and moving forward will have a couple of the OwlMtModels 1220 Routing & Grading Cards applied.

Right side with routing card

On the right side I put a simple routing card under the 7 of the car number.  The car's plywood sides could be hammer-stapled to, thus allowing the cards to be placed pretty much anywhere, although I'm sure GN would prefer the clerks to use the card boards, fitted low on the doors!

Left side with routing and a grading card.

The left side has a Grade "B" card over in the right side data block, below the herald.  There's also a routing card placed over the "Mill St" chalk mark.

In Closing


The basics of weathering this car to this point only took a little over an hour.  So don't be afraid to do a "quick and dirty" weathering pass on a model.  

Wrapped up and ready to roll.

I may experiment with some chipped paint showing a section of the plywood layer failing in a follow-up Part 2 post.  I may also make a light pass with the airbrush to blend everything together a bit.

Jason Hill

Related Articles:

Routing & Grading Cards with OwlMtModels 1220 Decals - Prototype Routing & Grading, demonstrated on NC&StL 15337.


GN Paint Schemes - off-blog reference resource

Sunday, September 17, 2023

Open Loads (Part 8 ) - Modeling High-Tension Steel Banding on Lumber Loads

I've been working on a large number of lumber loads this fall, including pilot models of the new OwlMtModels 3002/3003 "Short-Wide" kits, which are now available for pre-order.  

Finished OMM 3004 "Narrow" Lumber Load with ChartPak 1/64" 'Steel-Banding' replacing the wooden cross-ties.

I've been wanting to try the high-tension steel-bands, which started being used on lumber loads during the 1950s, and became widespread in the 1960s and beyond.  Modern modelers need to use high-tension bands on almost all of their modern loads, and even by the 1970s, wooden stakes were becoming very rare to see in prototype photos.

ChartPak to the Rescue!


My package of 1/64" ChartPak tape arrived yesterday... time to get tied up, or is that tied down?

The High-Tension Steel Bands - Hyatt Graphics sells 1/64th inch chart tape in 54 yard rolls for $10.30, which should last a number of lumber loads and other needs for steel banding around your model railroad.  Amazon and Walmart on-line also offer the same tape, but for more like $15.  I prefer to support the actual company that would be shipping the Walmart orders, so I went to Hyatt and talked with Nick.  Their phone number is (800) 234-9288 x630 if you want to talk to Nick as well.

Done Before?


Beautiful work on the steel-bands for this lumber load by Dave Maffei - Jason Hill photo at BAPM 2023 meet.

While I'm new to this technique, there have been plenty of modelers out there who have made wonderful use of this material.  The main difference in the application I want to explore here is the use of the ChartPak for replacing the wooden cross-ties on a load, not fully palletizing of each unit of lumber (aka bundle).

Tools?!


The "Special" tools I used for this project.

I did dip into my tool kit for some unique tools.  Including at least 3 self-closing tweezer/clamps.  I've used tools like this before when rigging ship models and fishing line "iron-wire" for freight car loads.  The clip/tweezer is a great and fast way to attach weight to a line and get it to hang straight while you tie knots or do other things to it.  The pen is a Silver ink, fine tip from Uni-ball that I picked up at Michael's Craft Store (along with my white "chalk marking" Gel-pen).  

Getting Started


As I've mentioned, my modeling era is just before these steel-bands became wide-spread in the lumber industry, but were used for other loads starting in WWII when it was developed.  I probably should have started with getting familiar with the tape on a unitized or palleted load, but hey, I didn't want to do that on this load, so I'll just show the process that it took to get it to work for me.  (The last build-photo I'll be talking about what finally worked well for going forward!)

After messing with a couple tries, I started getting some ideas...

The vinyl really likes having something to stick to and be burnished against.  Free-floating and anchoring very lightly around the stakes is not the ideal use for the tape.  I think you need to be a mutient 12-armed octopus to be able to do this without 'mechanical hand' help holding.  Two hands to hold the ends of the tape tight, another two to work No11 blades (wait, don't cut the tape!) or fine tweezers to get the tape to lay in the right place while glue dries, another two or three to work the ACC bottle and get a wire applicator to put the glue on the over-lapping section of tape/banding.  Then at least a couple more to grab another set of mini-clips to hold the two layers of tape together for the glue to dry!

That's one down... starting working number two on the right.

The basic idea is to get the loop of tape fairly tight, which usually means extra material is needed out both ends, over each side.  The tape won't want to lay on top of itself at the stakes.  In the photo above, I was able to get the lapped section of tape to bond with the ACC glue, but the 'under' layer of tape us pinched against the stake, if that slips or comes out, it will slacken the band-set... so not ideal.

Silver craft fine-tipped pen to make the steel clips that crimp onto the steel-bands.

The completed band... time to grab the silver gel-pen and mark where the tension clips are holding the steel bands together.  The ink flows fast and makes a slightly larger mark than I was hoping, but I may come up with ways to 'black ink' it smaller again, - but that will have to wait for the next post on using steel banding.

Annoying challenges continue, the tape won't want to lay on top of itself at the stakes, as we can see at the left-stake here. - At first, don't worry about that.  You can come in after the band is 'done' with the flush-cutters to clip off the excess from the 'inside' of the loop-band.

Victory! - ?


Finally, I got the hang of this, I think!  It gets rather busy in the foreground of this photo, so I'll try to explain.  

My final anchoring solution - wrapping around stakes/boards & Mini-clips!

There's two mini-clips, each is weighting down one end of the tape.  The tape has been wrapped around a post/brace to anchor it off, then the clip provides the weight to keep it there.  (The tackiness of the tape isn't reliable with this much force.)  I've already fitted the longitudinal bracing over the top of the tape bands, which gives me something more to anchor to.  The tape was fed under and around the bracing and stakes to form nearly two complete loops between the stakes.  The 'inner' one is at the lower far right, the front loose end is the one coming diagonally from the left stake, around the close stake and brace, then clipped off with the mini-clip.  In this jury-rigged mess, the two far-side loops of tape are laying on top of one another that I can apply some ACC with an extra piece of plastic stake material (anything will work, wire, etc).

Once the glue has set, I can clip off the extra material with the flush-cutter and put some silver inked band-clips on with the pen.

The new load is designed to fit Walthers 46ft USRA Gondolas, so let's sit back and enjoy the finished model.

Of the 6-sets of banding that I did for this load, I tried probably a dozen times to get the tape to start.  The tape stretches too, so it is very tricky to use.  

More of an end-view of the steel banding.

I will also say, the ideal way is probably to use some ACC and let it fully dry tacking the band  to the end-side of one stake to provide an anchor.  

Covert Chalk Markings


The Walthers 46ft USRA Gondolas are good for many different prototypes, which could be reloaded with lumber.

On a couple of my USRA 46ft gondolas, I've marked on the outside where the inside stake pockets are located, so I can quickly align the loads as I place them in the car.  There's nothing actually inside the car to keep it aligned fore-aft in this position.

In Closing


Other side of the PRR 316083 gondola with the load bunched together, towards the center of the car.

Perhaps form a single loop to enclose one stake, then close it off, that will provide the anchor, then wrap it around the other stake and back to the first after the glue dries.  This from above would form a loop, but with a 'crossover' between them.  Rather like a 4x8 layout with a track cutting across the center of the loop, forming two reverse loops. - I'll probably try that on the next steel-banded load I do.

Jason Hill

Related Articles:


Open Loads (Part 7) - Shifted Lumber Loads - What happens when your load moves?

Open Loads (Part 5) - Lumber Loads on Flats & Gondolas - Examples of Open Lumber Loads.

Open Loads (Part 2) - Lumber in Boxcars - Ideas for building lumber loads inside boxcars.

Lumber Load in Gondola SP 160522 - MDC Kitbash - Modifying OwlMtModels 3004 Lumber Load for gondola with false-load below gondola sides.

Wednesday, September 6, 2023

Chalk Marks - A New Method

I really want to draw attention to the human details that we so often forget on our models.  No, I don't mean modeling a brakemen riding a car exactly, or a clerk walking the paths in a yard, 'mud hopping' the string.  No, I mean the notes that the crews left for themselves and others to understand various needs of the car's status, routing, servicing, or maybe even to set the car out in the middle of a blizzard at night when the trainman doesn't feel like trying to read a car number.

Gel-Pen with 0.5mm tip and strong white covering gel-ink which makes great chalk-marks!

So I wasn't planning to circle back to the NC&StL 15337 so fast, but I went by Michael's craft store today and found a great little white gel-pen from GELLYROLL 0.5mm tipped pen.  It doesn't work so well on glossy surfaces, but works great on dullcoated surfaces.  I found that I needed to clean the tip on some paper or ideally wood (tie material works great) to get fresh gel on the ball to present it onto the model surface.

Let's look at a few examples of chalk marks by Gel Pen...

NC&StL 15337


NC&StL 15337 - Fowler -TRRA photo, East St Louis, July 1948, Illinois, Joe Collias coll, Bobs Photo - Ted Culotta collection - with permission

Cross check the work against the prototype photo.  Not bad!  Looks like there's a #9 on the left end of the car.  Could be a track number or maybe a train symbol.  Hard to tell.  Several old chalk marks at the left stirrup which have been wiped out with someone's rag or a sleeve.  There's an old mark below the light weight.  I'm guessing there's a AB bleed-valve arrow and the letters "Rod" under door.  The door has some rough math of some sort being worked out, along with to the right of the door.  A random "P" appears to be next to the Internal Dimension data block, and some other marks under the lower ladder rungs.

A little work with the new gel-pen toy on the left side of NC&StL 15337 to match prototype photograph.

I like this white gel, as it dries flat and looks good as chalk marks.  I'm also planning to get some gray and other colors, like yellow, red, green, etc which carmen and clerks used if it was at hand.  The colors I'm looking for aren't going to be neon or super bright, but more realistically colored chalks that would have been available in the 1940s-1950s.

Right side of NC&StL 15337 with an assortment of chalk markings with the gel-pen.

The other side of the car is pretty basic, with OK marks, some other cryptic scribbles, some door math again to round it out the model.  I have some other plans in the work to do the final detailing on this model, which will make up last of the series on the NC&StL 15337 (Part 4).

SP 15203


SP 15203 with "Shorts" chalk mark.

The left side of Rapido B-50-15 includes the arrow for trainmen to quickly find the bleed valve lever in the dark of night when walking the string of cars.  As my Jawbone Branch is connected directly to traffic flow between Bakersfield and Los Angeles, usually using the freight symbol "Mojave Shorts", or often just called the "Shorts" for the division, direction implied by which end of the division the car is starting on.  Shorts West from Los Angeles  and Shorts East from Bakersfield.  The combination of the station number "1511" indicates the car's heading for Mojave.

The other side of SP 15203 just has the crypic instruction "Hold".

One of the common chalk marks was "Hold", this can be used in dozens of places and is a great mark to put on cars.  Is the car empty and the agent wants to keep it in the yard?  Well, 'Hold' it here.  Which cars are we pulling from this industry?  Oh, someone marked this as a hold, to remind us the loading crews aren't done with their work.  Maybe the car's on three-day demurrage agreement unload still, and there's a weekend, so the car's not having to be unloaded until Tuesday, so we're holding the car until it's released by the customer.

SP 15564


Looks like the last trip of SP 15564 wasn't kind, time for a "Clean out"!

The left side of SP 15564 I went with the basic bleed arrow and a carmen's instruction to get the car cleaned out, which usually involved a set-over to a track on the edge of the yard for a day and a visit from a worker with a broom.

The other side has an "OK" and the bleed arrow for this side.

For now the other side is very basic generic marks.  When I get a couple of other colors I may add some more.

NP 11661


NP 11661 with a few basic marks.

I haven't put much on this Rapido Double-sheath NP boxcar with simple marks for "4th St" and "S/O 2".  Sounds like the car recently was routed to something on 4th Street of somewhere and setout 2, which is another cryptic message for some Conductor to himself.

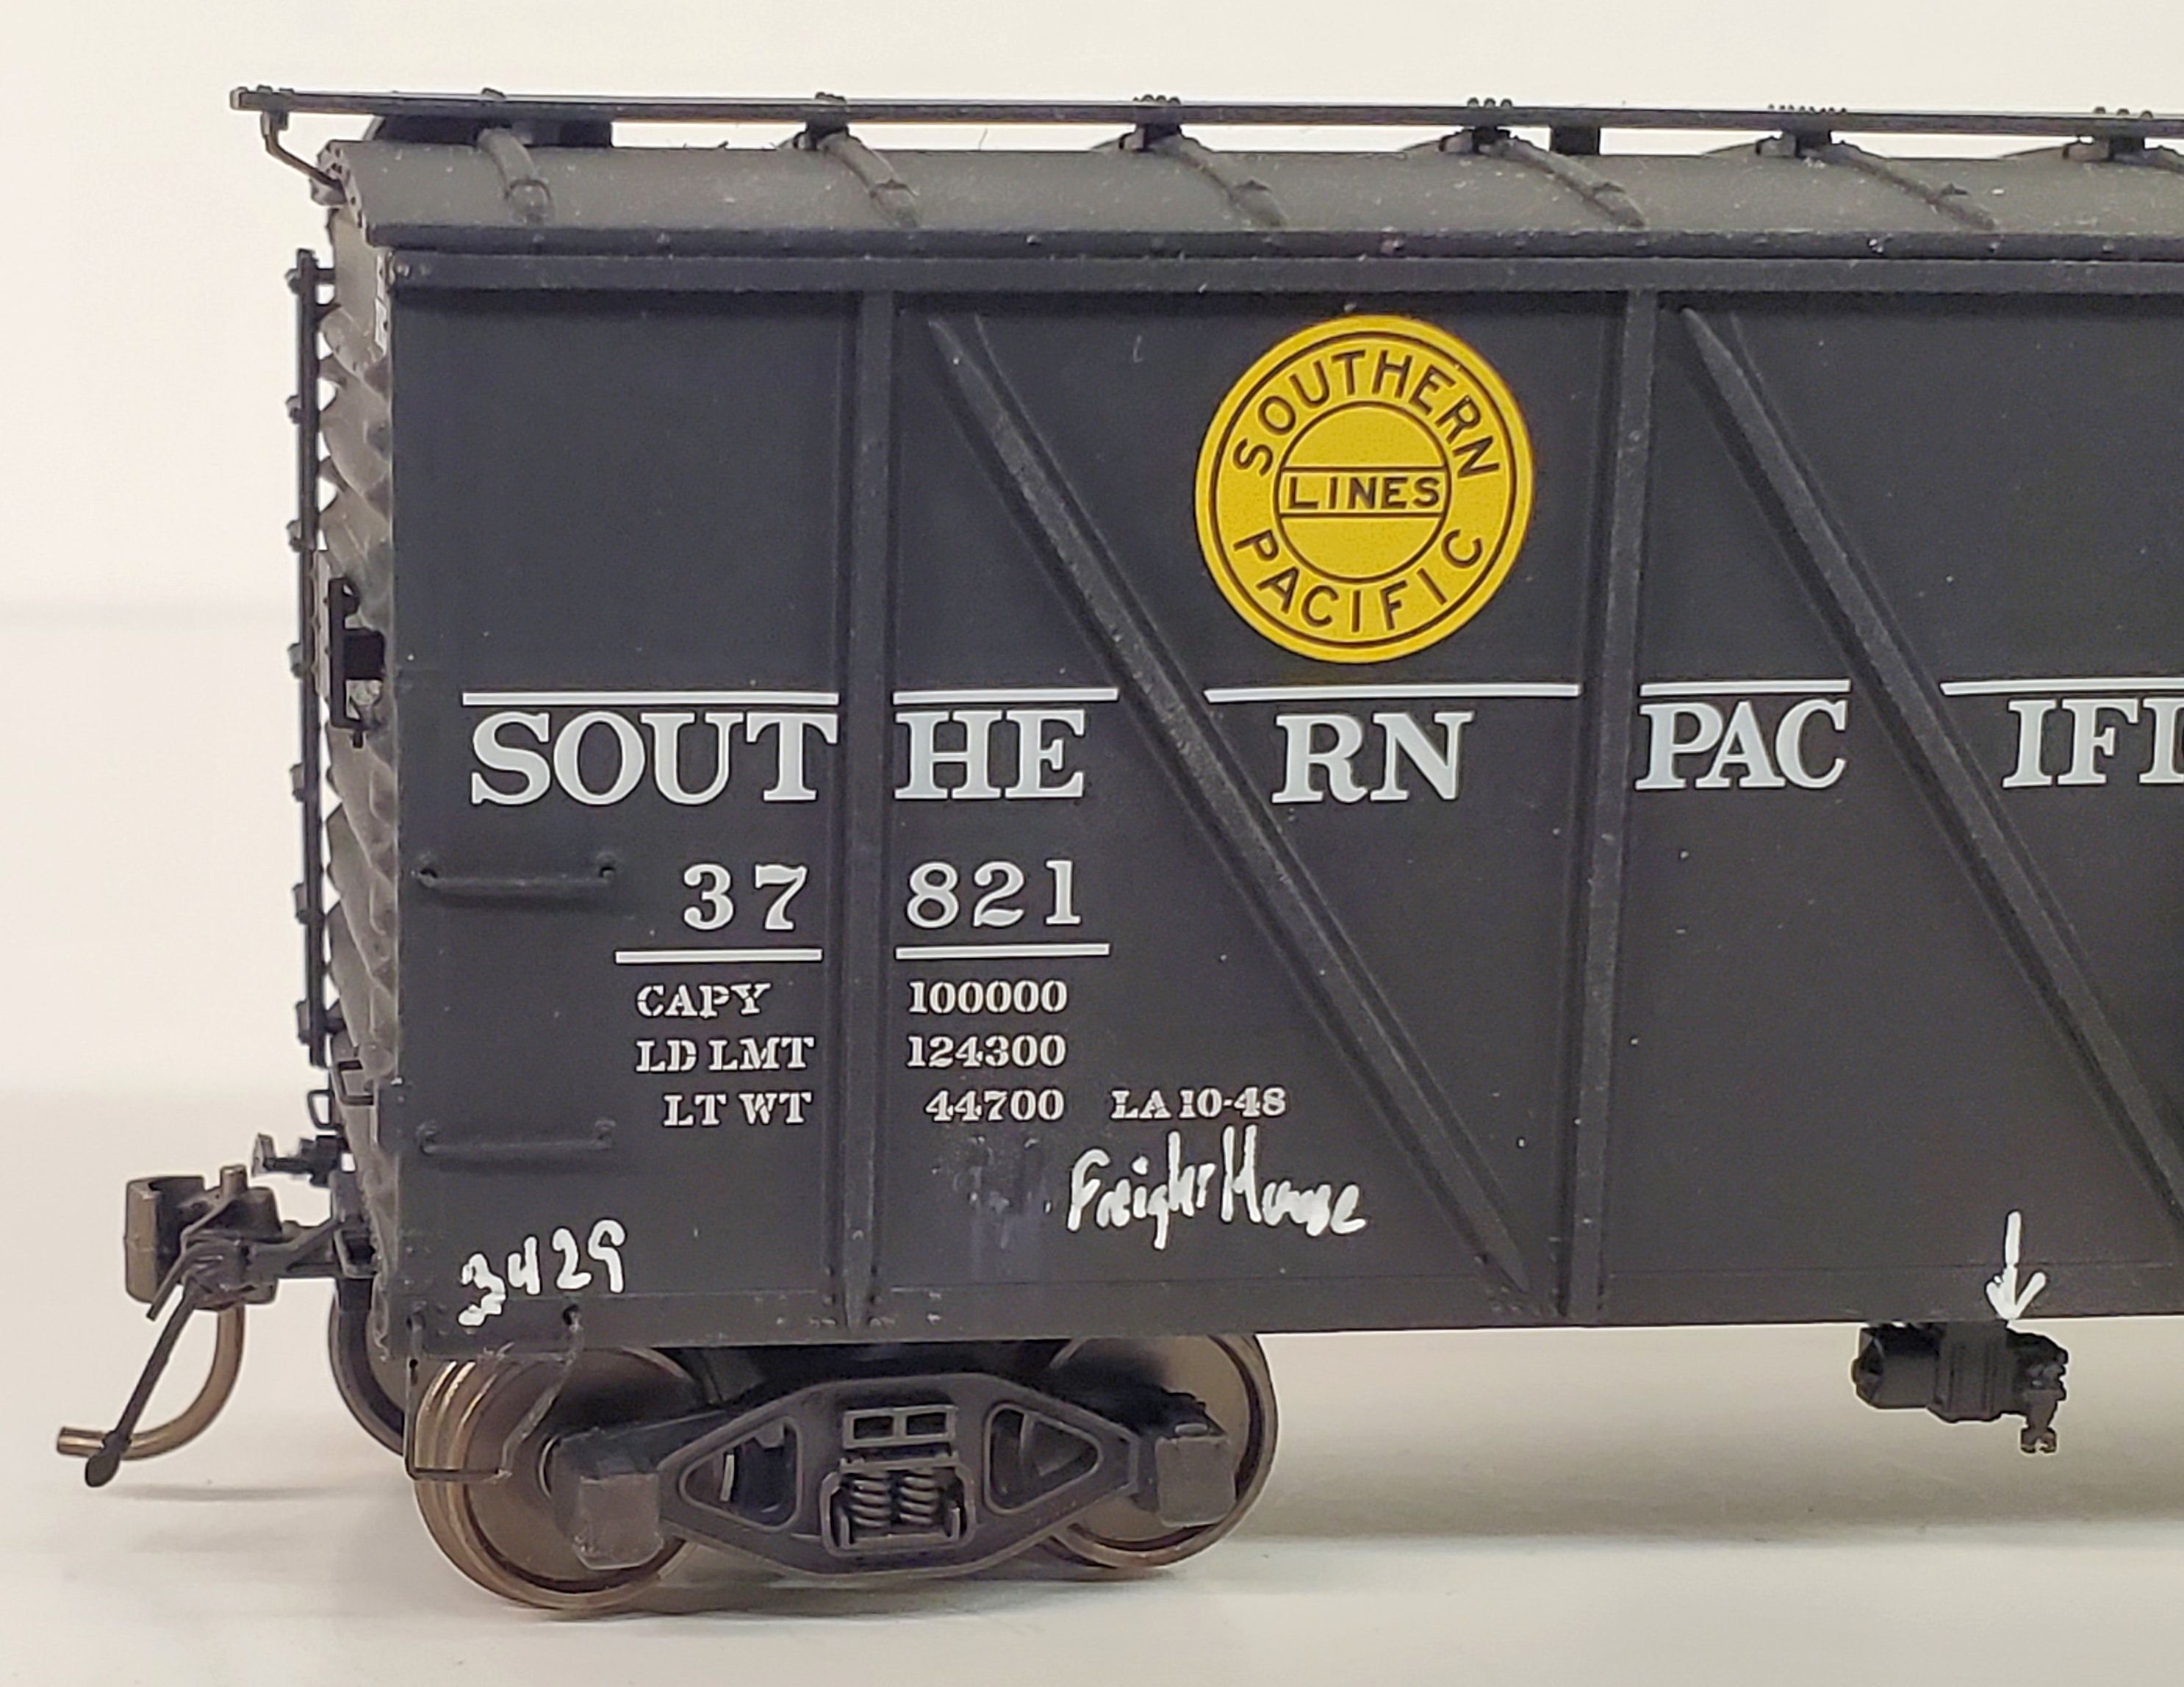
SP 37821 "Overnight" B-50-16


SP 37821 chalk mark "Freight House" and station code "3429".

I decided not to obviously assign the routing for this B-50-16 Overnight car to Los Angeles Freight House, but instead have hidden that exact message on the car by using the SP's Los Angeles station number, 3429.  The PMT 'Overnight' loading at the SP freight house was the usual loading/unloading point.  As I may be using the car in general freight service, which may focus on Freight Forwarders, which for the Jawbone Branch, often would mean coming from the LA Freight House also!  So win-win situation.

SP 37821 with "Team 3" chalk mark.

The other side of the Overnight car I went with a more generic chalk mark of "Team 3" which would probably be a spot or door number at the local Team track.

UTLX 72176


UTLX 72176 with "Clean out" note.

The tank cars get in on the fun too.  This Tangent GA Type 17 8k car has been marked with a carmen's order to "Clean out" the car, which was then struck out with a line and 'OK' marked, to show the car's clean and ready to go for the next trip.

I'll do more with the Tangent and Rapido tankcar models at some point, covering weathering and other little bits to improve the models.

In Closing


A parting view of NC&StL 15337... for now.

One other point to mention on the NC&StL 15337 which many cars will also show, I noticed that the prototype photo shows scuff marks and mud from the trainmen's boots as they climbed up to handle the brake and retaining valve.  Also one of the chalk marks on the prototype went behind the 2nd from the bottom ladder grab.  Lots of little details of marks to include on this car and others in my fleet.

Jason Hill

Related Articles:


SP 15469 (Part 1) - Lettering Changes & Backdating Rapido B-50-15

Weathering NP 11661 - A Rapido Double-Sheath Boxcar