
It's been at least 20 years since I last worked on my Rivarossi SPMW Pullman cars, and I think it's about time to do some upgrades! While not as perfectly accurate as the Walthers and Branchline plastic-tooled passenger cars of the early 2000s, So, they can be had at swap meets and on-line websites second hand.
Starting Point & History
.jpg) |
| Time to upgrade my SPMW Pullman Bunk Cars! |
One nice advantage of using the old Rivarossi cars is that they're not to expensive and they also have the non-air conditioned roofs! The lack of A/C makes them perfect for modeling these bottom-grade tourist cars, several hundred of the older "Tourist" Pullmans were sold to the SP during 1948 in the lead up to the disposition of the 9000 Pullman cars to the railroads at the end of the year. This makes since as the court's anti-trust order came in 1945, the railroads and Pullman had been negotiating exactly which cars would be sold off, scrapped, or would be bought for continued service after the Pullman company owned pool was broken up in December 1948.
Several other large batches of Pullman cars which the SP bought in 1948 were retired by the SP in 1953 as they wore out and weren't needed with the LW cars the SP bought in 1949 and 1950 for the Cascade and Sunset Limited. Then another large group of HW Pullmans were retired from revenue service in 1955-56 after the discontinuance of all the SP's 3rd rank passenger trains at the end of 1954. Most of SP's premier HW Pullmans didn't last past 1956 in regular service. The remaining SP HW Pullmans were held, leased, in the new railroad owned Pullman Pool until the 1962-1966 time frame when the US Government finally cut off the requirement to keep a national pool of passenger cars for national emergency military movements.
Several other large batches of Pullman cars which the SP bought in 1948 were retired by the SP in 1953 as they wore out and weren't needed with the LW cars the SP bought in 1949 and 1950 for the Cascade and Sunset Limited. Then another large group of HW Pullmans were retired from revenue service in 1955-56 after the discontinuance of all the SP's 3rd rank passenger trains at the end of 1954. Most of SP's premier HW Pullmans didn't last past 1956 in regular service. The remaining SP HW Pullmans were held, leased, in the new railroad owned Pullman Pool until the 1962-1966 time frame when the US Government finally cut off the requirement to keep a national pool of passenger cars for national emergency military movements.
 |
| SPMW System Outfit Consist, circa 1960 Lone Pine - owensvalleyhistory,com - ebay47_lone pine_sml |
While I'm keeping my modeling in the pre-1958 era, this consist certainly could have existed in Freight Car Red scheme before 1958. So I'm going to do some upgrades to my old Rivarossi Pullman SPMW cars.
My original starting point for these three models were my 25-year-old models using MicroScale decals and minimal research materials, resulting in cars that were only retired in 1954-56.
 |
| One of my original SPMW Pullmans from the early 2000s. - Jan 2020 at LMRC, Jason Hill photo. |
In the last 15 years SPH&TS has printed their series of Passenger Car book, including one dedicated to the SP's Pullman cars, which covers much of the prototype information. Plus Pulllman Panorama has more information on Pullman series, arrangements, plan numbers, basic dispositions, etc. And now in 2023, Ken Harrison has released his wonderful SPMW book with many photos.
Unfortunately, my cutoff has been circa 1953 for my fleet since I settled on steam-diesel transition era modeling and even with the Jawbone Branch's cutoff date now being pushed back towards 1954/55, these cars are really pushing the limits of my 'comfort' bracket for modeling. Also one of the numbers I chose 25+ years ago should have been a 16-Section Tourist Sleeper, so basically totally the wrong basic model.
Repainting
These issues have finally pushed me to redo my SPMW Pullman cars.
.jpg) |
| SPMW 4807 before decalling, left side. |
The cars that became the 4807 was repainted using a custom mix of StarBrand paint from P-B-L of SP Freight Car Red and I was out of the Light Freight Car Red, so I mixed in some Depot Buff to make the paint look like it's been sun-faded a bit.
.jpg) |
| SPMW 4807 before decalling, right side. |
The car was easy to repaint. I removed the interiors and roof/window section. A piece of scrap sheet styrene was used inside the windows to keep paint from wondering around the already painted interior of the cars.
.jpg) |
| SPMW 4812 before decalling, left side. |
The 4812 used a nearly straight mix of StarBrand SP FCR, which is actually quite a bit more saturated. So I'll just say that this car's been more recently repainted to full FCR colors.
.jpg) |
| SPMW 4812 before decalling, right side. |
The I had already painted the roofs aluminum/silver a number of years ago, so no need to do that again. I did swap a couple of the roofs around again, to make the two FCR cars come out with aluminum roofs and the car below got the only non-aluminum roof.
They're Green?!
The third car received some special treatment, when I went back through Ken Harrison's SPMW book again, I found several photos of freshly retired Pullman Tourist Car. These cars didn't receive FCR paint immediately, but instead continued in Pullman Green with patching for SPMW within a couple of months of being sold to the SP in 1948.
.jpg) |
| Left side SPMW 4866 before decalling. |
Because I do generally consider 1946/1948 as the early edge of my modeling, I decided to repaint one of my Pullmans from FCR into this 'original' scheme when these cars came to the SP. Specifically, I chose the 4866, which was converted in Feb'48 and was still in patched green scheme later that year when photographed. Ken has a photo of this car in the book, which mostly matches up with the old Rivarossi models I'm using. The car has single aisle windows, but one minor change is it has four full size windows on the A-end lounge room. I don't really feel like rebuilding the windows, as I'd have to change the prism glass in the roof.
.jpg) |
| Right side SPMW 4866 before decalling. |
It is hard to tell in the prototype photo if the letterboard was patched with SP Dark Olive Green or maybe black. I pre-painted the black patch on the side and also the letterboard between the panel joints. Then masked the lower center panel per the photograph for the reporting marks. The old Pullman Green was custom mixed from StarBrand SP DOG, with a bit of black to get towards my 'standard' Pullman shade (less "warm" red-brown) and then Depot Buff was added to bleach and pre-weather the green color. As this green coat is actually going directly over weathered FCR, it creates an interesting reverse-modeled appearance. The letterboard was then lightly oversprayed with the 'Pullman Green' custom mix, which let much of the pre-shading black come through. This effect is commonly used by aircraft and armor modelers to create special effects around panels and panel lines. In this case to creating a color difference around the center letterboard panel, which would have been patched out.
Decalling!
So now the question is who's decals to use? I've seen MicroScale's offerings, but they really don't give good return for the space of decal paper used. Too much space is spent on very rare and specialized MW equipment that I don't even plan to own anytime soon, but not enough of the common car types. I found an answer when Todd Allen Osterburg told me that he was developing several new SPMW decal set, which are now being offered by OwlMtModels and printed by Bill at PDC in Canada.
 |
| SPMW Pullman Conversions - OMM #1224W |
The OwlMtModels 1224W & WS set is available at OwlMtModels' new store-front. Two versions are available; one with solid lettering (W), and the other with 'stencil' bars remaining (WS). The set is designed to decal up to three cars from the common number series of SPMW's Pullman bunk cars. Included are "Occupied Outfit Cars" signs which can be fabricated to hang on the end-grabirons and on the switch stands of the track the cars are left on, effectively 'blue-flagging' the cars so they aren't coupled to. Often these standing outfits when set up for 'camp' mode would not be moveible without some amount of work to stow and clear away the various stairs, ladders, water, electrical, etc connections to the ground.
OwlMtModels is also offering decal set #1225 SPMW Boxcars, which covers many assignments for B-50-8/10/11/12/13/14/15/16 classes. and #1218 for SPMW Supply Boxcars.
 |
| Examples of OMM's stencil reporting marks, and warning signage from OMM #1225WS set on B-50-2 Ready Boxcar. |
OwlMtModels is also offering decal set #1225 SPMW Boxcars, which covers many assignments for B-50-8/10/11/12/13/14/15/16 classes. and #1218 for SPMW Supply Boxcars.
SPMW 4807
.jpg) |
| SPMW 4807 Decalled Left Side |
The 4807 was lettered with 'typical' arrangement for reporting mark placement, and I chose to add the Danger/Peligro warnings, which tended to move almost anywhere along the lower car side. The left side still needs a "LT WT" stencil applied to the left of the weight 152000 stencil. - Just noticed that I missed that when I took these photos.
.jpg) | |
|
The SPMW 4807 still has some kludged roof vents, which I'll probably be removing. The 4807 actually did have a T-smokejack which was closer to the center of the car, in the corner of the main 12-section part of the car.
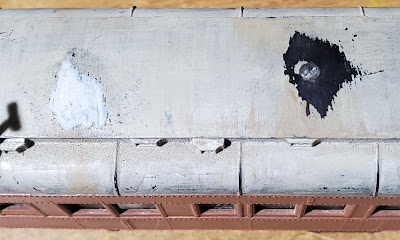 |
| Vents clipped off, sanded, and 'patched' with light gray GellyRoll gel-pen. |
I'll be doing some tricks to hide that. I decided to try using the same Gel-Pens that I used for chalk marks to roughly get the same color on the roof, then I'll do some more roof weathering blending. Might be interesting to draw in more of the roof panel lines on the un-detailed roofs.
SPMW 4812
.jpg) | |
|
The SPMW 4812 is more 'typical' of the most retired Pullmans in Ken's book before the late 1958s when propane tanks for cooking and heating were cut into the side of the car. Cars with these modifications are certainly interest, requiring ladder/stairs and doors, etc. Many of the cars in the book also show swamp coolers and even fuel-oil tanks installed in vestibules with the doors sometimes removed.
.jpg) | |
|
But these cars are pretty much done now. I'll probably do a bit of weathering to slightly knock down the brightness of the white decals.
SPMW 4866 - "The Green One"
.jpg) |
| Left side of finished SPMW 4866 with patched reporting marks. |
One interesting small detail is that the prototype 4866 had a non-standard stenciling applied to the car in the prototype photograph. It had periods on the "M.W." which all other cars I've seen photos of didn't have. I used the 0.5mm White Gel-Pen that I covered using for Chalk Marks last month's blog.
.jpg) |
| Right side of finished SPMW 4866 with patched reporting marks. |
The under body of 4866 is still showing mostly FCR color for now. I'll probably weather it darker as it would have had coming from old Pullman scheme.
Other Modifications
I am planning to make a couple more changes to these cars, as Ken's book has shown more of what these non-air conditioned Pullman Tourist cars looked like in SPMW service. One of the big features about these 1948 conversions is that they do not have roof ducts. Therefore they also shouldn't have the A/C equipment under the floor.
The Rivarossi models come with three battery boxes on one side, and another on the other side. The prototype photo of 4866 shows the car does have the large water tank and the short-fat air tank, but nothing else hanging under that side of the car. I'll probably cover cutting these boxes off in Part 2, which shouldn't be too hard with a razor-saw.
The Rivarossi models come with three battery boxes on one side, and another on the other side. The prototype photo of 4866 shows the car does have the large water tank and the short-fat air tank, but nothing else hanging under that side of the car. I'll probably cover cutting these boxes off in Part 2, which shouldn't be too hard with a razor-saw.
I will also say that these cars had some modifications from 25 years ago, including cutting down the fixed 'diaphragms' and not fitting any new diaphragm (which is correct for most MW cars), body mounting KD couplers on closer couplings, and rebuilding the bolsters to lower the car to more correct heights.
Thoughts of Post-1958 Outfit
|
| SPMW System Outfit Consist, circa 1960 Lone Pine - owensvalleyhistory,com - ebay47_lone pine_sml |
Maybe I'll find another body, and do a post-1958 gray with black lettering version, just to do it for OwlMt to show what they'd look like. I have this great photo of a gray SPMW Outfit at Lone Pine, which probably was stationed there as they scrapped the track back from the end of the branch at Owenyo in 1960, from the owens valley history website. This consist has three of these older ex-Pullman 12-1 bunk cars without A/C.
In Closing
I'm going to wrap up this post at this point. Just to point out, I only used the one set of OMM 1224W for these three cars. Some creative cutting was used to get '80' and '81' and '72' to get the digits for the '07' and '12' number jumble to work out nicely. '44's were cut up to provide the leading '4's for the '48' series cars. Extra hundred series numbers pairs of '44' and '55' are provided for the 4400 and 5500-series cars. We'll probably change future prints to have an extra 48 or two to help if you focus on these cars.
Edit, 2023 Nov: After talking with Ken Harrison at the Bakersfield Convention about the patch on the letterboard, I'll probably be patching that section again to full black, as we decided that both patches would have been done at the same time when the SP bought them and struck out the Pullman lettering.
So I'll come back and do a Part 2 with any last touch-ups I do on these cars. Perhaps, I'll do it on the gray scheme with black lettering... At some point in the future, if I want to add lighting to these 'camp cars' so that I could do cool night-scenes on the Jawbone Branch, I may refit these cars with Walthers metal trucks as on SP 5199 (Part 1 & Part 7).
.jpg) |
| Completed SPMW 4866 with end-reporting marks too. |
Edit, 2023 Nov: After talking with Ken Harrison at the Bakersfield Convention about the patch on the letterboard, I'll probably be patching that section again to full black, as we decided that both patches would have been done at the same time when the SP bought them and struck out the Pullman lettering.
So I'll come back and do a Part 2 with any last touch-ups I do on these cars. Perhaps, I'll do it on the gray scheme with black lettering... At some point in the future, if I want to add lighting to these 'camp cars' so that I could do cool night-scenes on the Jawbone Branch, I may refit these cars with Walthers metal trucks as on SP 5199 (Part 1 & Part 7).
Jason Hill
Related Articles:
Chalk Marks - A newer blog on using GellyRoll pens for chalk marks by clerks and carmen on freight cars.
SP 5199 (Part 1 - My build-blog on a 69-BP-30-1 from Southern Car & Foundry.
Freight Car Overview Index - A list of my modeling blogs on various SP & Multiple RR's cars, including many SPMW cars.
Owens Valley History - Website with hundreds of photos of Owens Valley and the Jawbone Branch, which I'm modeling.


